The dotnet cli (or .NET CLI) is a command-line interface (CLI) tool for developing the .NET application. It is a cross-platform tool and runs on Windows, MAC, or Linux. This article covers installing and using the dotnet cli to create, build, and run ASP.NET Core applications.
Table of Contents
dotnet cli (.NET CLI)
Dotnet cli is a command line tool. It contains commands that you can use to
- Create a new project
- Build a project
- Run the project
- Publish the project
- Restore Nuget Packages
- Migrate from one version to another version of .NET
Download & Installing dotnet cli
The dotnet cli is part of the .NET SDK. It is installed automatically along with .NET SDK. There are no seperate installer available for donet cli. If you have not installed .NET SDK, then you can refer to our guide on how to Download & Install NET SDK or Install ASP.NET Core
The CLI installs side by side manner. We can install & use multiple versions of CLI Tools side by side.
Check if dotnet cli is installed.
To verify if the dotnet cli has been installed or not enter dotnet in the Windows command prompt.
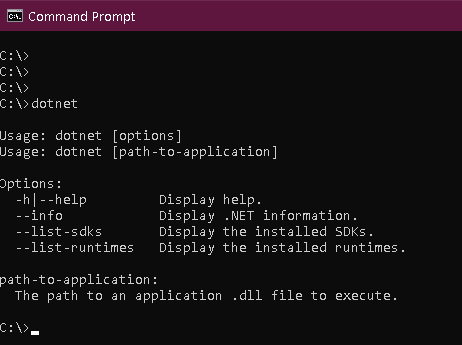
If it is correctly installed, then you will see the usage and help instructions as shown in example above.
If it is not then, you will see the message ‘dotnet’ is not recognized as an internal or external command,operable program or batch file.
Using dotnet cli
The syntax of NET CLI consists of three parts. The “driver”, the “verb”, and the “arguments”
dotnet [verb] [arguments]
The driver is “dotnet”. It can either execute a command or run an application.
The “verb” is the command that you want to execute. It performs an action.
The “arguments” are arguments that we pass to the commands invoked.
Commonly used Commands
Here are some of the most common dotnet cli commands.
| Command | Description |
|---|---|
| new | Creates a new project, configuration file, or solution based on the specified template. |
| restore | Restores the dependencies and tools of a project. |
| build | Builds a project and all of its dependencies. |
| publish | Packs the application and its dependencies into a folder for deployment to a hosting system. |
| run | Runs source code without any explicit compile or launch commands. |
| test | .NET test driver used to execute unit tests. |
| vstest | Runs tests from the specified files. |
| pack | Packs the code into a NuGet package. |
| migrate | Migrates a Preview 2 .NET Core project to a .NET Core SDK 1.0 project. |
| clean | Cleans the output of a project. |
| sln | Modifies a .NET Core solution file. |
| help | Shows more detailed documentation online for the specified command. |
| store | Stores the specified assemblies in the runtime package store. |
Creating a New ASP.NET Core project using dotnet CLI
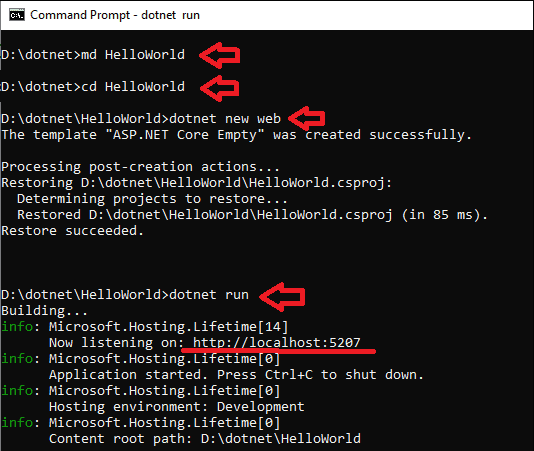
Open the command prompt or Windows Powershell and create the folder “HelloWorld”
Dotnet new
dotnet new command creates a new project. The partial syntax is as follows
1 2 3 | dotnet new <TEMPLATE> [--force] [-i|--install] [-lang|--language] [-n|--name] [-o|--output] |
Where
TEMPLATE
The project template to use when we invoke the command.
–force
Forces content to be generated even if it would change existing files. This is required when the output directory already contains a project.
-i|–install <PATH|NUGET_ID>
Installs a source or template pack from the PATH or NUGET_ID provided.
-l|–list
Lists templates containing the specified name. If invoked for the dotnet new command, it lists the possible templates available for the given directory. For example, if the directory already contains a project, it doesn’t list all project templates.
-lang|–language {C#|F#|VB}
The language of the template to create. The language accepted varies by the template (see defaults in the arguments section). Not valid for some templates.
-n|–name <OUTPUT_NAME>
The name for the created output. If we do not specify the name, it will use the name of the current directory.
-o|–output <OUTPUT_DIRECTORY>
Location to place the generated output. The default is the current directory.
-h|–help
Prints out help for the command
The complete list of options for dotnet new is available here
Create a new Project using dotnet new
The following command creates a new dotnet project using the TEMPLATE
1 2 3 | dotnet new <TEMPLATE> |
You can find the list of templates using
1 2 3 | Dotnet new -l |
List of Templates
| Template | Description |
|---|---|
| console | Console Application |
| classlib | Class library |
| mstest | Unit Test Project |
| xunit | xUnit Test Project |
| web | ASP.NET Core Empty |
| mvc | ASP.NET Core Web App (Model-View-Controller) |
| razor | ASP.NET Core Web App |
| angular | ASP.NET Core with Angular |
| react | ASP.NET Core with React.js |
| reactredux | ASP.NET Core with React.js and Redux |
| webapi | ASP.NET Core Web API |
To create an empty web application, use the template web
1 2 3 | Dotnet new web |
The image below shows how you can create a new project using the template “web”
1 2 3 4 5 6 | md HelloWorld => Create folder cd HelloWorld => cd into the new folder dotnet new web => create a new project using the template web dotnet run => run the project. |
Restoring the Dependencies with dotnet restore
Once we created the new project, we need to download & install the dependencies. To do that we can use the restore command
1 2 3 | Dotnet restore |
use –help to get help
1 2 3 | Dotnet restore --help |
Running the Application with dotnet run
Use dotnet run to start the application

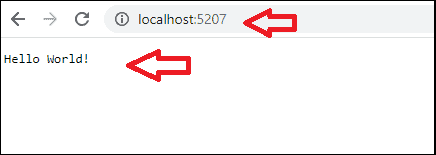
Open localhost:5207/ in the browser, and you should be able to see “Hello World”
Summary
We learned how to make use of dotnet CLI ( command-line interface). This tool is useful in MAC /Linux, where IDE Like Visual Studio is unavailable.

Great Post!! Thanks For Sharing