In this Article, we will introduce you the Views in ASP.NET Core applications. The View is the Component of the MVC design pattern (or architecture), which is responsible for presenting the User interface to the User.
Table of Contents
What is a View
The View is responsible for rendering the model to the Users. The Controller in ASP.NET Core applications gets the request. It then executes the appropriate business logic and gets the required data (model). It then delegates the responsibility of rendering the model to the View.
Must Read: Creating ASP.NET MVC Application.
Responsibilities of the Views
The rendering the data or model is the only responsibility of the View. The Views should not contain any logic and must not do any processing.
The View can use any format to return to the user. The format could be HTML, JSON, XML or any other format for the user to consume as the response to the web request.
Example Project
Open the Project, we created the tutorial building ASP.NET Core Application.
You can download the source code from the GitHub from the Start Folder. The Completed Source code is available in Views Folder.
This Project contains a HomeController, HomeModel and Index View.
How to Create Views
The Example Project above already has an Index Action method.
Let us add another Action method
1 2 3 4 5 6 | public IActionResult About() { return View(); } |
The Controller methods (also known as Action methods), generally return an ActionResult (or a class derived from ActionResult).
Must Read: Action Results in ASP.NET MVC Core
The ActionResult that Produces an HTML Content is ViewResult. The View method of the Controller base class returns the ViewResult.
Right-click anywhere on the method and click on Add View.
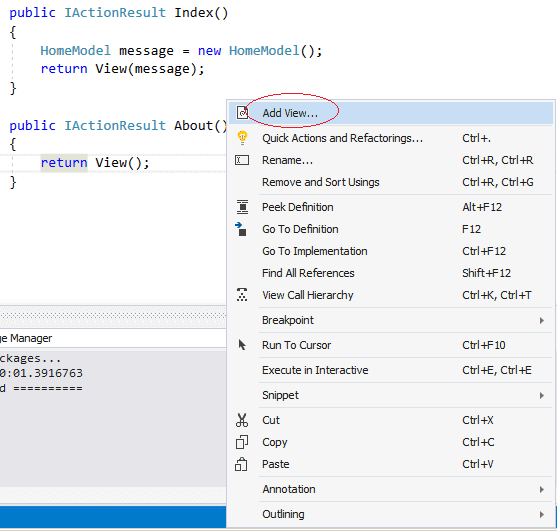
This will bring up the Add MVC View dialogue box as shown below
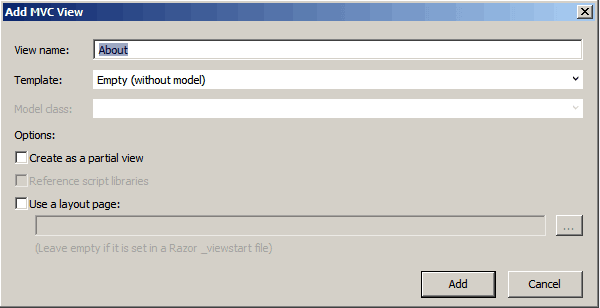
View Name
Enter View Name here. By convention, the name should be same as the action method name. You can override the convention here by changing the view name. If you choose to do so, then you can invoke the view by passing the name of the View as the first argument to the View method
View(“ViewName”)
Template
The template has several options to choose from Create, Delete, Details, Edit, List, Empty(without model).
All the above templates need a model, except for the Empty Template. The Visual Studio code generator generates a view to create, edit, Delete, etc on the model provided depending on the selected template. Each of these Templates is explained below.
Create
Creates an HTML form for creating a new model. It generates a label and an input field for each property of the given model.
Delete
Creates an HTML form for deleting the model. It generates a label and the current value of each property of the model.
Details
Creates a view to display the model. It generates a label and the value of each property of the model
Edit
Creates an HTML form for editing the model. It generates a label and input field for each property of the given model
Empty (without model)
Creates an empty view
List
Creates an HTML Table to display the list of the given model. It generates a column for each Property of the model. You need to pass an IEnumerable<model> to the view. The view also contains links to actions for performing the create/edit/delete operations.
Model Class
This Dropdown shows all the model classes in the project. This option is disabled if you choose the Empty template under the template.
Create as Partial View
This Option creates a Partial View. The Partial View will create a part of the view and not the full view.
The PartialViewResults uses the model to render the part of the View.
The resulting partial view looks much like a regular view, except you’ll have no <html> tag or <head> tag at the top of the view. Selecting this option indicates that the view you will create is not a full view, thus the Layout option is disabled.
Reference Script Libraries
Selecting this option just adds the references to jquery.validate.min.js and jquery.validate.unobtrusive.min.js javascript libraries. These libraries are necessary for implementing client-side validation. These libraries are required when creating a view that contains a data entry forms such as an Edit view or a Create
Use a Layout Page
This option allows us to select a layout page for the View. The layout pages are used to share common visual elements in your pages and provide a consistent look and feel throughout your application.
For this example choose View name as about, Empty (Without mode) as template and do not select the Create a partial view and Use a layout page option
The View is created in the folder Views/Home/About.cshtml.
Open the about.cshtml and add <h1>About Us</h1> after the title tag as shown below
1 2 3 4 5 6 7 8 9 10 11 12 13 14 15 16 17 18 | @{ Layout = null; } <!DOCTYPE html> <html> <head> <meta name="viewport" content="width=device-width" /> <title>About</title> <h1>About Us</h1> </head> <body> </body> </html> |
Run and you should see About Us in the browser
Views Location
By Convention, All views are stored in the Views folder in the root of the app.
Each Controller gets a folder in the Views folder with the name same as the Controller but without the Controller Suffix. Thus, for the HomeController, there is a folder with the name Home in the Views folder.
Each Action method in the Controller gets a file of its own, named same as the Action method. Thus for the index method of the HomeController, there’s a file with the name index.cshtml in the Views/Home folder.
The following diagram illustrates how Views are stored in ASP.NET Core apps

Each action methods in the HomeController gets their own view file about.cshtml & index.cshtml and stored in the Views/Home Folder. Similarly, the action methods of CustomerController goes to the Views/Customer folder
How ASP.NET Core Locates the View
Our Example project has one Controller i.e. HomeController. Let us Add CustomerController to it.
Select the Controller folder, right click and add another controller. Name the controller as CustomerController
1 2 3 4 5 6 7 8 9 10 11 12 13 14 | using Microsoft.AspNetCore.Mvc; namespace MVCCoreApp.Controllers { public class CustomerController : Controller { public IActionResult Index() { return View(); } } } |
Let us not create the View, instead run the app and query the URL /Customer.
We will see the following error message.
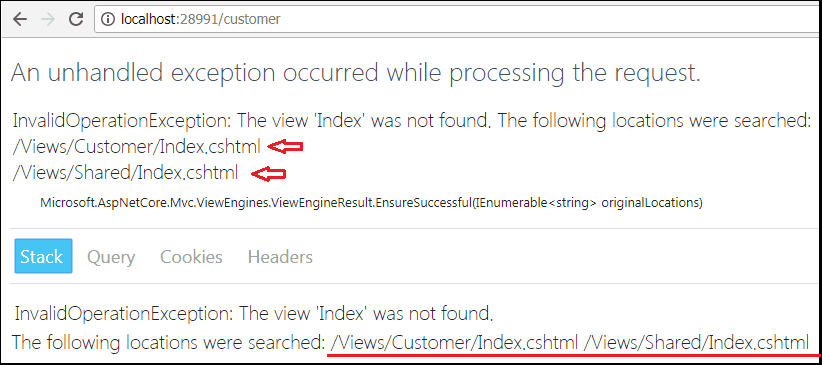
The above clearly shows that the ASP.NET Core MVC Middleware searches for the View in the following folder.
- /Views/Customer/Index.cshtml
- /Views/Shared/Index.cshtml
First in the Customer folder, which is the name of the controller. If not found it will look for it in the Shared Folder, before throwing an InvalidOperationException message
The shared folder is a special folder that contains views, layouts or partial views which is shared among multiple views.
Open the CustomerController and click on anywhere in the index method. Right-click and create an Empty View.
The view index.cshtml is automatically created inside the folder views/Customer.
Now, open the index.cshtml
1 2 3 4 5 6 7 8 9 10 11 12 13 14 15 16 17 | @{ Layout = null; } <!DOCTYPE html> <html> <head> <meta name="viewport" content="width=device-width" /> <title>Index</title> <h1>Customer List</h1> </head> <body> </body> </html> |
Now, run the app and you will not see any errors.
Summary
In this article, we learnt the View Fundamentals and How to Create Views.


nice article sir, very useful your post thanks for information provide