In this tutorial, we look at how to add a child or nested routes to an Angular route. Child Routes or Nested routes are a powerful new feature in the Angular router. Nested routes are routes within other routes. In this tutorial, we will show you how to create a child route and display the child components. The Angular allows us to nest child routes under another child routes effectively creating a Tree of routes.
Table of Contents
Child Routes / Nested Routes
The Angular applications are based on the idea of Components. The Components follows a Tree structure, where we have a root component at the top. We can then add child components forming loosely coupled components resembling a Tree
The Routes in Angular also follows the component tree structure and allows us to define the nested or child routes.
Example
Consider the following Component Tree
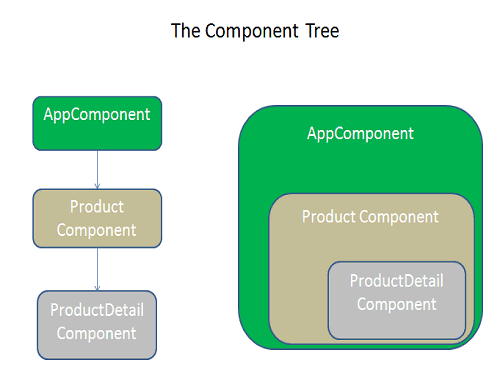
In the above example, the ProductComponent displays the list of Products. The ProductDetailsComponent is the child of the ProductComponent displays the details of the selected Product.
So Our routes would be /Product and /Product/Details/:Id
How to Create Child Routes / Nested Routes
This tutorial builds on the app we have built in the Passing Parameters to Route Tutorial. You can download the code from gitHub.
We already have created ProductDetailsComponent, but it is not designed as the child route of the ProductComponent. Let us update the code make it child route of the Product route.
Define the Routes
Open the app.routing.ts file
You will see the following routes defined in our application.
Here the ProductDetailComponent is the sibling of the ProductComponent and not its child
1 2 3 4 | { path: 'product', component: ProductComponent }, { path: 'product/:id', component: ProductDetailComponent }, |
To make ProductDetailComponent as the child of the ProductComponent, we need to add the children key to the product route, which is an array of all child routes as shown below
1 2 3 4 5 6 | { path: 'product', component: ProductComponent, children: [ { path: 'detail/:id', component: ProductDetailComponent } ], |
The child route definition is similar to the parent route definition. It has a path and component that Angular Router uses to render when the user navigates to this child route.
In the above example, the parent route path is ‘product’ and the child route is ‘detail/:id’
This is will match the URL path “/product/detail/id”.
When the user navigates to the “/product/detail/id”, the router will start to look for a match in the routes array
It starts off the first URL segment that is ‘product’ and finds the match in the path ‘product’ and instantiates the ProductComponent and displays it in the <router-outlet> directive of its parent component ( which is AppComponent)
The router then takes the remainder of the URL segment ‘detail/id’ and continues to search for the child routes of Product route. It will match it with the path ‘detail/:id’ and instantiates the ProductDetailComponent and renders it in the <router-outlet> directive present in the ProductComponent
Final app.routing.ts looks like this
1 2 3 4 5 6 7 8 9 10 11 12 13 14 15 16 17 18 19 20 21 22 | import { Routes } from '@angular/router'; import { HomeComponent} from './home.component' import { ContactComponent} from './contact.component' import { ProductComponent} from './product.component' import { ErrorComponent} from './error.component' import { ProductDetailComponent} from './product-detail.component' export const appRoutes: Routes = [ { path: 'home', component: HomeComponent }, { path: 'contact', component: ContactComponent }, { path: 'product', component: ProductComponent, children: [ { path: 'detail/:id', component: ProductDetailComponent } ] }, { path: '', redirectTo: 'home', pathMatch: 'full' }, { path: '**', component: ErrorComponent } ]; |
Display the component using Router-outlet
The components are always rendered in the <RouterOutlet> of the parent component.
For ProductDetailComponent the parent component is ProductComponent and not the AppComponent
Hence, we need to add <router-outlet></router-outlet> in the product.component.html as shown below
1 2 3 4 5 6 7 8 9 10 11 12 13 14 15 16 17 18 19 20 21 22 23 | <h1>Product List</h1> <div class='table-responsive'> <table class='table'> <thead> <tr> <th>ID</th> <th>Name</th> <th>Price</th> </tr> </thead> <tbody> <tr *ngFor="let product of products;"> <td>{{product.productID}}</td> <td><a [routerLink]="['detail',product.productID]">{{product.name}} </a> </td> <td>{{product.price}}</td> </tr> </tbody> </table> </div> <router-outlet></router-outlet> |
There is no change in the Product Detail Component.
1 2 3 4 5 6 7 8 9 10 11 12 13 14 15 16 17 18 19 20 21 22 23 24 25 26 27 28 29 30 31 | import { Component, OnInit } from '@angular/core'; import { Router,ActivatedRoute } from '@angular/router'; import { ProductService } from './product.service'; import { Product } from './product'; @Component({ templateUrl: './product-detail.component.html', }) export class ProductDetailComponent { product:Product; id; sub; constructor(private _Activatedroute:ActivatedRoute, private _router:Router, private _productService:ProductService){ } ngOnInit() { this.id=this._Activatedroute.snapshot.params['id']; let products=this._productService.getProducts(); this.product=products.find(p => p.productID==this.id); } } |
Note that we are using the snapshot method to retrieve the route parameter id.
Testing the Nested/Child Route
Run the app and click on the Product link. You will see that the Product Page is displayed. Click on any of the Product, and you will see the Product details page is displayed
Why subscribe to route params
Now, click on another product, and you will notice that the Product details page does not get updated with the new product.
Why?
Because the angular does not create the component if it is already present in the DOM. It reuses the component instance
This implies that the ngOnInit life cycle hook is not invoked when the user navigates to the component again. We are retrieving the parameter value in the ngOnInit using the snapshot method. Hence our component does not update itself.
This issue can be rectified by subscribing to the observable params property. Our component will be notified, whenever the value of the parameter changes. So that we can update the component accordingly.
Using the Subscribe method to retrieve the parameters in child routes
Now, open the product-detail.component.ts and change the ngOnInit method to subscribe to the params property as shown below
sub;
1 2 3 4 5 6 7 8 9 | ngOnInit() { this.sub=this._Activatedroute.params.subscribe(params => { this.id = params['id']; let products=this._productService.getProducts(); this.product=products.find(p => p.productID==this.id); }); } |
We need to unsubscribe when the component is destroyed so as to stop the memory leakage
1 2 3 4 5 | ngOnDestroy() { this.sub.unsubscribe(); } |
Now, you will see that as you click on another product, the ProductDetailComponents updates itself.
Nesting Children’s under a child
We can add child routes to a child route.
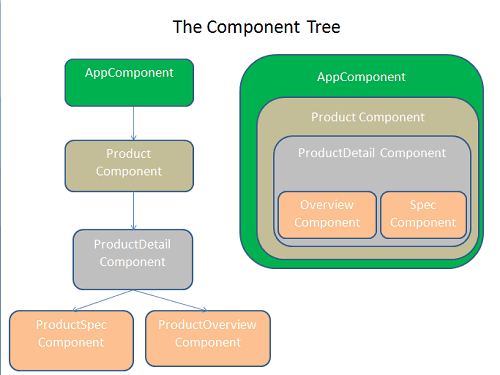
For Example, What if we want to show Product Overview & Specification under the Product Details Page. Our Component Tree is as shown below
Defining the child Route
First, we need to add three child routes under the Product/Details route as shown below
1 2 3 4 5 6 7 8 9 10 11 12 13 14 15 16 17 18 19 | export const appRoutes: Routes = [ { path: 'home', component: HomeComponent }, { path: 'contact', component: ContactComponent }, { path: 'product', component: ProductComponent, children: [ { path: 'detail/:id', component: ProductDetailComponent, children : [ { path: 'overview', component: ProductOverviewComponent }, { path: 'spec', component: ProductSpecComponent }, { path: '', redirectTo:'overview', pathMatch:"full" } ] } ] }, { path: '', redirectTo: 'home', pathMatch: 'full' }, { path: '**', component: ErrorComponent } ]; |
The first two child routes are simple. We map ‘Overview’ path to the ProductOverviewComponent & ‘spec’ URL path to the ProductSpecComponent
The Url would become ‘/product/detail/:id/overview’ and ‘/product/detail/:id/spec’
The last route is an empty path which is redirects to the Overview route. Note that we have set pathMatch to ‘full’
Mapping the action to View
The updated code for Product Details page is shown below
1 2 3 4 5 6 7 8 9 10 11 12 13 14 15 16 17 | <h1>Product Details Page</h1> product : {{product.name}} price : {{ product.price}} <ul class="nav navbar-nav"> <li><a [routerLink]="['overview']">OverView </a></li> <li><a [routerLink]="['spec']">Specification </a></li> </ul> <router-outlet></router-outlet> <p> <a class='btn btn-default' (click)="onBack()">Back to Product List </a> </p> |
We are using a relative path to while binding path to the routerlink directive. Absolute paths will begin with a forward slash /. When using the relative path, the router will append the path to the parent route path to construct the final URL.
1 2 3 4 5 6 | <ul class="nav navbar-nav"> <li><a [routerLink]="['overview']">OverView </a></li> <li><a [routerLink]="['spec']">Specification </a></li> </ul> |
The Angular Router renders both ProductOverviewComponent & ProductSpecComponent inside the ProductDetailComponent. Hence we need to add <router-outlet></router-outlet> in the Template of ProductDetailComponent
1 2 3 | <router-outlet></router-outlet> |
The Child Components
The ProductOverviewComponent just displays the text “Overview of <Name of the Product>” Message.
The most important point is how we retrieve the product id from the route. We are subscribing to the params array of the parent component.
1 2 3 4 5 6 7 8 9 10 11 12 13 14 15 16 17 18 19 20 21 22 23 24 25 26 27 28 29 30 31 32 33 34 35 36 | import { Component, OnInit } from '@angular/core'; import { Router,ActivatedRoute } from '@angular/router'; import { ProductService } from './product.service'; import { Product } from './product'; @Component({ template: `<h3> Overview of {{product.name}} <h3>` }) export class ProductOverviewComponent { product:Product; id; sub; constructor(private _Activatedroute:ActivatedRoute, private _router:Router, private _productService:ProductService){ } ngOnInit() { this.sub=this._Activatedroute.parent.params.subscribe(params => { this.id = params['id']; let products=this._productService.getProducts(); this.product=products.find(p => p.productID==this.id); }); } ngOnDestroy() { this.sub.unsubscribe(); } } |
ProductSpecComponent is similar to the above
1 2 3 4 5 6 7 8 9 10 11 12 13 14 15 16 17 18 19 20 21 22 23 24 25 26 27 28 29 30 31 32 33 34 35 36 37 38 39 | import { Component, OnInit } from '@angular/core'; import { Router,ActivatedRoute } from '@angular/router'; import { ProductService } from './product.service'; import { Product } from './product'; @Component({ template: `<h3> Specification of {{product.name}} <h3>` }) export class ProductSpecComponent { product:Product; id; sub; constructor(private _Activatedroute:ActivatedRoute, private _router:Router, private _productService:ProductService){ } ngOnInit() { this.sub=this._Activatedroute.parent.params.subscribe(params => { this.id = params['id']; let products=this._productService.getProducts(); this.product=products.find(p => p.productID==this.id); }); } ngOnDestroy() { this.sub.unsubscribe(); } } |
Finally, do not forget to import both the components in app.routes.ts & app.module.ts
Summary
We looked at how to create child/nested routes in angular.


thank you
I like your style. You explain how it works simply, I understand it the first time I read it. Thank you very much for your efforts.
It is really good explanation.
It’s a little frustrating that the child routes must appear in a routeroutlet within the parent component. Is there not any way to have a child route open in it’s own page? If a child component can only be accessed from information selected from a parent page, then the relationship is nested regardless of if the child opens in a new page or not. So is there really no way to open a child route in a new page? I’m trying to implement breadcrumbs which are based on route and I’m hitting a roadblock with this aspect.
Absolutely right sir i am also facing same issue when i write this code.
Something like this:
{path: ‘products’, children: [
{path: ”, component: ProductsComponent},
{path: ‘product-details’, component: ProductDetailsComponent},
]}
The Best Angular Tutorials series i had ever seen , thank you bro … keep up
VERY GOOD EXPLAINATION.
Simple and to the point.
Should really appreciate for such good work. Wonderful!!
ty
Thanks you so much this Is what i’m looking for and with this articule i learned how to make a multidimensional and nested routes. I Will practice this concepts. Thanks
Thank you very much for this tutorial – helped me a lot
this._Activatedroute.parent is null error from ProductOverviewComponent. I am using Angular 4.4.6 version.
Hey…. I loved your description of child routes. I had no idea that the parent route component needed to have a ‘router-outlet’ of it’s own. Now that I know that, I understand WTF is going on.
Thank you for your wonderful explaination.
Really liked this tutorial.
ty