In this tutorial, we are going to look at Angular Components. We will look at the building blocks of the components and the important metadata properties of Angular Components like selector, template, styleURL, etc. We will build a Hello World App in Angular and show you how create a Angular Component (HelloWorldComponent) .
Table of Contents
What is an Angular Component
The Angular Component is the main building block of an Angular application.
The Component contains the data and user interaction logic that define how the View looks and behaves. A view in Angular refers to a template (HTML).
The Angular Components are plain JavaScript classes defined using the @Component Decorator. This Decorator provides the Component with a View to display and Metadata about the Component.
The Component is responsible for providing the data to the View. Angular uses data binding to get the data from the Component to the View and vice versa. The data binding is achieved using special HTML markup, the Angular Template Syntax. The Component can also get notified when the View changes.
Angular applications can have lots of components. Each Component handles a small part of the UI. These components work together to produce the complete user interface of the application.
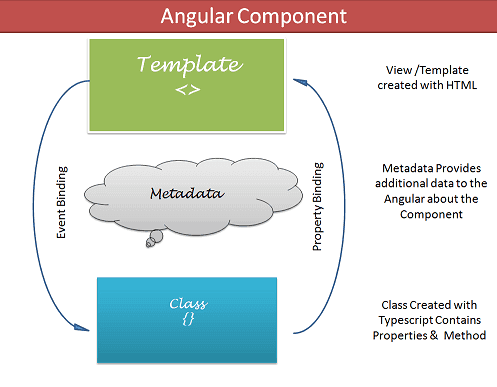
The Components consist of three main building blocks
- Template
- Class
- MetaData
Building blocks of the Angular Components
Template (View)
The Template defines the layout and content of the View. Without the template, there is nothing for Angular to render to the DOM.
The Templates are only HTML codes and the Angular-specific special HTML markups (known as the Angular Template Syntax).
You can add Angular directives, Angular Pipes & Other Angular Components on the template.
The data to Template comes from the Component, which gets it from an Angular Service. We can keep the Template in sync with the Component using the data binding techniques. The templates can use Event Binding or two-way data binding to notify the component when the user changes something on the View.
There are two ways you can specify the Template in Angular.
- Defining the Template Inline
- Provide an external Template
Class
The Class provides the data & logic to the View. It contains the Typescript code associated with Template (View). We use TypeScript to create the class.
Class Contains the Properties & Methods. The Properties of a class can be bound to the view using Data Binding.
The simple Angular Class
export class AppComponent
{
    title : string ="app"
}
By convention, we suffix the Component class as Component to easily identify them.
Metadata
Metadata Provides additional information about the component of Angular. Angular uses this information to process the class. We use the @Component decorator to provide the Metadata to the Component.
@Component decorator
A decorator is a function that adds metadata to a class, its methods & to its properties. The Components are defined with a @Component class decorator.
When Angular sees a class with @Component decorator, it treats the class as a Component.
A Decorator is always prefixed with @. We must place the Decorator immediately before the class definition. We can also build our own decorators. The decorators are Similar to attributes in C#
Important Component metadata properties
Selector
Selector specifies the simple CSS selector. The Angular looks for the CSS selector in the template and renders the component there.
Providers
The Providers are the Angular Services that our component is going to use. The Services provide service to the Components or to the other Services.
Directives
The directives that this component going to use are listed here.
Styles/styleUrls
The CSS styles or style sheets that this component needs. Here we can use either an external stylesheet (using styleUrls) or inline styles (using Styles). The styles used here are specific to the component
template/templateUrl
The HTML template that defines our View. It tells Angular how to render the Component’s view. The templates can be inline (using a template) or we can use an external template (using a templateUrl). The Component can have only one template. You can either use an inline template or an external template, and not both.
How to Create Angular Component
Create a new Angular application. If you are new to Angular, you can follow the steps provided in the following tutorial to create the application
When we create a new project, Angular automatically creates the component app.component.ts. It will also mark this as a root component, so when you run the project, it will display its template (app.component.html) to the user.
In this tutorial, we add another angular component and make it the root component. We name our Component HelloWorldComponet. When we run the App, it will display contents from the newly created Component.
Creating an Angular Component requires us to follow these steps
- Create the Component file.
- Import the required external Classes/Functions.
- Create the Component class and export it.
- Add @Component decorator
- Add metadata to @Component decorator
- Create the Template
- Create the CSS Styles
- Register the Component in Angular Module
Create the Component file
Select the src/app folder, right-click, and click on the new file. Enter the name of the file as hello-world.component.ts
The file name starts with the feature name (hello-world) by convention. We then follow it up with a dot and type of class (Component). The extension used is .ts indicating that this is a typescript module file.
You can read more about naming conventions from the Angular Style Guide.
Import the Angular Component Library
Before we use any Angular (or external) functions or classes, we need to tell Angular how and where to find them. We do this using the Import statement. The Import statement is similar to the using statement in c#. It allows us to use the external modules in our class.
To define the Component class, we need to use the @Component decorator. This function is part of the Angular Core library. So we import it into our class as shown below
import { Component } from '@angular/core';
Create the Component Class and export it
The third step is to create the Component class using the export keyword. The Export keyword allows other components to use this Component by importing it.
export class HelloWorldComponent {
  title = 'Hello World';
}
Note we are using Pascal case naming conventions for the class name. The above class defines a Property named title and assigns a default value, “Hello World”.
Add @Component decorator
The next step is to inform Angular that this is a Component class. We do that by adding the @Component decorator. We must add the decorator immediately above the class definition.
@Component({
})
export class HelloWorldComponent {
  title = 'Hello World';
}
Add metadata to @Component decorator
The next step is to add the metadata to the Component using the @component decorator. Add the following to the component metadata.
@Component({
  selector: 'app-hello-world',
  templateUrl: './hello-world.component.html',
  styleUrls: ['./hello-world.component.css']
})
export class HelloWorldComponent {
  title = 'Hello World';
}
selector
We have chosen app-hello-world as the selected for this Component. The Angular, wherever it finds the selector app-hello-world in the HTML, renders the HelloWorldComponent in its place.
templateUrl
In the above example, we have used an external template using templateUrl metadata—the templateUrl points to the external HTML file hello-world.component.html.
We can specify only one file as a template file per Component.
styleUrls
styleUrls declares the styles for our Template. The metadata points to the external CSS file hello-world.component.css. This file is a Component specific CSS style.
We can include more than one CSS file.
Create the Template (View)
The Template is an HTML file, which the Component must display to the user.
The Angular knows which template display, using the templateUrl metadata, which points to hello-world.component.html.
Select the src/app folder, right-click, and click on the new file. Enter the name of the file as hello-world.component.html.
By convention, we give the same name as the component file it represents. It will have an extension of HTML.
<h1>
   {{title}}!
</h1>
Note that title is inside the double curly bracket. When rendering the View, Angular looks for the title Property in our Component and binds the property to our View. We call this data binding. The double curly bracket syntax is known as interpolation, which we will look at in our following tutorial.
Add the Styles
The next step is to add the CSS Styles. The styleUrls metadata tells Angular where to find the CSS File. This property points to external file hello-world.component.css
By convention, we name the file after the component file with the .css extension. Note that styleUrls metadata can accept multiple CSS Files.
Select the src/app folder, right-click, and click on the new file. Enter the name of the file as hello-world.component.css
Let us keep the file blank for now.
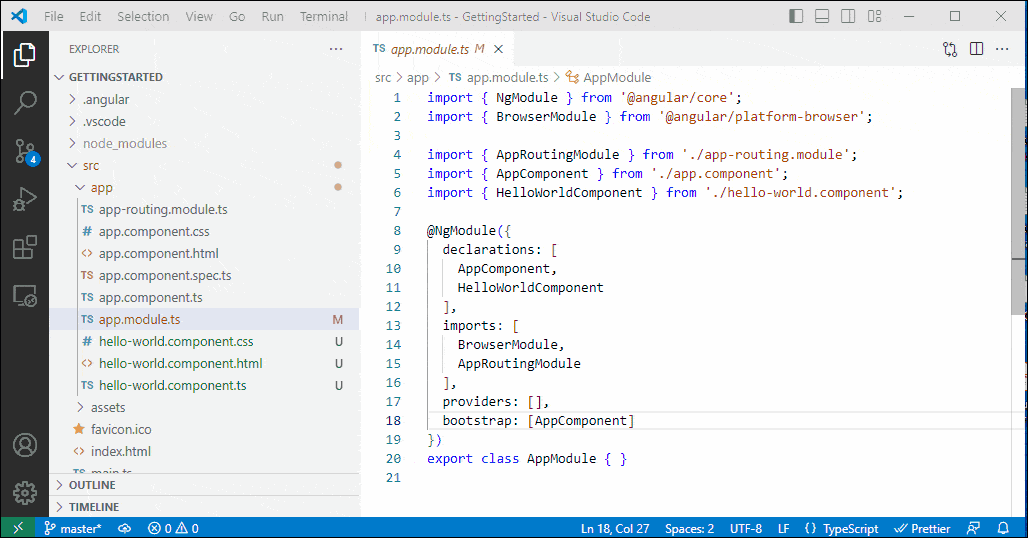
Register the Component in Angular Module
We have created the Angular Component. The next step is to register it with the Angular Module. Our application already has one Module, i.e., app.module.ts, which is also a root module.
The root module is the Module Angular loads when the App starts.
The Angular Module organizes the related components, directives, pipes, and services and arranges them into cohesive blocks of functionality.
We use the @NgModule class decorator to define an Angular Module and provide metadata about the Modules. There are four important properties of @NgModule metadata. They are declaration, imports, providers & bootstrap.
We include the components, pipes, and directives part of this Module in the declaration array.
We add all the other Angular Modules this Module needs in the imports array.
Include all the angular services part of this Module in the providers’ array.
Assign the Component we want to load when Angular loads this Module to the bootstrap array.
To Make use of our HelloWorldComponent, we import it.
import { HelloWorldComponent } from './hello-world.component';We also need to add it to the declaration array.
  declarations: [
    AppComponent, HelloWorldComponent
  ],
Now, our Component is ready to use.
Our final app.module.ts.
import { NgModule } from '@angular/core';
import { BrowserModule } from '@angular/platform-browser';

import { AppRoutingModule } from './app-routing.module';
import { AppComponent } from './app.component';
import { HelloWorldComponent } from './hello-world.component';

@NgModule({
  declarations: [
    AppComponent, HelloWorldComponent
  ],
  imports: [
    BrowserModule,
    AppRoutingModule
  ],
  providers: [],
  bootstrap: [AppComponent]
})
export class AppModule { }
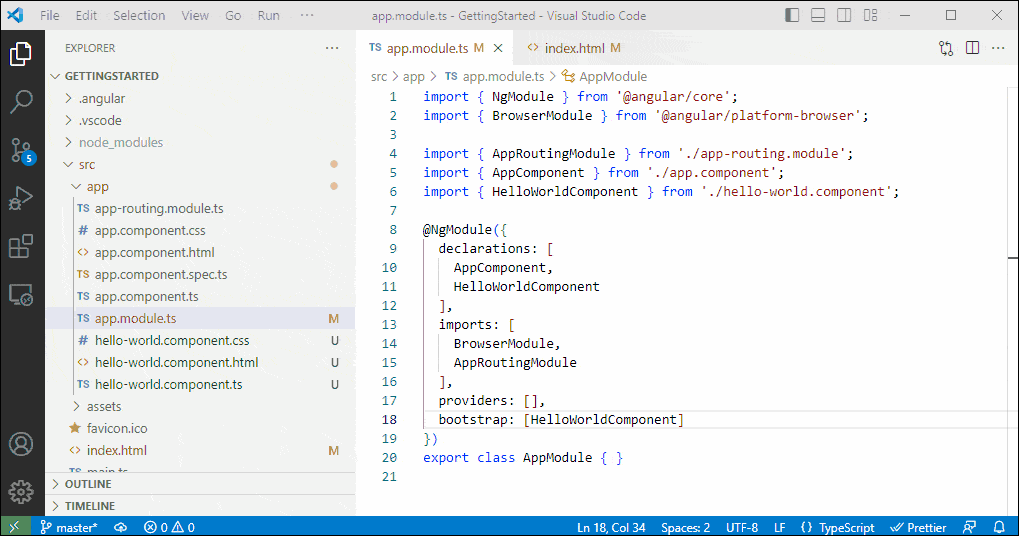
HelloWorldComponent as Root Component
When the application starts, It loads the AppComponent. Let us change it and display HelloWorldComponent instead.
To do that, we assign the HelloWorldComponent Component to the bootstrap property and remove the AppComponent.
You can just open the app.module.ts and locate the following code.
bootstrap: [AppComponent]Update it with the following code.
bootstrap: [HelloWorldComponent]Now open the src/app/index.html and locate the following line.
<body>
<app-root></app-root>
</body>
and replace it with this
<body>
 <app-hello-world></app-hello-world>
</body>
Run the App using ng serve --open. You will see “Hello World” on the screen.
Multiple Root Components
Angular allows us to bootstrap multiple components. We can make both HelloWorldComponent and AppComponent as root components.
We need to update the bootstrap array property of the app.module.ts and also add both selectors in index.html.
Update the bootstrap property in the app.module.ts.
bootstrap: [AppComponent, HelloWorldComponent]Add both selectors in the index.html
<body>
  <app-hello-world></app-hello-world>
  <app-root></app-root>
</body>
Open the app.component.html and update the content to
<h1>Hello for AppComponent</h1>Run the application.
Display as a Child Component
We rendered the HelloWorldComponet as the root component. But this is not the correct way to render a child component. You should have only one Component as the root Component. All other Components must be rendered as the child of the root component.
There are two ways in which we can display a child Component.
- Via Angular Router
- Via Component Selector
The Angular Router Tutorial covers rendering a Component using the Angular Router.
We already used the component selector to render the Component ( app-hello-world for HelloWorldComponent). To render HelloWorldComponent as child component follow the following steps
- Remove the
<app-hello-world></app-hello-world>from the index.html. - Remove the
HelloWorldComponentfrom the bootstrap property inapp.module.ts. - Open the
app.component.htmland add theapp-hello-worldselector.
<h1>Hello for AppComponent</h1>
<app-hello-world></app-hello-world>
Now the HelloWorldComponent renders as a child component of the AppComponent.
Summary
Follow these steps to create the Angular Component
- Create the Component file.
- Import the required external Classes/Functions.
- Create the Component class and export it.
- Add @Component decorator
- Add metadata to @Component decorator
- Create the Template
- Create the CSS Styles
- Register the Component in Angular Module
There are two ways in which you can display the Component. One is using the Angular Router, and another way is to use the Component selector in the Template.


Thanks
Great
Excellent
Beautiful Tutorial. The professional Trainer.
You are a genius teacher man, thanks for your effort to educate people
nn
“By convention we prefix the Component class with Component so as to easily identify them.”
I think it’s not prefix. It should be suffix, right?
appreciated!!!
Best Angular Tutorial I have found. Cheers
how to find this tutorial ?
Great tutorial man… Keep it up.
Simple words…Perfect Tutorial
great work .thank you
very nice man keep it up!!!
This line : ” The Angular, when instantiating the component, searches for the selector in the HTML file ”
When Angular searches for selector in HTML file, which HTML file are we talking about, “index.html” file or the “app.component.html” file ?
Thanks in Advance !! I am in Love with this Series 🙂
Updated the Article with more information.
outstanding explanation #man.
Great. This is the best
Thanks very much, this an amazing tutorial I ever seen
Bro u r Exceptional ,Outstanding tutorial
great job
yes, agood methodologie and an easy way to explain; thanks
Thanks
I can’t stop myself to read everything and put a comment too.fantastic tutorial 🙂 🙂
the same
Thanks