In this tutorial, we are going to discuss how to create a Crystal Report using ASP.NET Web Form applications. We will show you how to create the Typed Dataset and bind the Crystal Report to the Dataset in a Web Form application.
You can read our following tutorial on how to Create Crystal Reports
- How to Create Crystal Reports using Windows Forms Application
- How to Create Crystal Reports Using ASP.NET MVC Application
We are using Visual Studio 2013 and SAP Crystal Reports for Developer Edition to Visual Studio. Click to Download Crystal Report for Visual Studio. The Code also works under Visual Studio 2015 Community Edition and the latest version of Crystal Reports.
We are using the Northwind Database. You can download it from CodePlex
Table of Contents
- Create the ASP.NET Web Forms Application
- 1. Create ASP.NET Web Forms Project
- 2. Create a Dataset
- 3. Add Crystal Report to the Project
- 4. Bind the Dataset to Crystal Report and Add Fields
- 5. Create an ASP.NET Web Form
- 6. Add a Crystal Viewer Control to Web Forms and Bind it to the Report
- 7. Run And View The Report
- Notes
- Source Code
Create the ASP.NET Web Forms Application
Creating the Crystal Reports involves the following steps
- Create ASP.NET Web Forms Project
- Create the Dataset
- Add Crystal Report to the Project
- Bind Dataset to the Crystal Report and Add Fields
- Add a Web Form to the project
- Add CrystalReportViewer control & Bind it to the Report
- Run and Test the Report
1. Create ASP.NET Web Forms Project
The First step is to create a Web form application.
Follow these steps to create a Web Forms Project
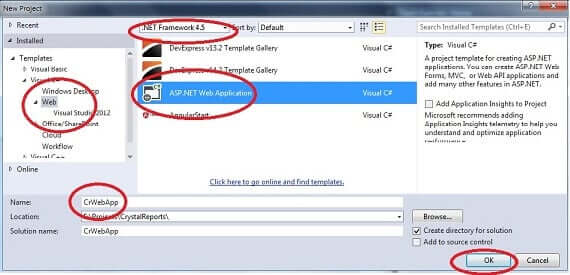
- Launch Visual Studio.
- From the File menu, click New Project
- From Templates ->Visual C#
- Select Web
- Select ASP.NET Web Application
- Choose Name as CrWebApp
- Click on OK
This will open the New ASP.NET Project Wizard.
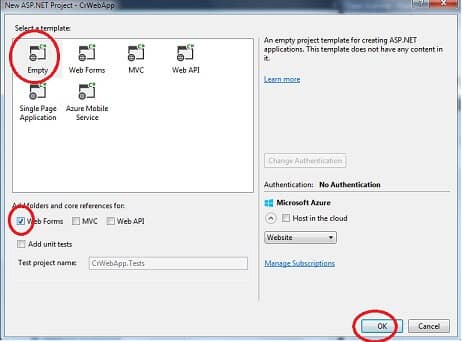
- Select Empty Template
- Click on Webforms
- Click on OK
2. Create a Dataset
In the Previous Tutorial, we learnt how to use OLE DB (ADO) connection. For this example let us choose ADO.NET Dataset. To use ADO.NET Dataset we need to create a dataset in our project. To do that follow the following steps
- Select your Project
- Right Click
- Go to Add New
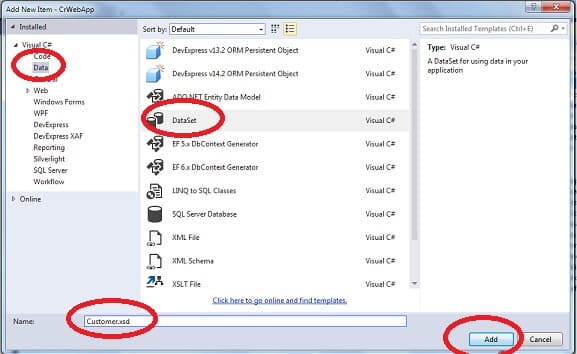
Add New Item dialogue box appears. Here follow these steps
- Select New Item
- Select Data on left-hand side box
- On the right-hand side select Dataset
- Name the dataset as customer
- Click on Add
This will bring Dataset Designer on your screen
Dataset Designer
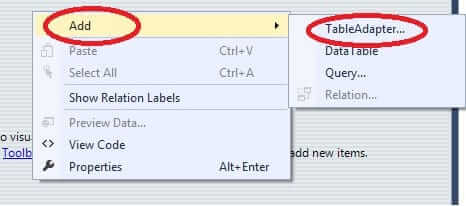
Right-click and select Table Adapter.
Choose your data connection wizard
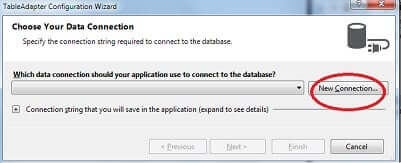
This will bring up Choose your data connection wizard. The drop-down will display the already created connections. To Create a new connection, click on the New Connection
Click on New Connection
Add Connection dialogue box
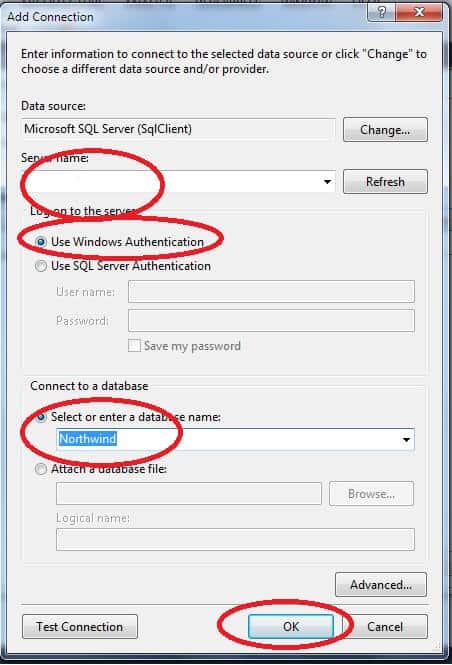
The next dialogue box is Add Connection dialogue box. The first Option in this screen is data source which, is as you can see is displayed as Microsoft SQL Server (SQL Client). If you wish to change it to some other provider then, click on Change. That will take you to the list of available Data Source Select the appropriate one for your project and Click OK
Since we are connecting to the SQL server database let us choose to cancel
Follow these steps to set your database connection
- In Server Name field enter name of your SQL Server Instance Name
- Under authentication, you can either choose windows authentication or specify user ID & Password. I will choose Windows Authentication
- Select database Name. Select NorthWInd
- Click on Test Connection to verify Connection
- Click on OK to finish
We are taken back to the Choose your data Connection window
Choose your data connection wizard
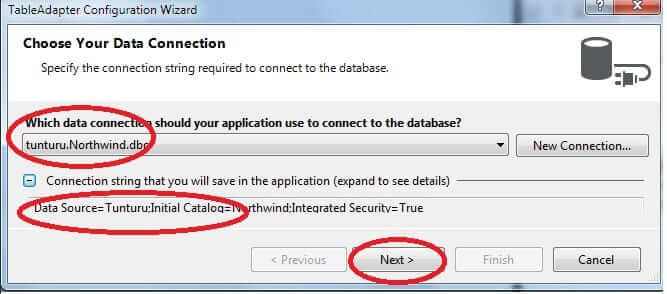
The new connection which we created in the previous step appears on drop down. Expand the plus right below connection drop-down see the connection string
- Select the Newly created connection
- Click on NEXT
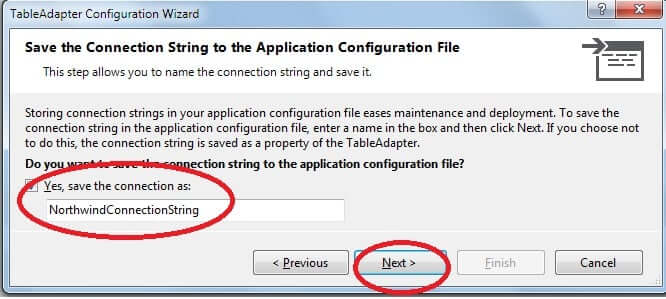
You will be prompted to whether you wish to add this connection to the web.config file. Select yes and click Next. This will bring up Choose your Command Type Dialog Box
Choose your Command Type
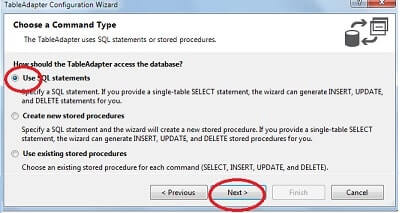
Here you are given three options to select the Command Type
- Use SQL Statement
- New Stored Procedure
- Existing Stores Procedure
Let us choose Use SQL Statement. Click on Next. This will bring up Enter SQL Statement dialogue box
Enter SQL Statement dialogue box
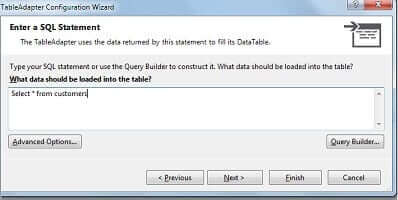
Here you are prompted for the SQL statement. Enter our query as
Select * from customersClick on Next. This will take us to the Choose methods to Generate dialogue box
Choose methods to Generate
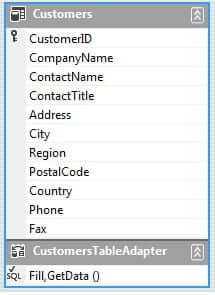
This wizard asks for the methods you want to add to our TableAdapter. Select tick on all three and Click on Next. The dataset is generated for us. Save and close the dataset
Now we have created our dataset. We are now ready to connect this dataset to our crystal report
3. Add Crystal Report to the Project
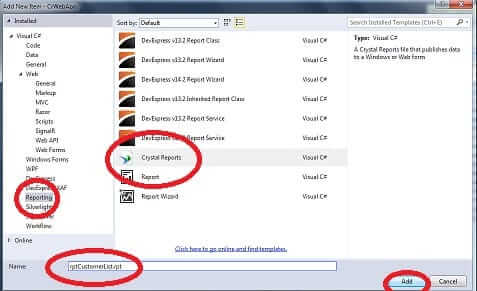
To Add Crystal Reports to the Report do the following
- Select your Project
- Click Add
- Click New Item
- On the left-hand templates column, choose Reporting
- Select Crystal Reports
- Name the Report as rptCustomerList
- Click on Add
This will bring up the Crystal Report Gallery
Crystal Report Gallery
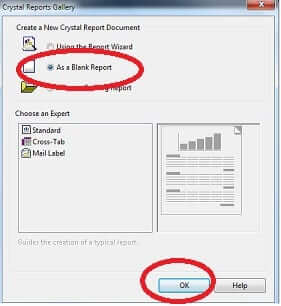
The Gallery offers three options to create report
- Using The Report Wizard
- As a Blank Report
- From an existing Report
In the Create your first Crystal Report Using Windows Forms, we showed you how to create the report using the first Option i.e. using the Report wizard. For this example let us create the report as a Blank Report
Select as blank Report and click on Ok
A blank Report is Created and ready for use. Notice that the reference to the following Crystal Report Namespace is added to our project
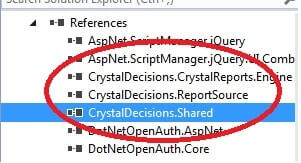
- CrystalDecisions.CrystalReports.Engine
- CrystalDecisions.ReportSource
- CrystalDecisions.Shared
4. Bind the Dataset to Crystal Report and Add Fields
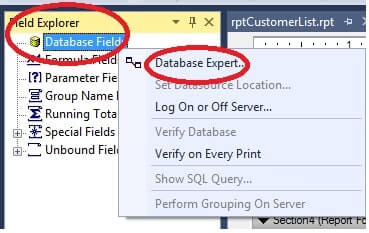
Now we need to connect this report to the dataset we created. Locate and Open the crystal Report rptCustomerList. To Connect to the dataset do the following
- Select Field Explorer
- On Database fields -> Right Click
- Click on Database Expert
- Go to Project Data and select ADO.NET Datasets
The dataset we have created will appear in the Project Data
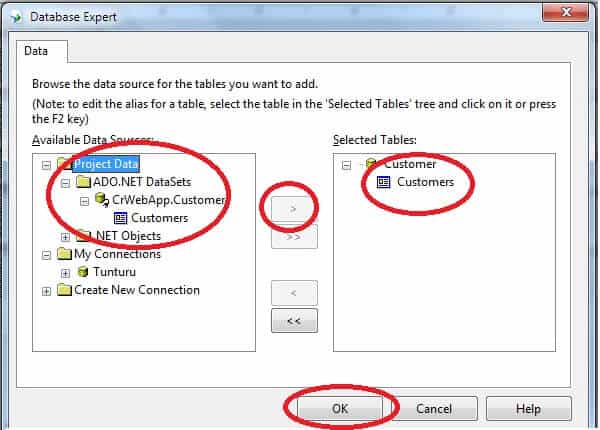
- Select Customers Dataset.
- Click on Right Arrow to add this to the Report.
- Click on OK.
Add fields to Report
The next step is to add the fields to the report. To do this follow these steps
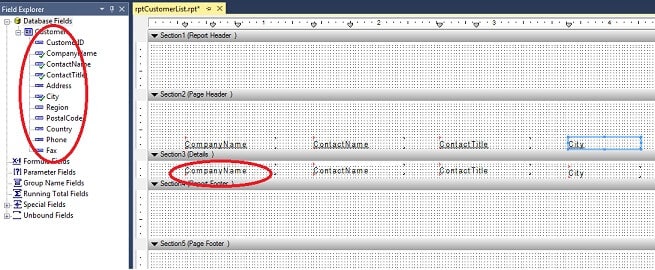
- Go to Fields Explorer.
You will notice that the customer table which has added here appears here with all the fields. - Expand database fields.
- Expand customers.
- Select the fields you wish to place on Report Drag them to the report.
- Let us Place title, companyName, contactName, contactTitle, and city in the report.
Save the report and close all the open windows.
5. Create an ASP.NET Web Form
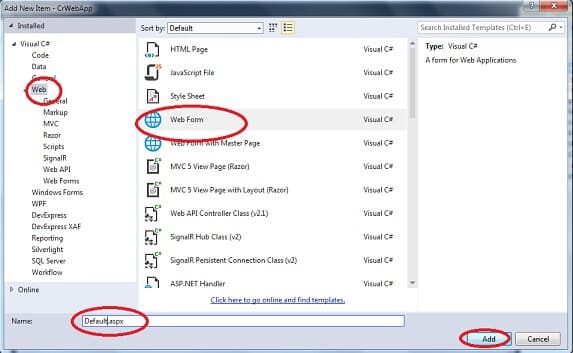
The next step is to create a web form to show the report. To do this follow these steps
- Go to Project Right-click
- Click on Add
- Click on New Item
- Add New Wizard Appears
- Select Web
- Select Webform
- Name it as default.aspx
Click on add to create the form
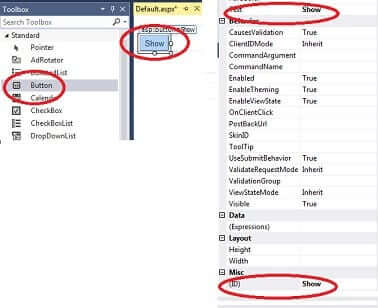
The next step is to add a button to our web form. To do this
- Open the default.aspx.
- Click on Design tab at the bottom.
- Go to the toolbox.
- Select button.
- Drag it and place it on the web page.
- Rename the button caption as SHOW.
- Rename the ID Property to Show.
6. Add a Crystal Viewer Control to Web Forms and Bind it to the Report
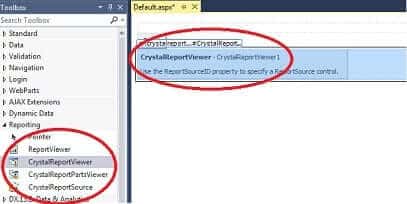
The next step is to add crystal Viewer control to our form. To do this
- Open the default.aspx.
- Click on Design tab at the bottom.
- Go to the toolbox.
- Locate Reporting Tab.
- Select Crystal Report Viewer Control.
- Drag it on the web page.
Bind Report to the Crystal Report Viewer
To View the Crystal Report we need to bind the Report (rptCustomer) to the Crystal Viewer Control, which we added to our Web Form. To do this double click on Show Button to open the code behind class
We need to Import following Name Space from the Crystal Reports.
Using CrystalDecisions.CrystalReports.Engine;
Using CrystalDecisions.Shared;
First, We need to Fill the data table with the Customers data. To do that Create an instance of Table Adapter CustomersTableAdapter and invoke the Fill Method to Fill the data.
Create the rpt object, which is an instance of our rptCustomerList. Note the rptCustomerList is the name of the Crystal Report, which we had created in step 3. Assigning the Dataset ds to Report using the method SetDataSource. The object rpt is our Report.
Crystal Report Viewer control’s job is to display the report. All we need to do is to assign the report to the ReportSource Property of the Crystal Report Viewer Control (CrystalReportViewer.ReportSource = rpt). Now our Crystal Report Viewer is ready to display our report.
Finally, store our Report in the Session using Session.Add(“report”, rpt). The Report object is retrieved from the Session and assigned to the ReportSource Property of the CrystalReportViewer Control when the page is refreshed or user navigates from one page to another. This is done from the Page_Init event.
Finally, our code looks like this
using System;
using System.Collections.Generic;
using System.Linq;
using System.Web;
using System.Web.UI;
using System.Web.UI.WebControls; //Crystal Report Namespaces
using CrystalDecisions.CrystalReports.Engine;
using CrystalDecisions.Shared;

namespace CrWebFormsApp {
  public partial class Default : System.Web.UI.Page     {
    rptCustomerList rpt;

    protected void Page_Load(object sender, EventArgs e){
    }

    protected void Page_Init(object sender, EventArgs e){

      if (Session["report"] != null)
      {
        CrystalReportViewer1.ReportSource =(rptCustomerList)Session["report"];
      }
    }

    protected void Show_Click(object sender, EventArgs e){

        CustomerTableAdapters.CustomersTableAdapter da = new CustomerTableAdapters.CustomersTableAdapter();
        Customer ds = new Customer();
        Customer.CustomersDataTable dt=(Customer.CustomersDataTable)
        ds.Tables["Customers"];
        da.Fill(dt);
        rpt = new rptCustomerList();
        rpt.SetDataSource(ds);
        CrystalReportViewer1.ReportSource = rpt;
        Session.Add("report", rpt);
    }
)
7. Run And View The Report
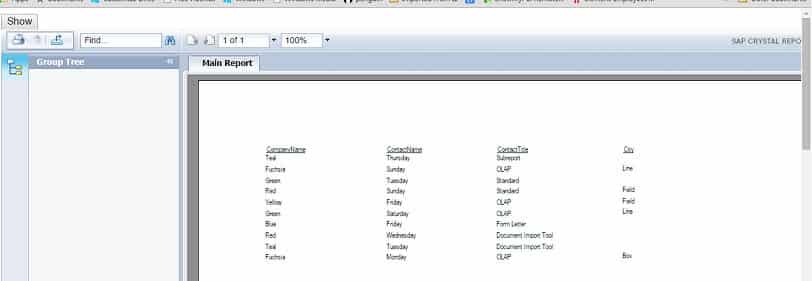
Save and run and you will see your first report in ASP.NET Web Forms
Notes
It may happen that report might not display properly or may not display at all. There are two common problems, that usually occurs in ASP.NET Web Forms application.
- Crystal report Errors : Could not load file or assembly crdb_adoplus or one of its dependencies
- Crystal Report Shows a blank Page in ASP.NET Web Application
Source Code
You can download the source code from the GitHub. The Source code is made using Visual Studio 2015 Community Edition and SAP Crystal Reports Developer Edition for Visual Studio Service Pack 17
The sample database Northwind can found from CodePlex
Run Crystal Reports Under 64 Bit IIS.
Go to Tools -> Option then select Project and Solutions -> Web Projects and tick on the option “Use the 64-bit version of IIS Express for web sites and projects”


Great tutorial! My pitfall: make sure the button is actually hooked up to the Show_Click method before trying the fixes mentioned. When I was binding the data, double clicking the “Show” button to access the code behind did not automatically set that function as the button’s onclick. I had to go into the button’s html tag (you could also set it in the button’s properties) and set it manually. Never rule out the simple stuff I guess
thanks so useful inform.. be strong
Thank you for example
I have a big problem crystals. I have designed an app using web forms in VS 2015. When testing, the reports run well, but I deploy on the server, i get Load report failed.
How can this be resolved?
Thank you
[email protected]
Can reports created with crystal reports 2020 be run on Windows 2019 server under asp.net 4 or higher? If so what crystal runtime file needs to be installed on the server and where do we download that file or app?
yes
No hay como ese amistoso lenguaje Visual Basic .Net
Totalmente de acuerdo
Hi
What if you don’t see the tables in the Database Expert window?
I don’t see mine appearing in the dataset. It was working before when I first tried.
Crystal report generation using asp.net web forms is not working for me..
i am using VS 2015
there are no errors at all but the report isnt getting displayed on the browser
You should import the crystal report 13 template in your current project and add the reference config section in “web.config”
Excellent tutorial! This has helped me start an upgrade from Classic ASP and Crystal 8 running on a 32 bit app server to the latest Crystal in .net 2015 running on a 64 bit server.