The Angular CLI is a command-line interface for Angular. This tool helps us quickly get started with creating the Angular application. It also helps us to maintain, develop, test , debug & build Angular application from the command shell. In this tutorial, we will learn how to use the Angular CLI commands to manage Angular applications. We will be covering Angular CLI commands like ng new, ng generate component, ng generate directive & ng generate pipe, etc.
Table of Contents
What is Angular CLI
The Angular CLI is a command-line tool that allows us to create, develop, scaffold, and manage Angular applications from a command shell.
Angular CLI takes care of the time-consuming and error-prone task of creating and configuring the initial application. It also helps us quickly add new components, directives, and modules. .
Using Angular CLI, you can
- Create a new Angular Project using a single command with all the initial default configurations. It sets up the Routes, type of style sheets to be used, whether to use stand alone components etc at the time of creation of the Project.
- We can add Components, Directives, Pipes, Services & Modules etc to it using few commands.
- It helps us to compile and build the application for distribution.
- It also has a development server, which helps us run, test and debug the application during the development phase. A single command (“
ng serve“) compiles our application, starts a web server, and runs our application.
Angular Vs. Angular CLI
Angular is a complete framework that helps build single-page client applications. It consists of core functionalities that you need to develop a client application. It contains various libraries and tools to help us do that.
Angular CLI is just a command-line tool. It contains lots of commands that make it easier to work with the Angular framework.
For example, using the command “ng new,” we can create a new Angular project within a few minutes.
How to Install Angular CLI
Before installing Angular CLI, we need to install the NodeJs and npm (Node Package Manager). The current version of Angular is 17. It requires NodeJS version from 18.13 to 20.9. You can refer to the Angular version history to find the version of NodeJS. The npm is installed along with the NodeJS
You can visit the link to download & Install NodeJS
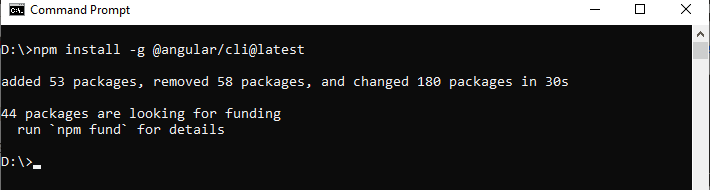
We install the Angular CLI using the following npm command.
npm install -g @angular/cli@latest
The above command installs the latest version of Angular CLI on your machine. Note that we have used the -g flag (which stands for global) to install the Angular CLI system-wide so you can use it in all projects.
Angular CLI Versions
The current version of Angular CLI is 17.3.3 (as on 11.04.2024).
Since Angular Version 6, the Angular CLI follows the same version number as that of Angular. Hence for Angular 17, the corresponding version of the Angular CLI is 17.
The Angular CLI version 1.7 was for Angular 5, and Angular CLI 1.4 was for Angular 4
You can keep track of the latest Angular CLI release from Angular CLI release information.
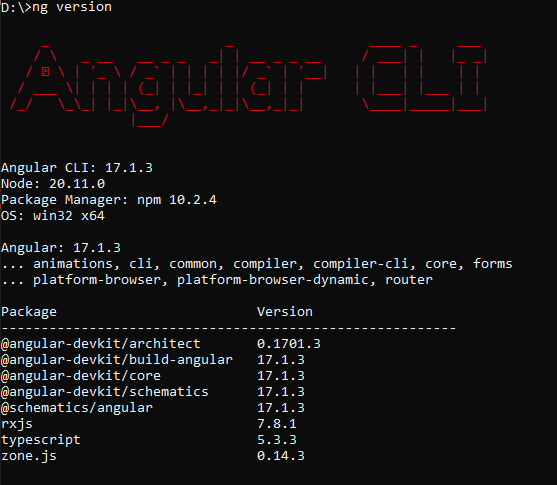
Angular CLI Version Check
You can find out the Current Installed Angular CLI Version by Using the Command
ng versionThe latest version as of writing this article is 17.1.3. The command above also gives the version of the node installed in your system.
Angular CLI Commands
The following list shows some of the important Angular CLI commands.
| Commad | Alias | Description |
|---|---|---|
help | Help message shows the List of available commands and their short descriptions. | |
version | v | Find out the version of the Angular CLI Installed |
new | n | Creates a new folder (Workspace) and ads the initial Angular app. Note that you can create multiple apps in a single folder (Workspace) |
add | Adds the npm package to the workspace and configure the default app project to use that library. | |
generate | g | Generates and/or modifies files based on a schematic. |
update | Updates your application and its dependencies | |
serve | s | Builds and serves your app, rebuilding on file changes. |
run | Runs a custom target defined in your project. | |
build | b | The Compiles the Angular app into an output directory ( Default is dist) |
test | t | Runs unit tests in a project. |
e2e | e | Builds and serves an Angular app, then runs end-to-end tests using Protractor. |
config | Retrieves or sets Angular configuration values. | |
doc | d | Opens the official Angular documentation (angular.io) in a browser, and searches for a given keyword. |
lint | l | Runs linting tools on Angular app code in a given project folder. |
extract-i18n | Extracts i18n messages from source code. |
Getting Help
ng helpGetting help on individual commands us the syntax ng [command name] --help. For Example
ng add --help       //help on add command
ng new --help       //help on new command
Creating the Application with ng new
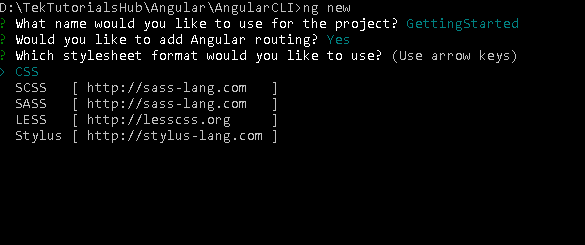
The ng new command is used to create new folder and creates an App with the provided name.
ng new The command will ask you
- What name would you like to use for the new workspace and initial project?
Enter the name of the project here. “GettingStarted“. - Would you like to add Angular Routing?
Answer this as Yes unless you do not want to add Angular Routing. - Which stylesheet format would you like to use?
You arrow keys to select the available options from CSS, SCSS, SASS & LESS.
The above command will create a folder GettingStarted and copies all the required dependencies and configuration settings. The Angular CLI does the following.
- Creates a new folder
GettingStarted - Downloads and installs Angular libraries and any other dependencies.
- Installs and configures TypeScript.
- Installs and configures Karma & Protractor for testing.
- Initialises the Git.
Running the Application
To run the application cd into the folder and run either ng serve or use npm start (which runs the ng serve behind the scene)
cd gettingStarted
ng serve         // or npm start
Now open the browser and enter the URL http://localhost:4200/ and you should be able to see Welcome to GettingStarted! Message
You can stop the app by pressing ctrl-c
ng new options
| Options | Alias | DESCRIPTION | Value Type | Default Value |
|---|---|---|---|---|
--collection | -c | A collection of schematics to use in generating the initial application. | String | |
--commit | Initial git repository commit information. | boolean | true | |
--create-application | Create a new initial application project in the 'src' folder of the new workspace. When false, creates an empty workspace with no initial application. You can then use the generate application command so that all applications are created in the projects folder | boolean | true | |
--defaults | Disable interactive input prompts for options with a default. | boolean | false | |
--directory | The directory name to create the workspace in | string | ||
--dry-run | -d | Run through and reports activity without making any changes. | boolean | false |
--force | -f | Forces overwriting of any existing files in the project folder | boolean | false |
--help | Shows a help message for this command in the console | boolean | ||
--inline-style | -s | Use inline style rather than the external StyleSheet file. does not create external Stylesheets | boolean | false |
--inline-template | -t | Does not create an external template file for the component. Specifies if the template will be in the ts file. | boolean | false |
--interactive | Enable interactive input prompts | boolean | true | |
--minimal | Installs a minimal set of features. does not create test files. | boolean | false | |
| --new-project-root | The path where new projects will be created, relative to the new workspace root. | string | projects | |
| --package-manager | The package manager used to install dependencies. | npm | yarn | pnpm | cnpm | ||
--prefix | -p | The prefix to apply to generated selectors for the initial project. | ||
--routing | Generates a routing module. If the option is not specified, it will ask for the confirmation | |||
| --skip-git | -g | Do not initialize a git repository. | boolean | false |
| --skip-install | Do not install dependency packages. | boolean | false | |
--skip-tests | -S | Do not generate "spec.ts" test files for the new project. | ||
--ssr | Creates an application with Server-Side Rendering (SSR) and Static Site Generation (SSG/Prerendering) enabled | boolean | false | |
| --standalone | Creates an application based upon the standalone API, without NgModules | boolean | true | |
| --strict | Creates a workspace with stricter type checking and stricter bundle budgets settings. This setting helps improve maintainability and catch bugs ahead of time | boolean | true | |
| --style | The file extension or preprocessor to use for style files. | css | scss | sass | less | ||
--view-encapsulation | Specifies the view encapsulation strategy. | Emulated | None | ShadowDom | Emulated |
ng new example
//creates with new project with Style CSS
ng new gettingStarted --routing  --style CSS

//creates the new project with HelloWorld_root as the selector
ng new HelloWorld --routing  --style CSS -p HelloWorld
ng generate
ng generate <schematic> [options]
ng g <schematic> [options]
ng generate or (ng g) is used to generate components, module, class, pipes & directives, etc. The following tables show the list of artifacts that can be generated.
| schematic | Syntax | DESCRIPTION |
|---|---|---|
appShell | ng g appShell [options] | Generate an App shell. Read about App Shell from here |
application | ng g application | Generates an application |
class | ng g class | Generates Class file |
component | ng g component | Generates a component |
directive | ng g directive | Generates a Directive |
enum | ng g enum | Generates an enum |
guard | ng g guard | Generates a Guard Component |
interface | ng g interface | Generates an Interface |
library | ng g library | Generates a Library |
module | ng g module | Generates a Module |
pipe | ng g pipe | Generates a Pipe |
service | ng g service | Generates a Service class |
serviceWorker | ng g serviceWorker [options] | Generates a Service worker |
universal | ng g universal [options] | Generates a Universal |
Common options
The following are the common options of the ng g command
| OPTION | Alias | Default | DESCRIPTION |
|---|---|---|---|
--defaults=true|false | false | When true, disables interactive input prompts for options with a default | |
--dryRun=true|false | -d | false | When true, run through and report activity without writing out results. |
--force=true|false | -f | false | When true, force overwriting of existing files |
--help= | false | Shows a help message for this command in the console. | |
--interactive=true|false | false | When false, disables interactive input prompts. | |
--standalone | true | Whether the generated component is standalone. Note that From Angular 17 default is True. Standalone components are available since Angular 14 |
Component
The following command generates the component.
ng g component <name> [options]
Examples
ng g component Hello
The above command does the following
- Creates the
Hellofolder under thesrc/appfolder - Create the
HelloComponentalong with CSS, Spec & Template file under theHellofolder - The CSS selector use the format
app-<name>. i.e.app-hello - Creates Standalone component in Angular 17 or above if standalone flag is not specified or is set to true.
- If Module based component is chosen then it will Import the
HelloComponentin the root module and adds it to the declarations array.
Standalone Components
Angular 17 Creates Standalone component if you omit the standalone flag or set it to true. To create Module based component, you need to specify --standalone=false flag.
In Angular 15 & 16 setting --standalone=true will create the Standalone component. Omitting the flag or setting it to false will result in creation of Module based component.
Angular 14 does not have standalone flag. All Components are created as Module based components. You need to manually edit to component to use the Standalone API.
Angular 13 and below did not have standalone API.
Examples
ng g component --flat Hello does not create the hello folder. The component is created in the src/app folder.
ng g component --flat hello/hello creates the component under src/app/hello folder
ng g component --export hello adds the component to the exports metadata array of the module.
ng g component --prefix=myapp hello uses the CSS selector as myapp-hello.
ng g component --selector=hi --force hello uses the selector as hi
generate component inside module
ng g module account generates the code for account module
ng g component --module=account account/hello adds the component to the account module
ng g component --module=account hello this works provided the current directory is module directory i.e src/app/account
The following is the list of all available options
| OPTION | Alias | Default | DESCRIPTION |
|---|---|---|---|
--changeDetection= Default|OnPush | -c | Default | Specifies the change detection strategy. |
--entryComponent= true|false | false | Specifies if the component is an entry component of declaring module. | |
--export=true|false | false | Specifies if declaring module exports the component. | |
--flat= true|false | false | Flag to indicate if a directory is created. | |
--inlineStyle= true|false | -s | false | Specifies if the style will be in the ts file. |
--inlineTemplate=true|false | -t | false | Specifies if the template will be in the ts file. |
--lintFix= true|false | false | Specifies whether to apply lint fixes after generating the component. | |
--module= module | -m | root module | Allows specification of the declaring module. |
--prefix= prefix | -p | The prefix to apply to generated selectors. | |
--project= project | The name of the project. | ||
--selector= selector | The selector to use for the component. | ||
--skipImport= true|false | false | Flag to skip the module import. | |
--spec= true|false | true | Specifies if a spec file is generated. | |
--styleext= styleext | css | The file extension to be used for style files | |
--viewEncapsulation= | -v | Emulated | Specifies the view encapsulation strategy. |
--standalone | true | Whether to use the standalone API. Since Angular 17 default is True. Standalone API are available since Angular 14 |
Directive
ng g directive <name> [options] is used to generate the directive. For Example ng g directive Some generates the Some.Directive.ts. The following code is generated. It also generates the some.directive.spec.ts
import { Directive } from '@angular/core';

@Directive({
  selector: '[appSome]'
})
export class SomeDirective {

  constructor() { }

}
The above command does not create the folder. You can use the ng g directive directive/Some, which will create the directive under the folder directive.
You can use the command ng g directive --flat=false Some, which will create the directive under the folder Some (folder name is same as the directive name)
You can use the --force flag to force overwriting of the files, if the files already exists
Use the--module flag to add the directive to a module other than the root module.
Use the --prefix or --selector flag to change the CSS Selctor.
You can use the --export & --skipImport to add the directive to exports and imports metadata of the module
The following is the complete list of available options
| OPTION | Alias | Default | DESCRIPTION |
|---|---|---|---|
--export=true|false | false | Specifies if declaring module exports the component. | |
--flat= true|false | true | Flag to indicate if a directory is created. | |
--lintFix= true|false | false | Specifies whether to apply lint fixes after generating the component. | |
--module= module | -m | root module | Allows specification of the declaring module. |
--prefix= prefix | -p | The prefix to apply to generated selectors. | |
--project= project | The name of the project. | ||
--selector= selector | The selector to use for the component. | ||
--skipImport= true|false | false | Flag to skip the module import. | |
--spec= true|false | true | Specifies if a spec file is generated. | |
--standalone | true | Whether to use the standalone API. Since Angular 17 default is True. Standalone API are available since Angular 14 |
Pipe
ng generate pipe <name> [options] is used to generate the pipe. For Example, ng g pipe Date generates the date.pipe.ts. The following code is generated. It also generates the date.pipe.ts.spec.ts
import { Pipe, PipeTransform } from '@angular/core';

@Pipe({
  name: 'date'
})
export class DatePipe implements PipeTransform {

  transform(value: any, args?: any): any {
    return null;
  }

}
The above command does not create the folder. You can use the ng g pipe pipes/Date, which will create the pipe under the folderpipes.
You can use the command ng g pipe --flat=false Date, which will create the pipe under the folder Date (folder name is the same as the pipe name)
You can use the --force flag to force overwriting of the files, if the files already exists
Use the--module flag to add the pipe to a module other than the root module.
You can use the --export & --skipImport to add the directive to exports and imports metadata of the module
The following is the complete list of available options
| OPTION | Alias | Default | DESCRIPTION |
|---|---|---|---|
--export=true|false | true | Specifies if declaring module exports the component. | |
--flat= true|false | true | Flag to indicate if a directory is created. | |
--lintFix= true|false | false | Specifies whether to apply lint fixes after generating the component. | |
--module= module | -m | root module | Allows specification of the declaring module. |
--project= project | The name of the project. | ||
--skipImport= true|false | false | Flag to skip the module import. | |
--spec= true|false | true | Specifies if a spec file is generated. | |
--standalone | true | Whether to use the standalone API. Since Angular 17 default is True. Standalone API are available since Angular 14 |
Service
ng generate service <name> [options] is used to generate the service. For Example ng g service Data generates the data.service.ts &data.service.ts.spec.ts. The following is the sample code generated by the command
import { Injectable } from '@angular/core';

@Injectable({
  providedIn: 'root'
})
export class DataService {

  constructor() { }
}
The above command does not create the folder. You can use the ng g service services/Data, which will create the service under the folderservices.
You can use the command ng g service --flat=false Data, which will create the service under the folder Data (folder name is same as the service name)
| OPTION | Alias | Default | DESCRIPTION |
|---|---|---|---|
--flat= true|false | true | Flag to indicate if a directory is created. | |
--lintFix= true|false | false | Specifies whether to apply lint fixes after generating the component. | |
--project= project | The name of the project. | ||
--spec= true|false | true | Specifies if a spec file is generated. |
class
ng generate class <name> [options] is used to generate the class. For Example ng g class customer generates the customer.ts in the current folder. The following is the sample code generated by the command
export class Customer {
}
Use the command ng g class class/customer to create the class under the class folder.
| OPTION | Alias | Default | DESCRIPTION |
|---|---|---|---|
--project= project | The name of the project. | ||
--spec= true|false | true | Specifies if a spec file is generated. | |
--type=type | default | Specifies the type of class |
Module
use the ng g module <name> [options] command to generate the module. For Example ng g module account generates the account module under the folder src/app/account. The following code is generated
import { NgModule } from '@angular/core';
import { CommonModule } from '@angular/common';

@NgModule({
  declarations: [],
  imports: [
    CommonModule
  ]
})
export class AccountModule { }
ng g module account --module=app generates the account module and adds it to the imports metadata array of AppModule
ng g module account --routing=true --force. The --force flag overwrites the previously generated files. The --routing=true also creates the account-routing.module. The routes are registered with the forChild(routes)
ng g module account --force --routing=true --routingScope=Root registers the routes with the forRoot(routes)
Adding Components, Pipes, Directives to module
You can add component, directive, pipe & services to module by using the flag --module=[ModuleName] and naming the component as [ModuleName]/[ComponentnNme].
For Example, The following commands creates the account module and adds the HelloComponent, SomeDirective, DataSerivce & DatePipe to the module
ng g module account
ng g component --module=account account/hello
ng g directive --module=account --flat=false account/Some
ng g service --module=account --flat=false account/Data
ng g pipe --module=account --flat=false account/Date
The following is the list of all the available options
| OPTION | Alias | Default | DESCRIPTION |
|---|---|---|---|
--flat= true|false | false | Flag to indicate if a directory is created. | |
--module=module | -m | Allows specification of the declaring module. | |
--project= project | The name of the project. | ||
--routing=true|false | false | Generates a routing module. | |
--routingScope=Child|Root | child | The scope for the generated routing. |
ng update
The ng update command updates or upgrades the angular application and its dependencies to the latest version. Click on how to upgrade Angular to latest version for more information
Resources
The Angular CLI Command Reference
Read More
Summary
The Angular CLI helps to increase productivity by helping us to quickly create the app and add the component, pipes, services & directives, etc to the module. The Angular CLI has a lot more commands like serve, build, test, lint, e2e etc, which help us to build and distribute the applications. We will cover those in one of the future tutorials.

