In this step-by-step tutorial, we learn how to use Standalone Components with Angular Router. Angular introduced a standalone Component API in version 14. It became a stable API in the Angular 15. One of the biggest benefits of the Standalone Component is that it offers better Lazy loading than the Module-based API. In this guide, we will show you how to set up and configure the Angular routes to Standalone Components. We will show you this by creating an Angular Routing Example application with Standalone Components and creating menu navigation system using the Angular Router.
Table of Contents
What is Angular Routing
Routing allows you to move from one part of the application to another part or one View to another View. The Angular Router Module provides the necessary services to handle the Routing. The Router is a separate module and it is present in the library package, @angular/router.
The Angular Router provides the necessary service providers and directives for navigating through application views.
How to configure Angular Router
To Configure the Router in Angular in standalone components, you need to follow these steps
- Set the <base href>
- Define routes for the view
- Register the Router Service with Routes at application startup
- Map HTML Element actions to Route
- Choose where you want to display the view
Set the <base href>
The HTML <base> element specifies the base URL to use for all relative URLs contained within a document.
The Angular Router uses the HTML5 style of Routing (or PathLocationStrategy) as the default option. The router makes use of the browser’s history API for navigation and URL interaction.
<base href="/">To make HTML5 routing work, we need to set up the “base href” in the DOM. This is done in the index.html file immediately after the head tag.
You can read more about the PathLocationStrategy & HashLocationStrategy
Define the routes
Next, create an array of route objects. Each route maps the path (URL Segment) to the component. You can do this in app.routes.ts.
import { Routes } from '@angular/router';
import { HomeComponent } from './home/home.component';

export const appRoutes: Routes = [
{ path: 'home', component: HomeComponent },
];
Where
path: The URL path segment of the route. We will use this value to refer to this route elsewhere in the app
component: The component to display.
This route tells angular to render HomeComponent when the user navigates to the URL “/home”
Register the Routes
We need to register the routes at the time of application startup. The application startup code is in the main.ts file. If you open the file, this is what you will find.
import { bootstrapApplication } from '@angular/platform-browser';
import { AppComponent } from './app/app.component';
import { appConfig } from './app/app.config';

bootstrapApplication(AppComponent, appConfig)
  .catch((err) => console.error(err));
bootstrapApplication method is responsible for rendering the root component. It expects two arguments.
- The component to render when the application starts.
ApplicationConfigobject, which provides the set of configurations for thebootstrapApplicationmethod.
The ApplicationConfig contains only one member: the Providers array. In the providers array, we register every service that needs to be made available to the root component and all of its children. Hence we need to add the Angular router related services in the providers array.
The ApplicationConfig is configured in the file app.config.ts.
import { ApplicationConfig } from '@angular/core';
import { provideRouter } from '@angular/router';
import { appRoutes } from './app.routes';

export const appConfig: ApplicationConfig = {
  providers: [provideRouter(appRoutes)]
};
The provideRouter is a helper method that registers the services related to Angular Router and configures the routing. This is where we register the routes we created.
provideRouter(appRoutes)
Map Action to Routes
Next, we need to bind the click event of the link, image, or button to a route. This is done using the routerLink directive.
<a class="nav-link" [routerLink]="['contact']">Contact us</a>The routerLink directive accepts an array of route names along with parameters. This array is called a Link Parameters array.
When the application requests navigation to the route “contact”, the router looks in the routes array and activates the instance of the component associated with the route “contact”, which is ContactComponent. The browser address location & history are updated to /contact
Choose where you want to display
Finally, we need to tell the angular where to display the view. This is done using the RouterOutlet directive as shown. We will add the following directive to the root component
<router-outlet></router-outlet>Standalone Components with Angular Router: Example application
Let’s build an Angular Router example application with two components and build a navigation system. You can download the source code from here
Create a new Angular Standalone project
Go ahead and create a new Angular project routingdemo using the standalone API.
On Angular 17 or higher
Angular 17 and above creates the Angular projects using Standalone Components as the default option.
ng new routingdemo Create the following components. Again no need to specify the standalone attribute as they are defaults
ng g c home/HomeComponent --inline-style --inline-template  --skip-tests --flat
ng g c home/ContactComponent --inline-style --inline-template  --skip-tests --flat
ng g c ErrorComponent --inline-style --inline-template  --skip-tests --flat
On Angular 16
In Angular 16, you need to include the --standalone flag to create the standalone project.
ng new routingdemo --standaloneSimilarly, you need to include the standalone attribute while creating the components.
ng g c home/HomeComponent --inline-style --inline-template --standalone --skip-tests --flat
ng g c home/ContactComponent --inline-style --inline-template --standalone --skip-tests --flat
ng g c ErrorComponent --inline-style --inline-template --standalone --skip-tests --flat
Create Routes to Component
We created HomeComponent & ContactComponent in the previous section. Now let us create routes to them.
It is good practice to create all our route configurations in a separate file. The ng new automatically creates app.routes.ts under the app folder. Open it and add the following routes.
import { Routes } from '@angular/router';
import { HomeComponent } from './home/home.component';
import { ContactComponent } from './home/contact.component';
import { ErrorComponent } from './error.component';

export const appRoutes: Routes = [
  { path: 'home', component: HomeComponent },
  { path: 'contact', component: ContactComponent },
  { path: '', redirectTo: 'home', pathMatch: 'full' },
  { path: '**', component: ErrorComponent }
];
First, we import Routes from the router module
import { Routes } from '@angular/router';Next, we need to import all the components, that require routing. We have imported Home, Contact and Error Components
Finally, we define a constant (appRoutes) that contains the Routes that we wish to create. The Routes is an array of route configuration objects (or route objects).
Each route has several configurable properties.
Our First route is
{ path: 'home', component: HomeComponent },The first parameter is the path, which represents the URL path segment. The second parameter is the component to display. The above route configuration means, when you navigate to /home (URL path segment), then the HomeComponent gets displayed.
Note that the path does not contain the leading slash
The next route is similar to the home route
{ path: 'contact', component: ContactComponent },
Default Route
The third route is default route
{ path: '', redirectTo: 'home', pathMatch: 'full' },When the path is empty, it indicates a default route. The default route is redirected to the home path using the RedirectTo argument. This route means that, when you navigate to the root of your application /, you are redirected to the home path (/home), which in turn displays the HomeComponent.
Note, that we have pathMatch argument set to ‘full’. The pathMatch tells the Router how to match the URL. When it is set to full, the path is matched to the entire URL.
Every route ends in an empty space for ex: /contact/’’. If pathMatch is not set to full then the router will apply the redirect to every route, which results in the error.
Wild Card Route
The next route is the wildcard route
The “**” matches every URL. The Router will display the ErrorComponent.
Order matters: First one wins
Note that the order of the route is important. The Routes are matched in the order they are defined. The Router always returns the first matching route (first-match-wins strategy)
Since the wildcard route (**) matches every URL. we should be place them last.
Now, we have set up our routes. Now we will add these routes to our application.
Register the Routes
We register the routes with the Angular Router Service, when we configure it during the application startup.
To do that open the app.config.ts. This file created automatically by the ng new.
import { ApplicationConfig } from '@angular/core';
import { provideRouter } from '@angular/router';
import { appRoutes } from './app.routes';

export const appConfig: ApplicationConfig = {
  providers: [provideRouter(appRoutes)]
};
import the appRoutes that we created in the previous step.
import { appRoutes } from './app.routes';Pass the routes as the argument to the provideRouter method. provideRouter method registers the routes in the Angular Router service and adds all the router related services into the Providers array of the ApplicationConfig.
export const appConfig: ApplicationConfig = {
  providers: [provideRouter(appRoutes)]
};
The ApplicationConfig is passed to the bootstrapApplication at the time of application startup.
import { bootstrapApplication } from '@angular/platform-browser';
import { AppComponent } from './app/app.component';
import { appConfig } from './app/app.config';

bootstrapApplication(AppComponent, appConfig)
.catch((err) => console.error(err));The next step is to design the navigation. We use AppComponent to handle the navigation. It will display the menu option, which the user can click to navigate to a view.
To do that we need to use the RouterLink & RouterOutlet directives from the Angular Router Module. Hence we need to import them to AppComponent.
In the older module based API, we used to import the Router Module in the NgModule. All the Components, Directives and Pipes that are part of the NgModule would automatically gets to use them.
But, in Standalone API, there is no NgModule. Hence whatever the component needs, we need to import it in the component itself.
Open the app.component.ts.
import { Component } from '@angular/core';
import { RouterModule } from '@angular/router';

@Component({
  selector: 'app-root',
  standalone: true,
  imports: [RouterModule],
  templateUrl: './app.component.html',
  styleUrl: './app.component.css'
})
export class AppComponent {
  title = 'routingdemo';
}
Add the RouterModule to the imports array.
imports: [RouterModule],Since, we are using RouterLink & RouterOutlet from the Router Module, we can import them, instead of importing the entire Router Module.
imports: [RouterLink, RouterOutlet],Now, Open the app.component.html.
<div class="container">
  <nav class="navbar navbar-expand-lg navbar-light bg-light">
    <div class="container-fluid">
      <a class="navbar-brand" href="#">{{ title }}</a>
      <button
        class="navbar-toggler"
        type="button"
        data-bs-toggle="collapse"
        data-bs-target="#navbarSupportedContent"
        aria-controls="navbarSupportedContent"
        aria-expanded="false"
        aria-label="Toggle navigation"
      >
        <span class="navbar-toggler-icon"></span>
      </button>
      <div class="collapse navbar-collapse" id="navbarSupportedContent">
        <ul class="navbar-nav me-auto mb-2 mb-lg-0">
          <li class="nav-item">
            <a class="nav-link" [routerLink]="['home']">Home</a>
          </li>
          <li class="nav-item">
            <a class="nav-link" [routerLink]="['contact']">Contact us</a>
          </li>
        </ul>
      </div>
    </div>
  </nav>

  <router-outlet></router-outlet>
</div>
We are using bootstrap to style our components. You will find the link to bootstrap libraries in the index.html
We use the routerLink directive to bind anchor tag elements to the route
          <li class="nav-item">
            <a class="nav-link" [routerLink]="['home']">Home</a>
          </li>
          <li class="nav-item">
            <a class="nav-link" [routerLink]="['contact']">Contact us</a>
          </li>
RouterLink is an attribute directive. We enclose it in a square bracket. The routerLink is then bound to the template expression, which returns a link parameters array. The Link Parameters array is the Parameters or arguments to the Route. The Angular Router module constructs the URL using the link parameters array
In the example above,( [routerLink]="['home']") the string “home” is passed to the routerLink directive. The Angular router constructs the url as /home for the anchor link.
When the user clicks on the link, the Angular Router uses the path to locate the route associated with the path and activates the component.
Display the component using Router-outlet
Finally, we need to tell Angular where to display the Component. To do that, we use the Router-outlet directive
The RouterOutlet is a directive that tells Angular where on our page we want to display the view.
<router-outlet></router-outlet>That’s it. Download the complete source code
Running the Application
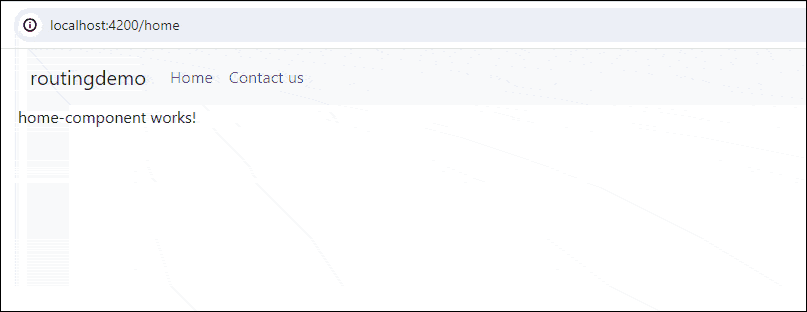
Go to http://localhost:4200, you should see the HomeComponent is rendered, which is the default root.
Type the invalid URL and you should see the ErrorComponent rendered.
Click on the menu options or Type the Back & forward button in the browser. Everything should work as intended.