This guide shows you how to migrate existing project to standalone components in Angular. ng generate command helps us to Migrate an existing Angular Project to Standalone Components. It will also migrate the directives and pipes to Standalone API. The Angular CLI takes care of the majority of the migration work, but there might be a need for a few minor changes from your end. In this article we will discuss the steps involved in migrating to standalone components in Angular in detail.
Table of Contents
Standalone Components Migration
The migration to standalone components process consists of three steps. All of them done using the ng generate command.
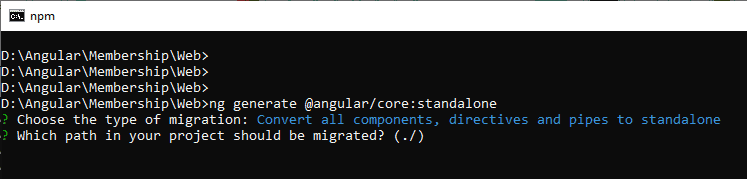
ng generate @angular/core:standalone When you run the above command, it will ask you to choose from the type of migration (or step) as shown below
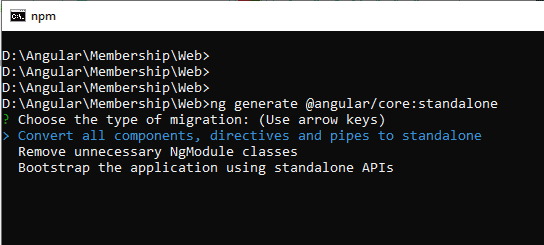
The three migration types are.
- Convert all components, directives and pipes to standalone
- Remove unnecessary NgModule classes
- Bootstrap the application using standalone APIs
These three steps are discussed below.
After choosing the migration type, you will be asked to specify the path (relative to the Project root). Use this if you the application is very large. Leaving it blank will migrate the entire application (The default path is ./ which points to the project route).
Migration Steps
There are three distinct migration steps. Before running the migration, you should know what to expect in each of those steps.
Convert all components, directives and pipes to standalone
This will look for every Component, Directive & Pipe and does the following
- Add the standalone flag.
- Populates the imports array of the Component with its dependencies.
- Removes the Component from the declaration array of NgModule.
- This step will not mark the
AppComponentas standalone as it is marked as bootstrap component in the AppModule.
For example
LoginComponent before migration
@Component({
    templateUrl: 'login.component.html',
})
export class LoginComponent implements OnInit {

}
LoginComponent after migration to Standalone Component.
@Component({
    templateUrl: 'login.component.html',
    standalone: true,
    imports: [CommonModule, ReactiveFormsModule]
})

export class LoginComponent implements OnInit {
}
LoginModule before migration.
@NgModule({
  declarations: [ LoginComponent, ChangePasswordComponent ],
  imports: [ RouterModule.forChild(appRoutes), SharedModule ],
  providers: [],
  exports : [ ],
  bootstrap: []
})
export class LoginModule { }
LoginModule after migration. You can see that LoginComponent & ChangePasswordComponent are removed from the declarations array.
@NgModule({
  declarations: [ ],
  imports: [ RouterModule.forChild(appRoutes), SharedModule ],
  providers: [],
  exports : [ ],
  bootstrap: []
})
export class LoginModule { }
Remove unnecessary NgModule classes
If we migrate all Components, Directives & Pipes, then NgModules are no longer necessary. This step will remove all the NgModules that are safe to remove.
A module is considered “safe to remove” if it:
- Has no declaration, providers & bootstrap components.
- Module does not have class Members.
- Has no
importsthat reference aModuleWithProvidersor reference a module that cannot be removed.
It is very likely that it will not be able to remove all the NgModules. For Example, if NgModule contain RouterModule.forChild(routes) or RouterModule.forRoot(routes), Migration step will not delete it. You need to change them manually.
This will not touch the AppModule (i.e. root module of the application)
Bootstrap the application using standalone APIs
This last step will remove the AppModule and configure the application to bootstrap using the standalone API. Run this step only after you completed previous steps for the entire application.
- The Module based applications are bootstrapped (
main.ts) using thebootstrapModulefunction. This step will remove that. Instead it will use thebootstrapApplicationto bootstrap the application using the theAppComponent. - The Migration step will autofill the
providersarray from the existingAppModule. - The
AppModulewill be deleted. - It will also mark the
AppComponentas Standalone.
The following is the example main.ts file before migration.
import { enableProdMode } from '@angular/core';
import { platformBrowserDynamic } from '@angular/platform-browser-dynamic';

import { AppModule } from './app/app.module';
import { environment } from './environments/environment';

if (environment.production) {
  enableProdMode();
}

platformBrowserDynamic().bootstrapModule(AppModule)
  .catch(err => console.log(err));
main.ts after migration.
import { enableProdMode, importProvidersFrom } from '@angular/core';
import { platformBrowserDynamic } from '@angular/platform-browser-dynamic';

import { environment } from './environments/environment';
import { AppComponent } from './app/app.component';
import { LoginModule } from './app/login';
import { SharedModule } from './app/shared';
import { routing } from './app/app.routing';
import { CommonModule } from '@angular/common';
import { BrowserModule, bootstrapApplication } from '@angular/platform-browser';
import { HTTP_INTERCEPTORS } from '@angular/common/http';
import {  AuthenticationService, HttpInterceptorService, SharedService } from './app/core';

if (environment.production) {
  enableProdMode();
}

bootstrapApplication(AppComponent, {
    providers: [
        importProvidersFrom(BrowserModule, CommonModule, routing, SharedModule, LoginModule),
         AuthenticationService,
        {
            provide: HTTP_INTERCEPTORS,
            useClass: HttpInterceptorService,
            multi: true
        },
        SharedApiService
    ]
})
  .catch(err => console.log(err));
Running the Migration
Now, you know what each steps does, you can proceed with the migration. Before proceeding ensure that
- You are using Angular 15.2 or above. Prior versions of the Angular does not support standalone components.
- Ensure that Application builds & runs correctly.
- Commit any pending changes in your repository. Start with a clean slate.
- Run the migration in a separate branch and commit after each step.
The migration runs in three distinct operations. You should verify the app after each step and may need to make necessary changes. Remember to commit changes in a separate branch.
If you are migrating a large application, then you may consider migrating specific paths at a time.
Step 1: Convert all components, directives and pipes to standalone
run the command ng generate @angular/core:standalone and select “Convert all components, directives and pipes to standalone“.
Once done, test your application & commit your changes.
Step 2: Remove unnecessary NgModule classes
run the command ng generate @angular/core:standalone and select “Remove unnecessary NgModule classes“.
Once done, test your application & commit your changes.
Step 3: Bootstrap the application using standalone APIs
If you migrating each path, then ensure that you complete the Step 1 & Step 2.
run the command ng generate @angular/core:standalone and select “Bootstrap the application using standalone APIs“.
Test you application after the above step.
The migration script may fail to migrate some parts of the application. In such cases it will leave a TODO comment. Check all those comments and take necessary action.
That it.

