We can add Validators dynamically using the SetValidators or SetAsyncValidators. This method is available to FormControl, FormGroup & FormArray.
There are many use cases where it is required to add/remove validators dynamically to a FormControl or FormGroup. Usually when you have a Form Field, whose value depends on another Form Field.
Table of Contents
Adding the Validators Using the SetValidators
Syntax
The setValidators programmatically adds the sync validators. This method will remove all the previously added sync or async validators.
setValidators(newValidator: ValidatorFn | ValidatorFn[]): void
Examples:
1 2 3 | this.myform.controls["mobile"].setValidators(Validators.required); |
1 2 3 | this.myform.controls["mobile"].setValidators([Validators.required,Validators.minLength(10)]); |
setAsyncValidators
The setAsyncValidators programmatically add the Async validators.
1 2 3 | setAsyncValidators(newValidator: AsyncValidatorFn | AsyncValidatorFn[]): void |
setValidators overwrites all existing Validators. Hence it is very important to include all the validators that we want in the setValidators method
Removing Validators Using clearValidators
There is no option that exists, which can remove an individual validator. Use clearValidators to remove all the validators of a control.
1 2 3 | this.myForm.controls['controlName'].clearValidators() |
Update Validation Status
Removing or adding the validators does not change the validity status of the form or the control immediately. The Validators run only when we change the value of the field.
We can force angular to run the validations using the updateValueAndValidity method.
1 2 3 | this.myForm.controls['controlName'].updateValueAndValidity() |
SetValidators Example
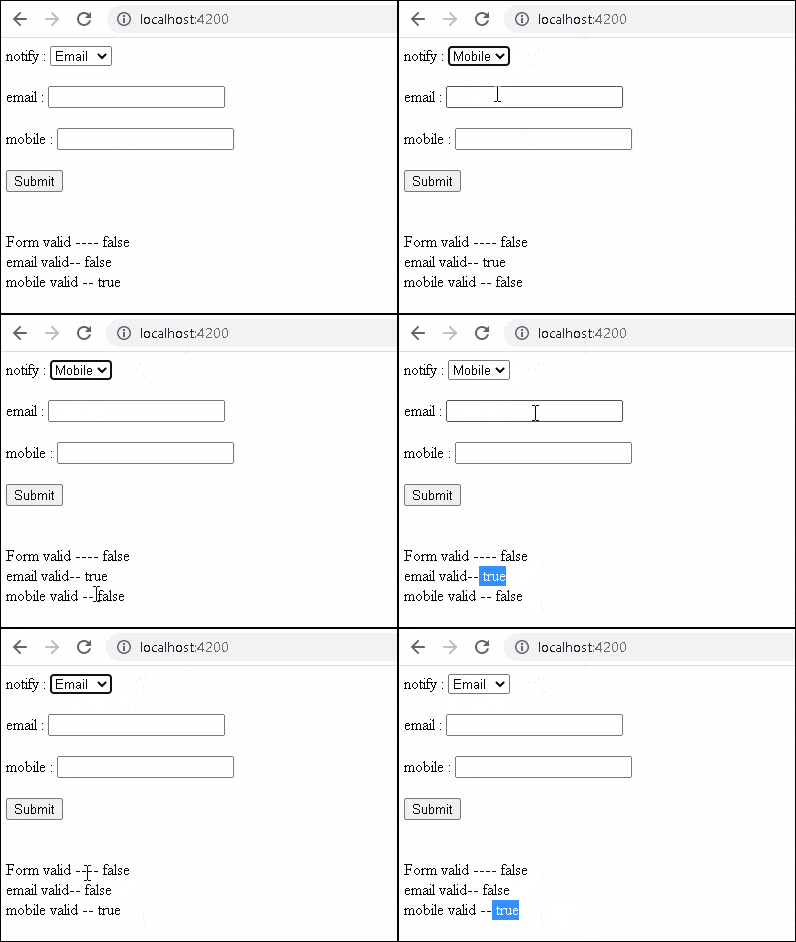
The following example, shows how to use the SetValidators in Angular
We have two fields email & mobile.
The user needs to choose, how he wants the system to notify him, using the drop-down field notifyVia. The drop-down has two options email & Mobile.
If the user chooses email, then we need to make the email field as a Required field. If he chooses the Mobile, then we must make the mobile field as Required field.
We subscribe to the valueChanges event of the notifyVia to listen for changes and invoke the changeValidators method.
In the changeValidators method, we check the value of notifyVia and add or remove the required validator using the setValidators. We also add the email validator (for email field) or MinLength validator (for mobile field). To remove the validator, we use the method clearValidators()
Finally, we use the updateValueAndValidity method, which forces the angular to update the validity status of the control.
1 2 3 4 5 6 7 8 9 10 11 12 13 14 15 16 17 18 19 20 21 22 23 24 25 26 27 28 29 30 31 32 33 34 35 36 37 38 39 40 41 42 43 44 45 46 47 48 49 50 | import { Component } from '@angular/core'; import { FormBuilder, FormGroup, FormControl, Validators } from '@angular/forms'; @Component({ selector: 'app-root', templateUrl: './app.component.html', }) export class AppComponent { title = 'setValidators'; myform:FormGroup; notifyOptions = ["Email" ,"SMS"] constructor(private fb: FormBuilder) { this.myform = this.fb.group({ email: new FormControl(''), mobile: new FormControl(''), notifyVia: new FormControl('',Validators.required), }); this.myform.get("notifyVia").valueChanges .subscribe(data=> { this.changeValidators() }) } changeValidators() { console.log(this.myform.get("notifyVia").value) if (this.myform.get("notifyVia").value=="Email") { this.myform.controls["email"].setValidators([Validators.required,Validators.email]); this.myform.controls["mobile"].clearValidators(); } else { this.myform.controls["email"].clearValidators(); this.myform.controls["mobile"].setValidators([Validators.required,Validators.minLength(10)]); } this.myform.get("email").updateValueAndValidity(); this.myform.get("mobile").updateValueAndValidity(); } } |
The component template
1 2 3 4 5 6 7 8 9 10 11 12 13 14 15 16 17 18 19 20 21 22 23 24 25 26 27 28 29 30 31 32 | <form [formGroup]="myform"> notify : <select formControlName="notifyVia"> <option *ngFor="let item of notifyOptions" [ngValue]="item">{{item}}</option> </select> <br> <br> email : <input type="text" formControlName= "email"/> <br> <br> mobile : <input type="text" formControlName= "mobile"/> <br> <br> <button type="submit" >Submit </button> </form> <br> <br> Form valid ---- {{myform.valid}} <br> email valid-- {{myform.controls['email'].valid}} <br> mobile valid -- {{myform.controls['mobile'].valid}} <br> |

References
Read More
- Angular Reactive Forms Validation
- Custom Validator in Angular Reactive Form
- Custom Validator with Parameters in Angular
- Inject Service Into Validator in Angular
- Template-driven form validation in Angular
- Custom Validator in Template Driven Forms in Angular
- Angular Async Validator Example
- Cross Field or Multi-Field Validation Angular


Thank you , it’s good
Thank you. You saved my day.
Cool run-down.
updateValueAndValidity()Saved my day on a conditional validator that kept throwing meNG0100: Expression has changed after it was checked...So, thanks for that!
An idea I had because I worried this would overload my form validation:
If you have a complex form and like to understand how this interferes with the validation process, introduce a custom
nullvalidator on fields you worry about and put a log-line in it the validator. The validator should always returnnulland will therefore not affect the validation, but every time validation is triggered it will fire a log.Was looking a solution for NG0100 error. Your comment helped me. Thanks a lot!
After using ‘setValidators’ the field start with ‘ng-valid’ even it’s not. only after modify it’s reset. How to use validate and stay without ng-valid or invalid at start ?
Run updateValueAndValidity() after using ‘setValidators’