In this tutorial, we look at how ASP.NET core Model Validation works. Often the data entered by the user is not valid and cannot be saved into the database. The entered data may contain a typo or user may intentionally enter the inappropriate data. Hence, we need to validate the user input before storing it in the database. The ASP.NET Core gives us Model Validator, which uses the validation attributes to validate the model, which makes our task easier. We also take a look at ModelState and how to use it. Finally, we look at the list of Validation attributes.
Table of Contents
Introduction to Model Validation
The Form Data is posted to Controller action is automatically mapped to the action parameter by the Model Binder. We already looked at how Model Binding works in ASP.NET Core.
The Model needs to be validated for the correctness. These validations can be done at the client side before sending data to the server or at the server side when the data is received from the client. The client-side validation is important because of better user experience, while the server side validation should ensure that the invalid data does not enter the system.
Importance of client-side Validation
- Better User experiences
- Since the validation happens in the client’s browser, the Response is faster and immediate.
- Saves Precious server resources bandwidth by Minimizing the Server round trips
- Since there is no HTTP Request/response round trip involved in the validation, It saves bandwidth & Server resources
Importance of server-side Validation
The client-side validation gives a better user experience, but not trustworthy. It may fail for many no of reasons. For Example.
- The Javascript may be disabled in the end users browser.
- The Malicious user can send the data directly to the user, without using the application or use some interceptor modify the HTTP Request.
- An Error in Javascript code may result in validation to succeed although data is invalid.
Hence, it is important to validate the data completely at the server side, even though you have done those validations at the client side.
Explicitly Validating a Model
Once you received the model in the controller, you can validate the model programmatically as shown below.
if (string.IsNullOrEmpty(model.Name))
{
    //Validation Failed
    //Send the list of errors to client
}
The above code just checks for whether the Name property is empty or null.
The above code works fine, but you may have several such properties in the model, where you need to check for the similar condition. Also, we need to figure out how to send the validation error messages to the client side so as to display it to the user.
The Model Validator does all these for us, without writing a single line of code.
How Model Validation works
We learnt how Model binding works in ASP.NET Core applications. When the HTTP Request arrives Model binder is invoked before passing the control to controller action method. The Model binder not only binds the value to the action parameter but also validates them by using the Model Validator.
The Model Validator runs after the model binding and runs a series of validations on each property of the model based on the attributes that you set on the model property. These attributes are called Validation attributes and contain the code, which is used by the Model Validator to validate the model.

All these Validations runs on the server side,
The ASP.NET Core has lots of built-in Validation attributes, which can be added to the properties in a model, to enforce the validation rule. These Validation attributes also known as DataAnnotations and are available in System.ComponentModel.DataAnnotations namespace. You need to import it in your ViewModel to use them.
For Example, you can mark the field as required using the attribute [Required].
[Required]
Public string Name {get;set;}
The Model binder does not throw any errors if the validation failed. But it updates the ModelState object with the list of errors and sets the isValid property to false before it invokes the action method.
We need to check the ModelState.isValid property to know whether the validation is failed and take appropriate action based on that like returning the list of errors to the client
if (ModelState.IsValid)
{
    //Model is valid. Call Service layer for further processing of data
} else {
    //Validation failed. Return the model to the user with the relevant error messages
}
How to Use Validation Attributes
Updating the Model with Data Annotation attribute
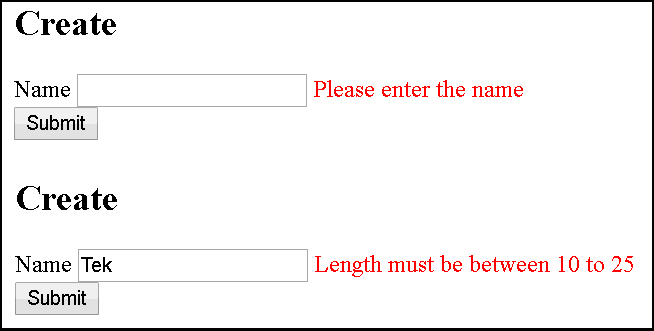
In the Model, Property adds the Data Annotation Attribute as shown below. The code below adds two validation attributes to the Name property. It also passes the custom error message to be displayed to the user in case of error.
[Required(AllowEmptyStrings =false,ErrorMessage ="Please enter the name")]
[StringLength(maximumLength:25,MinimumLength =10,ErrorMessage ="Length must be between 10 to 25")]
public string Name { get; set; }
View to display Validation error messages
In the View, use the Validation tag helpers to display the error message to the user.
The asp-validation-summary tag helper displays the list of Model Only Validation error messages at the top of the form. It is attached to the div element and placed at the top of the form.
The asp-validation-for displays the error message of the Name property right next to it. It is attached to the span element and placed next to the property.
The Validation tag helpers insert the field-validation-error & validation-summary-errors classes in the HTML if the errors are found. Hence we added the styles to display the error messages in the red on those classes.
You can read more about Validation Tag Helpers from this tutorial.
@addTagHelper *, Microsoft.AspNetCore.Mvc.TagHelpers
@model ASPNetCoreForms.Models.ProductEditModel

@{
    ViewData["Title"] = "Create";
}

<style>
    .field-validation-error {
        color: red
    }
    .validation-summary-errors {
        color: red
    }
</style>

<h2>Create</h2>

<form action="/home/create" method="post">

    <div asp-validation-summary="ModelOnly">
        <span>Please correct the following errors</span>
    </div>

    <label asp-for="Name">Name</label>
    <input asp-for="Name" />
    <span asp-validation-for="Name"></span>
    <br />

    <input type="submit" name="submit" />
</form>
Check ModelState.isValid in the controller Action
Finally, in the Controller action method, check if ModelState.IsValid to check if there is any error. In case of error return the View(model) back to the user.
We passing the model to view so that it can repopulate the values entered by the user. The Validation errors are inserted in the View by the Validation tag helpers.
[HttpPost]
public IActionResult Create(ProductEditModel model)
{
    string message = "";

    if (ModelState.IsValid)
    {
         message = "product " + model.Name + " created successfully";
    }
    else
    {
        return View(model);
    }
    return Content(message);
}
The following image shows the validation error messages displayed.
ModelState
The Model Binder updates the ModelState object, with the result of Model Binding & validation. The ModelState keeps track of the details of the values submitted to model along with the validation errors that occurred for each property of the model.
The ModelState is a Property of the ControllerBase class and is of type ModelStateDictionary Object.
ModelState properties
| Property | Type | Remarks |
|---|---|---|
| Keys | KeyEnumerable | Gets the key sequence. The collection of model properties' names. Keys Property gives you Access to state of individual model properties |
| Values | ValueEnumerable | The model properties' values Get the value sequence. |
| MaxAllowedErrors | Gets or sets the maximum allowed model state errors in this instance of ModelStateDictionary. Defaults to 200. | |
| HasReachedMaxErrors | bool | Gets a value indicating whether or not the maximum number of errors have been recorded. |
| IsValid | bool | Whether or not the model is valid |
| Item | ModelStateEntry | Access to individual model properties' state |
| Count | Int | The count of model properties |
| ErrorCount | int | The number of errors that are added to this instance of ModelStateDictionary via AddModelError or TryAddModelError. |
Methods of ModelState
AddModelError
Adds the specified error message to the Errors instance that is associated with the specified key.
Clear
Removes all keys and values from this instance of ModelStateDictionary.
ClearValidationState(String)
Clears ModelStateDictionary entries that match the key that is passed as the parameter.
GetFieldValidationState(String)
Returns the aggregate ModelValidationState for items starting with the specified key.
GetValidationState(String)
Returns ModelValidationState for the key.
TryAddModelError(String, Exception, ModelMetadata)
Attempts to add the specified exception to the Errors instance that is associated with the specified key.
Example of using ModelState
Getting the List of Errors
Looping through the keys to get the list of Errors in the ModelState
foreach (var modelStateKey in ModelState.Keys)
{
    var modelStateVal = ModelState[modelStateKey];
    foreach (var error in modelStateVal.Errors)
    {
        var key = modelStateKey;
        var errorMessage = error.ErrorMessage;
    }
}
Adding Custom Error Messages
Not all errors can be validated by the Model Validator. For Example, you got a valid Product Model, but the Product already exists in the Database.
In such cases, you can add the custom error messages to the ModelState and send it back to the user
if (ModelState.IsValid) {
    If (someService.IsProductExists(model)) {
        ModelState.AddModelError("", “Product already exists”);
        return View(model);
    } else {
        return View(model);
    }
}
List of Validation Attributes
We looked at Required & StringLength attributes in the previous example. The System.ComponentModel.DataAnnotations namespace contains several such attributes. Here is the list of available attributes.
CreditCard
Validates the property has a credit card format.
Example
[CreditCard(ErrorMessage ="Please enter a valid card No")]
public string creditCard { get; set; }
Compare
Compares the value with the value of other properties.
Example
Compare attribute is applied to the confirmPassword field. The OtherProperty argument property name is passed (“NewPassword”)
If ConfirmPassword does not match with the NewPassword, then the validation fails.
[Required(AllowEmptyStrings =false,ErrorMessage ="Please enter a valid password")]
public string NewPassword { get; set; }

[Compare(otherProperty:"NewPassword", ErrorMessage ="New & confirm password does not match")]
public string ConfirmPassword { get; set; }
Alternatively, you can make the comparison in an property get method and do some additional checking etc.
[Required(AllowEmptyStrings = false, ErrorMessage = "Please enter a valid password")]
public string NewPassword { get; set; }

[Compare(otherProperty: "validatePassword", ErrorMessage = "New & confirm password does not match")]
public string ConfirmPassword { get; set; }

public string validatePassword
{
    get
    {
       //Do Some calculations here
       return this.NewPassword;
    }
}
EmailAddress
Validates the property has an email format.
Example
[EmailAddress(ErrorMessage ="Please enter a valid email")]
public string EmailID {get;set;}
<label asp-for="EmailID"></label> <input asp-for="EmailID" /> <span asp-validation-for="EmailID"></span>
The following HTML generated
<label for="EmailID">EmailID</label>
<input type="email" data-val="true" data-val-email="Please enter a valid email" id="EmailID" name="EmailID" value="" />
<span class="field-validation-valid" data-valmsg-for="EmailID" data-valmsg-replace="true"></span>
<br />
As you can see in the HTML, the type attribute is set to email. In this case, the browser displays an error message if there is an invalid email ID.
Phone
Validates the property has a telephone format.
Example
[Phone(ErrorMessage = "Please enter a valid Phone No")]
public string PhoneNo { get; set; }
<label asp-for="PhoneNo"></label> <input asp-for="PhoneNo" /> <span asp-validation-for="PhoneNo"></span>
<label for="PhoneNo">PhoneNo</label>
<input type="tel" data-val="true" data-val-phone="Please enter a valid Phone No" id="PhoneNo" name="PhoneNo" value="" />
<span class="field-validation-valid" data-valmsg-for="PhoneNo" data-valmsg-replace="true"></span>
<br />
Range
Enables you to validate whether the value of a property falls between a specified range of values.
[Range(minimum:100,maximum:200, ErrorMessage = "Please enter a valid no between 100 & 200")]
public int Range { get; set; }
<label asp-for="Range"></label> <input asp-for="Range" /> <span asp-validation-for="Range"></span>
<label for="Range">Range</label> <input type="number" data-val="true" data-val-range="Please enter a valid no between 100 & 200" data-val-range-max="200" data-val-range-min="100" data-val-required="The Range field is required." id="Range" name="Range" value="0" /> <span class="field-validation-valid" data-valmsg-for="Range" data-valmsg-replace="true"></span> <br />
RegularExpression
Validates that the data matches the specified regular expression.
Example
[RegularExpression(pattern: "^Mr\\..*|^Mrs\\..*|^Ms\\..*|^Miss\\..*", ErrorMessage ="Name must start with Mr./Mrs./Ms./Miss.")]
public string FullName { get; set; }
Required
Makes a property required. Enables you to mark a property as required.
The Non-nullable value types (such as decimal, int, float, and DateTime) are inherently required and don’t need the Required attribute. The app performs no server-side validation checks for non-nullable types that are marked Required.
StringLength
Validates that a string property has at most the given maximum length.
Example
[StringLength(maximumLength: 25, MinimumLength = 10, ErrorMessage = "Length must be between 10 to 25")]
public string Name { get; set; }
Url
Validates the property has a URL format.
[Url(ErrorMessage ="Please enter a valid URL")]
public string Url { get; set; }
<label asp-for="Url"></label> <input asp-for="Url" /> <span asp-validation-for="Url"></span>
The following HTML generated
<label for="Url">Url</label>
<input type="url" data-val="true" data-val-url="Please enter a valid URL" id="Url" name="Url" value="" />
<span class="field-validation-valid" data-valmsg-for="Url" data-valmsg-replace="true"></span>
<br />
Summary
We looked at How Model Validator works in ASP.NET Core applications. This Validation happens at the Server side. You also need to validate the Model at the client side, which is covered in the next tutorial.


Gracias me ayudo mucho para iniciar la programacion asp.net core 3.1 con visual studio 2019