In this Visual Studio Crystal Reports tutorial, we will show you how to create Crystal reports using Visual Studio in a windows forms application. This Tutorial is created using Visual Studio 2013. You can also use Visual Studio 2010, Visual Studio 2012 or in Visual Studio 2015
Table of Contents
Requirement
For this lesson, you will need
- Microsoft Visual Studio 2013.
- SQL Server (2008 or above).
- SAP Crystal Reports for visual studio.
Read More
Download Crystal Reports for Visual Studio 2015
Download Crystal Reports Run time for Visual Studio 2015
Create Crystal Reports using Visual Studio

Create a Visual Studio Project
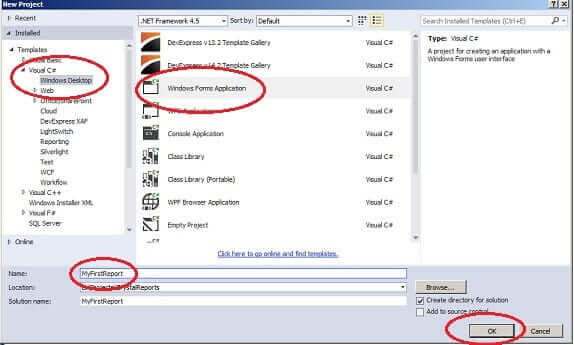
- Open Visual Studio and create a new project.
- Choose C#.
If you want to choose VB.NET you can go ahead and choose VB.NET. Designing reports with Crystal Reports is independent of the language or type of application. The steps are the same for both VB.NET & C#. For this Example, I will choose C# - Choose Windows Desktop Application.
- Under Various Application, Template chose Windows Forms Application
- Enter Name of the Project as MyFirstReport. Click OK. Visual C# Project is opened for you.
- Rename the form as frmCrystalReport
Create a Crystal Report
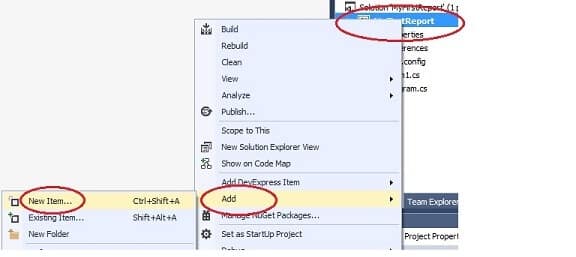
Now let us create a crystal Report. The following steps will guide you to add the new report
- Under Solution Explorer select your Project.
- Right Click and Add New Item. This displays the list of available templates.
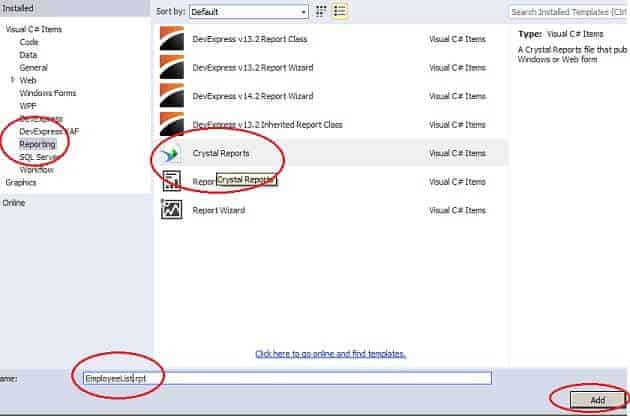

- Select Reporting Template Group.
- Scroll down to select the Crystal Report template.
- Enter the name as EmployeeList.
- Click on Add to Create your first Report. This will take you to Crystal Report Gallery.
Crystal Report Gallery
You can Create Report using the following options
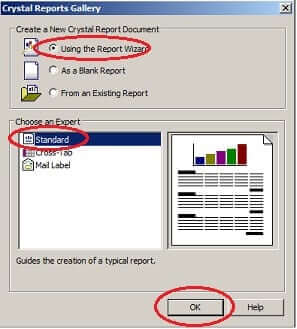
Report Wizard
- Using a Report Wizard.
Selecting this option will open the crystal report wizard which takes you through the various steps to help you in creating the report. - As a blank Report.
This will open a blank report. - From an Existing Report.
Here you are asked to select an existing report and the new report use.
Report Expert.
Crystal Report for Visual Studio comes with three report Experts.
- Standard Format.
This expert will create the standard report. - Cross Tab.
This expert will create a specialized report known as cross tab report. - Mail Label.
This expert will create mailing label report where data is displayed in a format that is suitable for use as address labels on envelopes.
In this example let us select Report Wizard and Standard Expert and then click on next. You will be taken to the Standard Report Creation wizard.
Standard Report Creation wizard
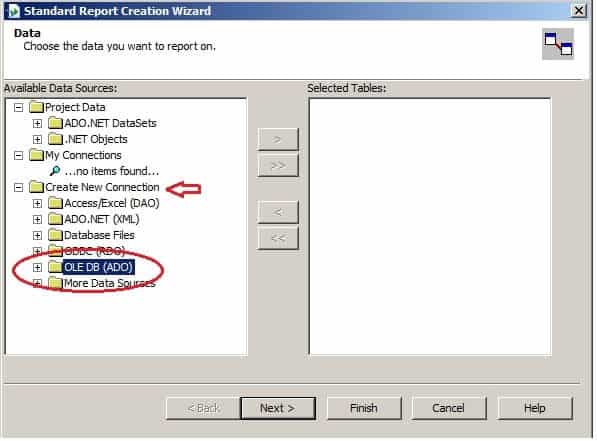
First dialogue box under this allows you to choose the data source that would be used in the report. It has three options
- Project Data.
This Option lists the data source connections already available in your project. - My Connections.
This Option lists the most recently used data source connection so that you can quickly add it your report. - Create New Connection.
This Option allows us to create a new connection to data source.
Let us Select OLE/DB option to connect to our data source. click on the plus sign right next to OLE/DB option. This will open the OLE/DB Dialog Box.
OLE/DB Dialog Box.

This Dialog Box Option displays the list of available OLE/DB Providers. Choose the appropriate OLE/DB Provider to connect to your data source.
Let us chose SQL Server Native Client 11.0 which is used to connect to the SQL Server Database. Click on next.
OLE/DB Connection Info Dialog Box.
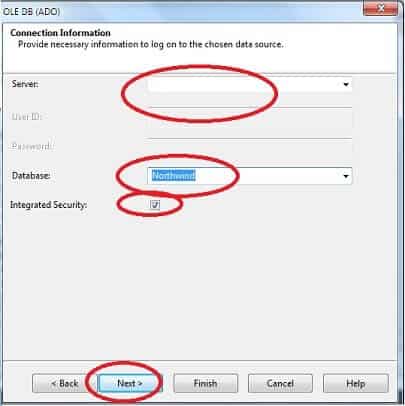
You will then see OLE/DB Connection Info Dialog Box. Here you need to input the database credential to connect to the data source.
Input server Name. You can either input the user id and password or choose Integrated security option. If you choose User id and password, then the crystal report will ask you for user id & Password while displaying the report. I will choose Integrated security.
Select the database from the drop-down. select northwind database. Click on next when you are done.
OLE/DB Advance Information Dialog Box

You will then see OLE/DB Advance Information Dialog Box. Make appropriate changes if any and click on Finish to go back to Standard Report Creation wizard.
Standard Report Creation wizard
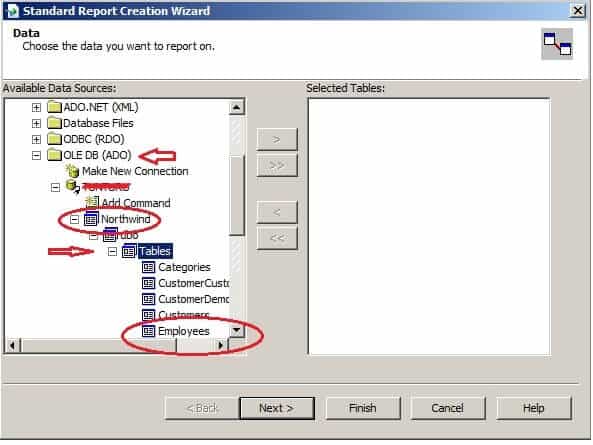
Northwind data connection we just made is displayed under OLE/DB option under Create the new connection.
Click on plus sign to expand to the database. Any Tables, Stored Procedures, Views under the selected data source connection is automatically displayed under the connection and is available to the report. Select the appropriate the table/Stored Procedures/View which you want in your report.

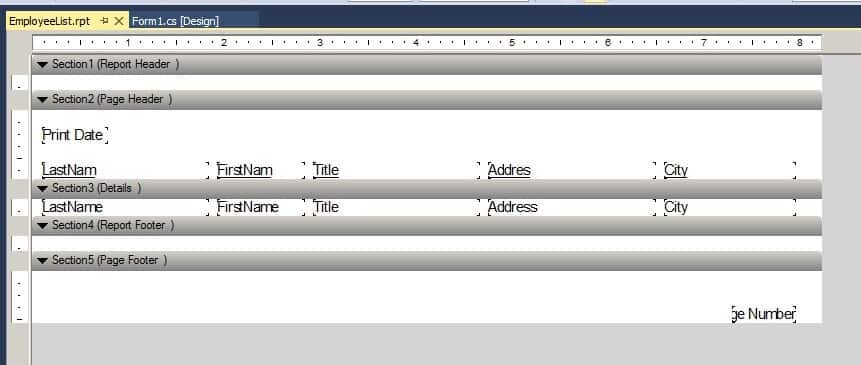
- Select employees table.
- Click right arrow key to add the table to the report.
The table will appear in the selected tables box on the right side. You can add more than one table to report. Click on next. You will be taken to Fields Dialog box.
Fields Dialog Box.
On the left side, you can see the list of fields from the employee table. These fields are now available to the report. You can select any field just by double-clicking on them. Selected fields will appear on fields to display box on the right side.
Select any field on the left side box and click on browse data and view the database values of the selected field.
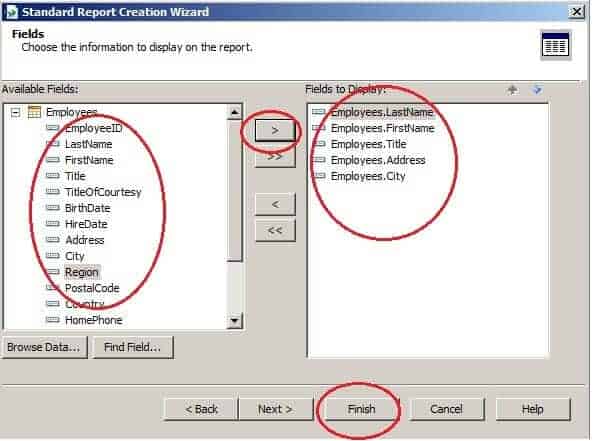
You can hold the control key and select multiple fields at once.
- Select FirstName, LastName, Title, Address, City.
- You can then click on right arrow key to add the fields to the report.
- The fields will appear on the right side box.
- You can move the field up and down by dragging the fields or using up or down arrow buttons.
- Place the fields in the order you want them to appear in the Report.
- Click on finish. You will then see the crystal report designer and the report is generated for you.
Crystal Report Viewer Control.
The next step is to show the crystal report in our windows form. To do this, you need to add Crystal Report Viewer control to the form. CrystalReportViewer Control is a usercontrol class and can be used as any other user control class. Primary Function of is to Display Reports.
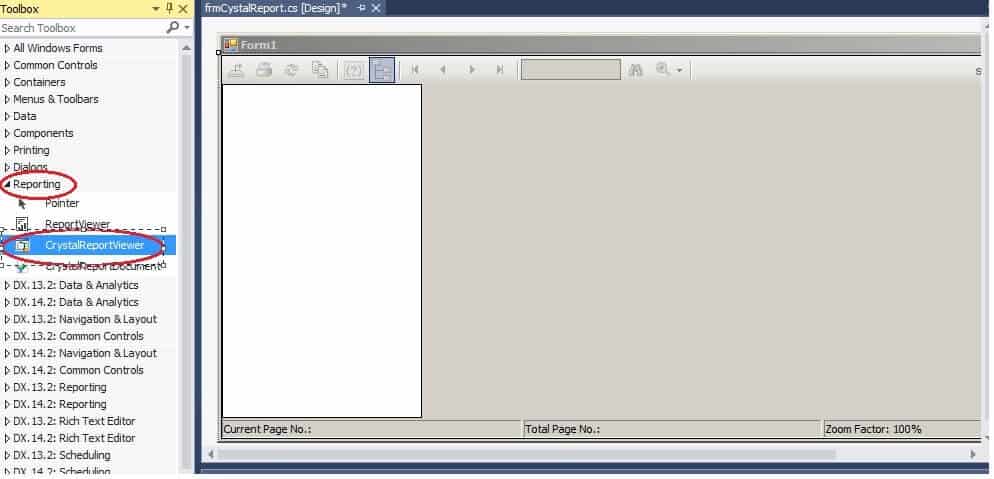
- Open the form frmcrystalreport which we have created.
- Locate Reporting tab in the toolbox.
CrystalReportViewer control is listed under the Reporting Tab in the toolbox. So go to the toolbox and locate the reporting tab. - Select the crystalReportViewer drag and drop it unto the form.
Good, now we have added the control.
Bind Report to Crystal Report Viewer Control
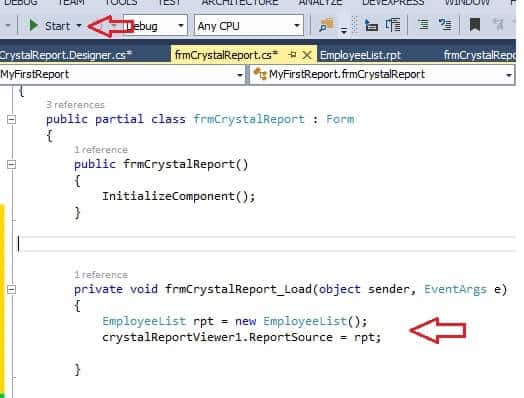
- Open frmCrystalReport.
- Go to the code-behind class.
- Under the form load event write the following code (Double click form header to create the event). Declare a variable rpt to hold the instance of the employeeListemployeeList is the name of the report which we have created.
Assign this to the report source property of the crystal report viewer control. The code will look like this.
private void frmCrystalReport_Load(object sender, EventArgs e)
{
    EmployeeList rpt = new EmployeeList();
    crystalReportViewer1.ReportSource = rpt;
}
Run Your First Report
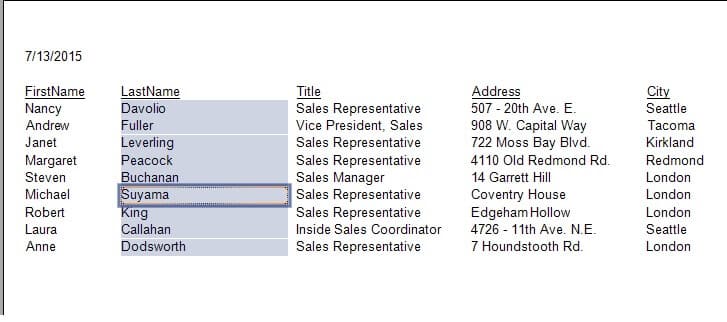
- Save the Project.
- Run the project.
Congratulations you have created your first crystal report
NOTES
If you have not selected Integrated security when creating the data source you may be prompted for the database user id and password. Just enter the user id and password to see the report.
Downloads
- Northwind database: Northwind.bak
- Source code : MyFirstReport


VS2022 crystal report doesn’t show in toolbox.
right click on View, then you will find the Toolbox, click on it and you will have it
I have installed crystal report sp34 for VS 2022 but its not showing up. Can you please guide me on this. Thanx in advance.
you can find it, if you Right click on View, then click Toolbox
Hi, I have prob in my vs. I’m using vs 2017. An exception of type ‘CrystalDecisions.CrystalReports.Engine.LoadSaveReportException’ occurred in CrystalDecisions.ReportSource.dll but was not handled in user code
You can refer to https://stackoverflow.com/questions/15828111/crystaldecisions-crystalreports-engine-loadsavereportexception-load-report-fail
hi, I got some error. I’m using vs 2015. Can you help me? Thanks
Error Report:
An exception of type ‘CrystalDecisions.CrystalReports.Engine.LoadSaveReportException’ occurred in CrystalDecisions.ReportSource.dll but was not handled in user code
Dear Friend,
I Have Installed Visual Studio 2015 Enterprise 32 bit and downloaded crystal report and run-time both 32 and 64 bits
but as I click on crystal report viewer in toolbox to add it into the form it all ways give me this message :
Failed to create component ‘Crystal Report Viewer’. the error message follows:
‘System.Runtime.InteropServices.COMExeption(0x8004D745): A reference to the component ‘Crystal Decisions.Windows.Forms’ already exists in the project.
at VSLangProj.Reference.Add(String bstrPath)
at
…..
at
…
Northwind db link is down can you kindly reupload it.
Regards,
Master Foo
i want use crystal report in web application so i want ask about this ,same steps or different?\
Please create crystal report tutorial with join (like inner join, left join and right join) with MySQL. Beacause i have problem with it. My Query is work fine. But, crystal report not showing the right reports. https://stackoverflow.com/questions/49485931/duplicating-data-in-crystal-report-with-mysql-and-c-sharp
Hi,
I am using this tutorial to learn how to create Crystal Reports using Visual Studio 2010.
I know SAP Crystal Reports (stand alone version) quite well, but this is my first experience with CR for VS.
I have successfully downloaded the files you recommend.
I have successfully created the Crystal Report shown in the example.
But I cannot add the Crystal Report Viewer.
In fact I don’t see it in the toolbox:
I see “ReportViewer”, but not “Crystal Report Viewer”.
What has gone wrong?
There are build errors and it seems some references relating to “CrystalDecisions” are missing.
What references are missing and how can I add them?
Thanks
Leon
Added:
When I work in C#, I can see the Crystal Reports Viewer in the Toolbox, provided I select .NET Framework 4 in the form properties.
But if I work in VB.NET, I cannot see the Crystal Reports Viewer.
Where has it gone?
Leon
Try uninstalling and installing Crystal Reports
The Latest Version in SP21. Download it from here
Download Crystal Reports
Great service..thank you