This tutorial will guide you on how to set up your Android phone or tablet to run Mobile App on the real device. The Android Emulator allows us to create as many virtual devices with different configurations to test our Apps. But it always a good idea to test our app on the actual device to check how it works.
Table of Contents
Run Android App on Real device
You need to follow these steps to make your Android Device ready so that you can test your App.
- Enable Developer Option
- Enable USB Debugging
- Install USB Drivers
- Connect the Device to Computer
Enabling Developer Option
To Enable USB Debugging, First, we need to enable Developer Option on the phone. Google since Android Version 4.2 has disabled the Developer Option. This was done so that people do not enable the USB Debugging Mode accidentally. Enabling USB Debugging Mode puts your device into the security risk.
For the devices with Android Version lower than 4.,2 the developer Option is already enabled.
To Enable the Developer Option to follow the steps
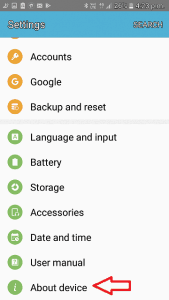
1. Go to settings and tap on About Phone / About Device or About Tablet Option
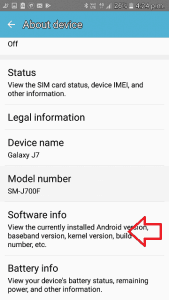
2. Tap on Software Info Option
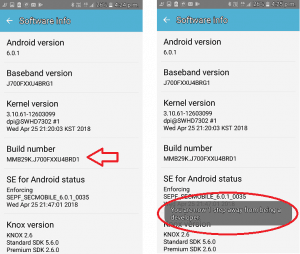
3. Locate Build Number and Tap on it seven times. You will see the message “You are now a developer” message. If the developer mode is already enabled then you will see the message “No need, developer mode has already been enabled”
Disable Developer option
In case you wish to disable the developer option you can go to Settings -> Application Manager. Select the Settings App. Select the Storage Option and clear the data. Note this will also reset your preferences within the settings menu.
Enable USB debugging
To enable USB Debugging, follow these steps
- Go to Settings
- Go to Developer Options
- Goto USB Debugging Option and enable it
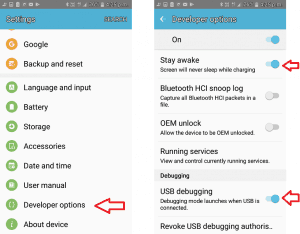
Enable Stay awake option
Under Settings -> Developer option enable the Stay awake option. This will ensure that the phone does not go to sleep mode while you are debugging the App
Install USB Drivers
You may be required to install the USB Drivers to connect your Android Phone to Computer. The USB Drivers can be downloaded from the Manufacturer’s website.
You can refer to the link to download the USB Driver based on your phone
The Above article also lists how to Install the USB Driver
Connect the Device to Computer
There are two ways you can connect the device to the PC to debug the nativescript applications.
- Connecting Over USB
- Connecting Over Wi-Fi
Connecting over USB
This is the simplest way. The USB cable usually comes with the Mobile Phone and connect it the PC and you should be good to go
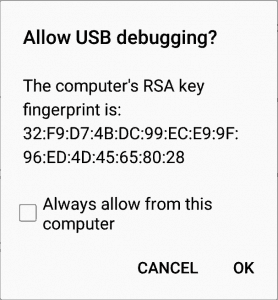
If the USB Debugging is enabled you will get a Message Allow USB Debugging?. Select Always Allow from the Computer. Click OK
Connecting Over Wi-Fi
Connect your device on the same wifi network as that of PC
Find out the IP Address of the Device. There are two ways you can find out the IP address.
- Goto settings -> About Device
- Tap on Status.
Or
- Goto settings -> Wi-Fi
- Tap on the Wifi Network connected
Locate the adb.exe. The adb is known as Android Debug Bridge is the tool that lets us communicate with a device. This tool is located under the platform-tools folder under the Android SDK folder.
The Android SDK folder can be found out by type SET ANDROID_HOME command. goto the folder

The adb is already running and listening on the USB port for the devices. To make it to listen to the TCP/IP Port number 5555 run the following command
adb tcpip 5555 Now, to connect the device run the following command
adb connect 192.168.0.103:5555Replace the IP 192.168.0.103 with the IP Address of your device.
To disable TCP/IP and enable the USB, run the command
adb usbTo Find out the available devices
adb devicesRun the App on Real Device
Now open the HelloWorld app, we created in the last tutorial and run tns run android. The App will be installed and run from the Device
Summary
In this tutorial, we learned how to run the NativeScript Android Application in Real Device.

Great impacts on your article
Thanks for Sharing