In this step by step tutorial, you will learn how to build the Entity Framework core console application. We will show you how to create the console application and install the required dependencies. Then, we will create an entity model. We will create DBContext, which is used to manage the entity model by creating a DBSet Property. Next, we will use the migration features of the Entity Framework Core (EF Core) to create the database. Finally, we will show you how to perform simple tasks like insert, query, update & delete operations on the model and persist the data into the database.
Table of Contents
Install Visual Studio 2019
The code in this requires you to install Visual Studio 2019. You can head over to the How to download & Install Visual Studio 2019.
Creating the Entity framework core Console Application
The first step is to create the EF Core console application.
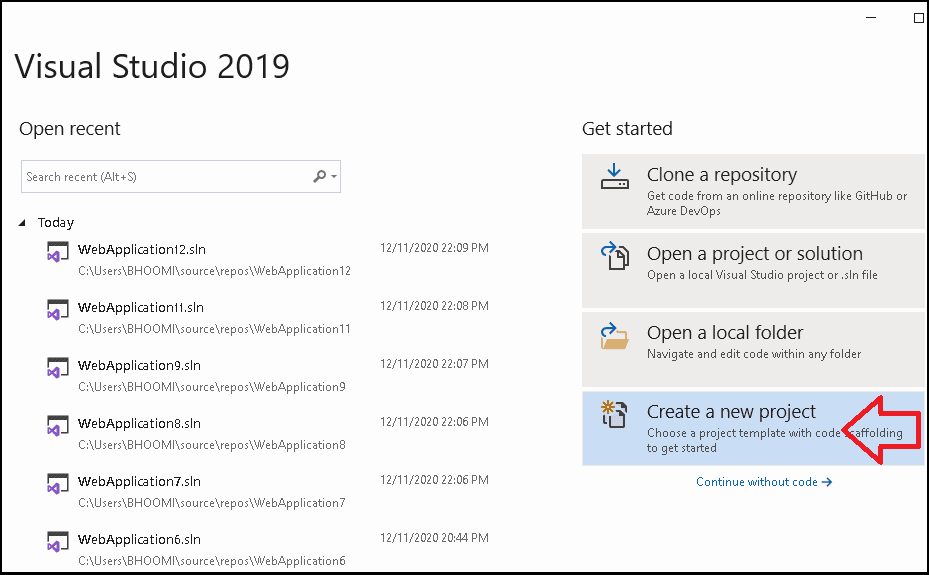
Open Visual Studio 2019. Click on the Create a new project option. ( If Visual Studio is already open, then Select File -> New -> Project to open the New Project form)
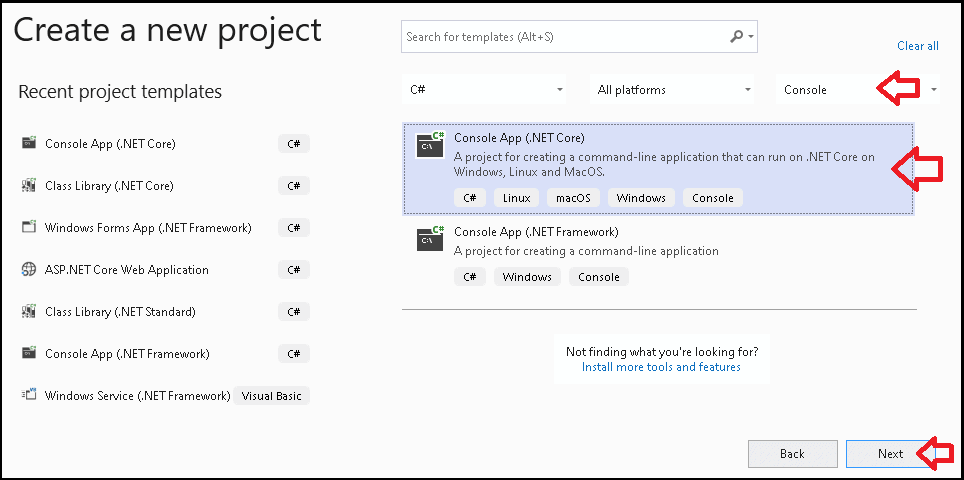
In the Create a new project wizard, select the Console option, and select the Console App (.NET Core) template. Click on Next when done
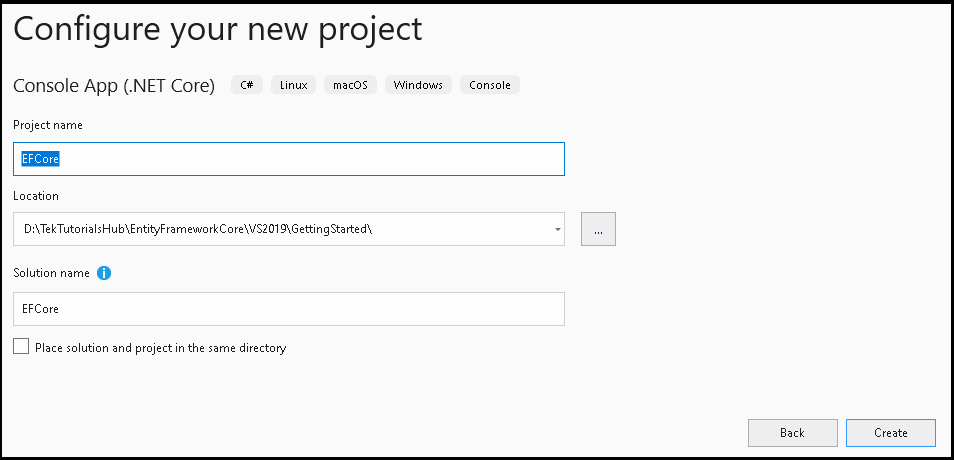
In the Configure your new project wizard, enter the project name and click on Create to Create new Console Project.
Installing EF Core
Now, we need to install Entity Framework Core.
The Microsoft.EntityFrameworkCore is the core library. But installing that alone is not sufficient. We also need to install the EF Core database provider(s). There are many different database Providers currently available with the EF Core. You can find the complete list of database providers.
For Example, to use the SQL Server, we need to install the Microsoft.EntityFrameworkCore.SqlServer. For SQLite install the Microsoft.EntityFrameworkCore.Sqlite. When we install the database provider(s), they automatically install the Microsoft.EntityFrameworkCore.
For this tutorial, we will be using the SQL Server, Hence we will install the install the Microsoft.EntityFrameworkCore.SqlServer package.
We will use the NuGet Package Manager to install the Entity Framework core.
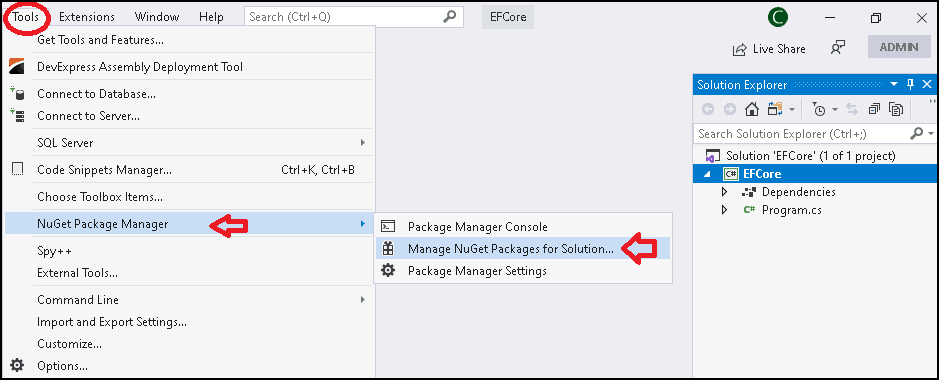
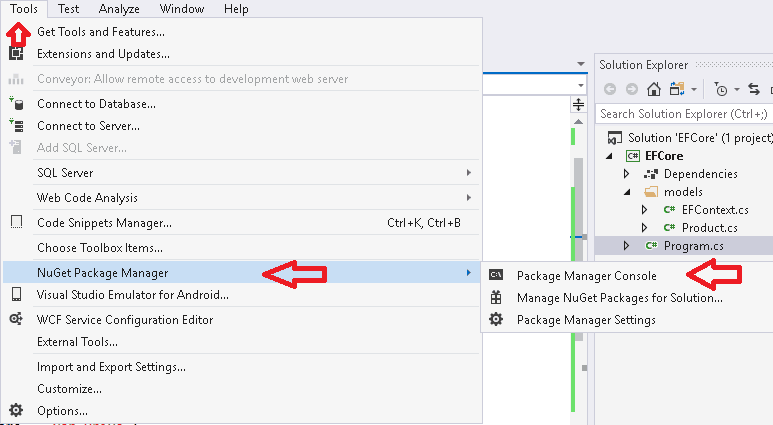
- Click on Tools -> NuGet Package Manager -> Manage NuGet Packages for Solution.
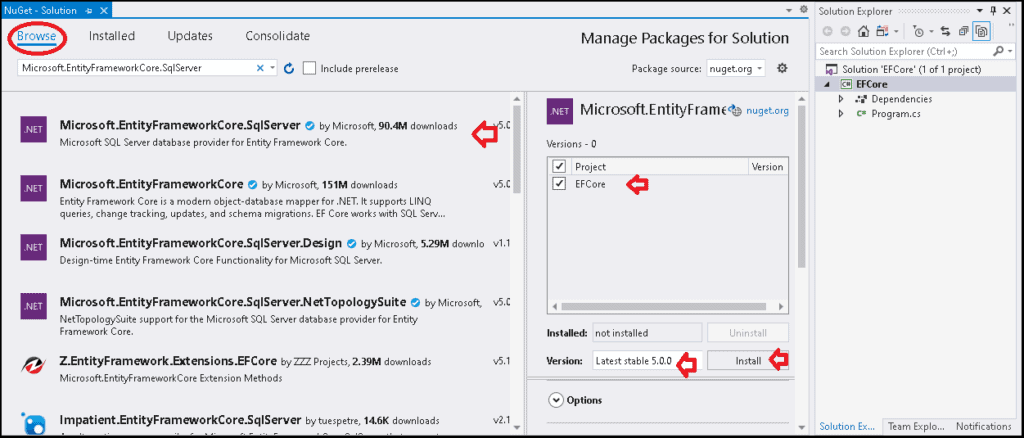
- Click on Browse.
- Enter
Microsoft.EntityFrameworkCore.SqlServerand hit enter to search. - Select
Microsoft.EntityFrameworkCore.SqlServerand on the right-hand side select the projectEFCore. - Click on Install.
- Click on I Accept, when asked.
- The Package Installs.
Installing Entity Framework Core Tools
The Entity Framework Core Tools contains command-line interface tools (CLI). These tools contain the command to create migrations, apply migrations, generate script migrations, and generate code for a model based on an existing database.
Open the Manage NuGet Packages for Solution window again and search for the Microsoft.EntityFrameworkCore.Tools and install it.
Modeling the database
EF Core performs data access using a model. A model is nothing but a POCO class. In EF Core we call them entity class.
The EF Core maps these entity classes to a table in the database.
Now, let us create a Product entity class
- Right-click on the solutions folder and create the folder
Models - Under the Models folder right click and create the class Product
- Change the class to the
publicand add two propertiesid&nameas shown below
namespace EFCore.Models
{
    public class Product
    {
        public int Id { get; set; }
        public string Name { get; set; }
    }
}
The DBContext class
The DBContext class manages the entity classes or models. It is the heart of the Entity Framework Core. This class is responsible for
- Connecting to the database
- Querying & Updating the database
- Hold the Information needed to configure the database etc.
We create our own Context class by inheriting from the DBContext.
Under the model folder, create the EFContext class and copy the following code.
using Microsoft.EntityFrameworkCore;

namespace EFCore.Models
{
    public class EFContext : DbContext
    {

        private const string connectionString = "Server=(localdb)\\mssqllocaldb;Database=EFCore;Trusted_Connection=True;";

        protected override void OnConfiguring(DbContextOptionsBuilder optionsBuilder)
        {
            optionsBuilder.UseSqlServer(connectionString);
        }

        public DbSet<Product> Products { get; set; }

    }
}
Now, let us understand each line of code.
Our EFContext class inherits from the DBContext class
public class EFContext : DbContextNext, we have define our connection string.
private const string connectionString = "Server=(localdb)\\mssqllocaldb;Database=EFCore;Trusted_Connection=True;";
The OnConfiguring method allows us the configure the DBContext. EF Core calls this method when it instantiates the context for the first time. This is where we configure the Context class. For Example, we configure the database providers, the connection string to use, etc.
The OnConfiguring method gets the instance of the DbContextOptionsBuilder as its argument. The DbContextOptionsBuilder provides API to configure the DBContext.
protected override void OnConfiguring(DbContextOptionsBuilder optionsBuilder)Inside the OnConfiguring method, we call the UseSQLServer extension method provided by the Microsoft.EntityFrameworkCore.SqlServer. The UseSqlServer method sets SQL Server as our database provider. The first argument to the UseSqlServer method is the connection string to use.
optionsBuilder.UseSqlServer(connectionString);We have hard coded connectionString in this example. But you can use the Configuration system provided by the .NET Core to store the connection string in external file.
DbSet
Creating the Model (Entity Type) is not sufficient to map it to the database. We must create a DbSet property for each Model in the context class. EF Core includes only those types, which have a DbSet property in the model.
The DBSet Provides methods like Add, Attach, remove, etc on the Entity Types. The Context class maps these operations into a SQL query and runs it against the database using the Database Providers.
public DbSet<Product> Products { get; set; }Creating the database
Now, our model is ready. The model has one entity type Product. We have created EFContext class to manage the Model. We have defined the DbSet Property of the Product so that it is included in the Model. Now it is time to create the database.
In Entity Framework Core, we use Migrations to create the database.
Adding Migration
Click on Tools – > NuGet Package Manager > Package Manager Console to open the Console
Run the Add-Migration to create the migration.
Add-Migration “NewDatabase”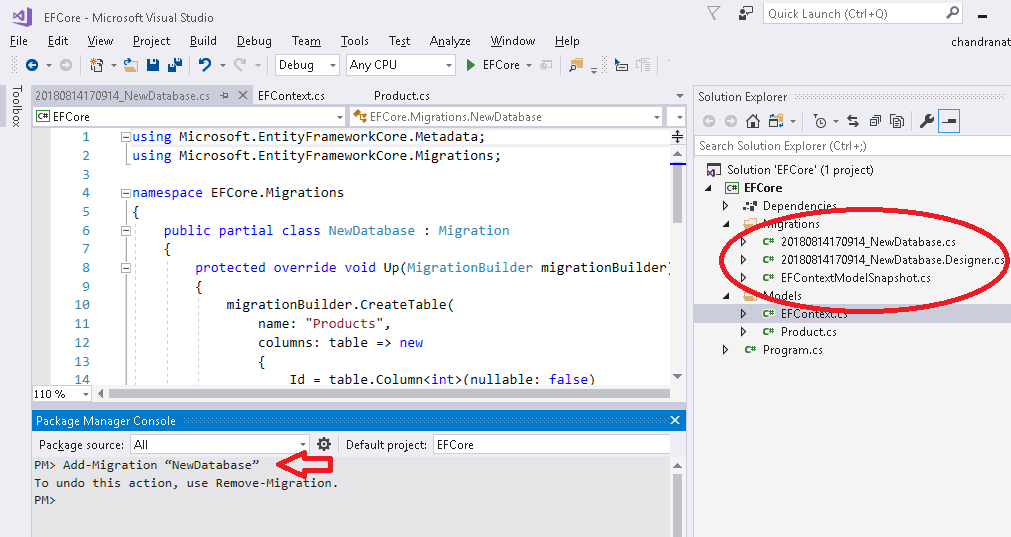
The Add-Migration generates the instructions to generate the SQL commands to update the underlying database to match the model. You can see that the three files are created and added under the Migrations folder.
Create the database
The next step is to create the database using the Migrations from the previous step.
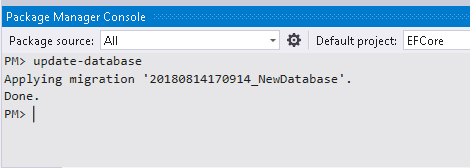
Open the Package Manager Console and run the command Update-Database.
The update-database uses the migrations to generate the SQL Queries to update the database. If the database does not exist it will create it. It uses the connection string provided while configuring the DBContext to connect to the database.
The Database
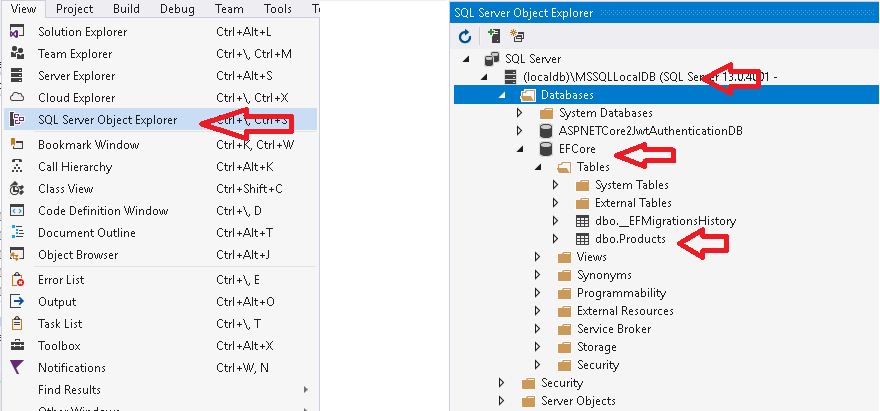
- Click on View -> SQL Server Object Explorer to Open SQL Server Object Explorer.
- Goto the (localDB)\mssqllocaldb
- You will see the EFCore database is generated as shown in the image below
CRUD Operations
Let us now add simple create/read/update & delete operations on the Product Entity model and persist the data to the database.
Inserting Data
Inserting to the database is handled by the SaveChanges method of the DBContext object. To do that, you need to follow these steps.
Create a new instance of the DbContext class.
using (var db = new EFContext())Create a new instance of the domain class Product and assign values to its properties.
Product product = new Product();
product.Name = "Pen Drive";
Next, add it to the DbContext class so that Context becomes aware of the entity.
db.Add(product);Finally, call the saveChanges method of the DBContext to persist the changes to the database.
db.SaveChanges();Here is the list of the complete insertProduct method, which is invoked from the Main method of the program.cs.
using EFCore.Models;
using System;

namespace EFCore
{
    class Program
    {
        static void Main(string[] args)
        {
            Console.WriteLine("Hello World!");
            insertProduct();

            Console.WriteLine("Press any key to continue");
            Console.ReadKey();
        }

        static void insertProduct()
        {
            using (var db = new EFContext())
            {
                Product product = new Product();
                product.Name = "Pen Drive";
                db.Add(product);

                product = new Product();
                product.Name = "Memory Card";
                db.Add(product);

                db.SaveChanges();
            }
            return;
        }

    }
}
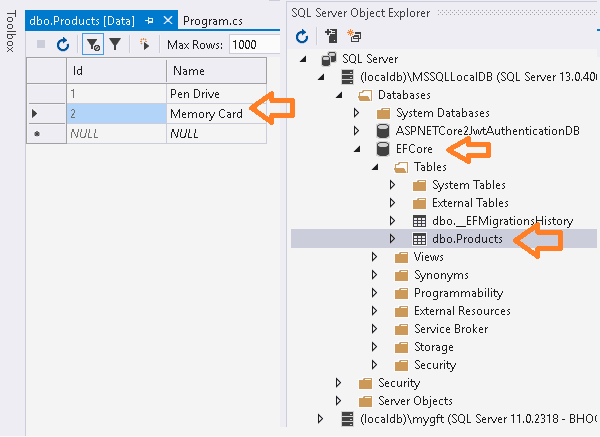
Run the code and Open the database to verify that the values are inserted.
Querying the Data
The queries are written against the Dbset property of the entity. The queries are written using the LINQ to Entities API. There are two ways in which you can write queries in LINQ. One is method syntax & the other one is Query Syntax.
The following example code retrieves the Product using the Method Syntax. It uses the ToList() method of the DbSet. The ToList() sends the select query to the database and retrieves and convert the result into a List of Products as shown below.
using System.Linq;

static void readProduct()
{

    using (var db = new EFContext())
    {
        List<Product> products = db.Products.ToList();
        foreach (Product p in products)
        {
            Console.WriteLine("{0} {1}", p.Id, p.Name);
        }
    }
    return;
}
And in the Main method call the readProduct to see the list of Products.
static void Main(string[] args)
{
    Console.WriteLine("Hello World!");
    //insertProduct();

    readProduct();
    Console.WriteLine("Press any key to continue");
    Console.ReadKey();

}
Update the Record
The following code shows how to update a single entity.
First, we use the find method to retrieve the single Product. The find method takes the id (primary key) of the product as the argument and retrieves the product from the database and maps it into the Product entity.
Next, we update the Product entity.
Finally, we call SaveChanges to update the database
static void updateProduct()
{
    using (var db = new EFContext())
    {
        Product product = db.Products.Find(1);
        product.Name = "Better Pen Drive";
        db.SaveChanges();
    }
    return;
}
In the Main method invoke the updateProduct and then readProduct to verify whether the values are changed.
static void Main(string[] args)
{
    Console.WriteLine("Hello World!");
    readProduct();
    updateProduct();
    readProduct();

    Console.WriteLine("Press any key to continue");
    Console.ReadKey();
}
Delete the Record
The following code demonstrates how to delete the record from the database.
Deleting is done using the Remove method of the DbSet. We need to pass the entity to delete as the argument to the remove method as shown below
static void deleteProduct()
{
    using (var db = new EFContext())
    {

        Product product = db.Products.Find(1);
        db.Products.Remove(product);
        db.SaveChanges();
    }
    return;
}
And in the Main method call the readProduct to verify whether the values are changed.
static void Main(string[] args)
{
    Console.WriteLine("Hello World!");
    readProduct();
    deleteProduct();
    readProduct();

    Console.WriteLine("Press any key to continue");
    Console.ReadKey();
}
Summary
In this tutorial, we learned how to create a console project using Entity Framework core. We created a model. Added DBContext to the project and passed our connection string to it. Then, we added DbSet Property of the Product model to the Context class. The Context manages all models, which exposes the DbSet Property. Then, we used Migrations to create the database. Finally, we learned how to add/update & insert records into the database.
Reference
Read More
- Entity Framework Core Tutorial
- ASP.NET Core Tutorial
- Database Connection String
- Installing EF Core
- Using MySQL & MariaDB in Entity Framework Core
- DBContext
- Fluent API Entity Framework Core
- Relationships & Navigational Properties
- Querying in Entity Framework Core
- Save Changes in Entity Framework Core
- Update Record
- Delete Record
- EF Core Migrations
WOW, Very nice article.
Nice and Thorough. It helped me alot, thank you so much.
شكرا جزيلا
I appreciate your explaining this course. thank you a lot.
ottimi articoli …. per chi inizia
That’s awesome..!
one of the best article on console, bundle of thanks..
Nice Post..
What a great tutorial. Very well explained and all works perfectly nearly 18 months later.
The only minor confusion is in the “Modeling the database” section, where you say to click on the Solution and create the Models folder when we actually add it under the project, as the screenshot some way further down shows. I only mention this because adding a “Solution Folder” is an option in Visual Studio.
Syntax errors on OnConfiguring line. Tutorial does not work for me. Is this tutorial for .Net 5?
Thank for your effort
Good article. Nice step by step explanation.
Thanks for this clear and simple tutorial. It helped me a lot
Thanks
Great article, thank you