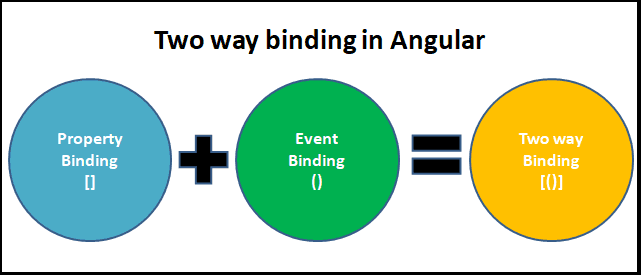
In this article let us explore the two way data binding in Angular and how NgModel implements the two-way binding in Angular Forms. The ngModel is a built-in directive and is part of the FormsModule. The Two-way binding uses the syntax [()]
Table of Contents
What is Two way data binding
Two way data binding means that changes made to our model in the component are propagated to the view and that any changes made in the view are immediately updated in the underlying component data.
Two way data binding is useful in data entry forms. Whenever a user makes changes to a form field, we would like to update our model. Similarly, when we update the model with new data, we would like to update the view as well
The two way data binding is nothing but both property binding & event binding applied together. Property Binding is one way from component to view. The event binding is one way from view to component. If we combine both we will get the Two-way binding.

Two way using property & Event Binding
The following example shows how we can achieve two-way binding using the combination of property binding & event binding
Create a new Angular application
copy the following code to app.component.html
1 2 3 4 5 6 | h2>Example 1</h2> <input type="text" [value]="name" (input)="name=$event.target.value"> <p> You entered {{name}}</p> <button (click)="clearName()">Clear</button> |
Update the app.component.ts with the following code.
1 2 3 4 5 6 7 | name="" clearName() { this.name=""; } |
We bind the name property to the input element ([value]="name"). We also use the event binding (input)="name=$event.target.value". It updates the name property whenever the input changes. The Angular interpolation updates the {{name}}, so we know the value of name property.
$event.target.value raises the error Property ‘value’ does not exist on type ‘EventTarget’ if fullTemplateTypeCheck is set to true under angularCompilerOptions in the tsconfig.json.
The error is due to the fact that the value property is not guaranteed to exist in the $event.target.
To solve this problem either you can use the $any typecast function ($any($event.target).value) to stop the type checking in the template or set fullTemplateTypeCheck to false in tsconfig.json.
Two-way binding syntax
The above example uses the event & property binding combination to achieve the two-way binding. But Angular does provide a way to achieve the two-way binding using the syntax [()]. Note that both square & parentheses are used here. This is now known as Banana in a box syntax. The square indicates the Property binding & parentheses indicates the event binding.
For Example
1 2 3 | <someElement [(someProperty)]="value"></someElement> |
The above syntax sets up both property & event binding. But to make use of it, the property must follow the following naming convention.
If we are binding to a settable property called someProperty of an element, then the element must have the corresponding change event named somePropertyChange
But most HTML elements have a value property. But do not have a valueChange event, instead, they usually have an input event. Hence they cannot be used in the above syntax
For Example, the following will not work as there is no valueChange event supported by the input element.
Hence we have a ngModel directive.
What is ngModel
The Angular uses the ngModel directive to achieve the two-way binding on HTML Form elements. It binds to a form element like input, select, selectarea. etc.
Internally It uses the ngModel in property, binding to bind to the value property and ngModelChange which binds to the input event.
How to use ngModel
The ngModel directive is not part of the Angular Core library. It is part of the FormsModule library. You need to import the FormsModule package into your Angular module.
In the template use the following syntax
1 2 3 | <input type="text" name="value" [(ngModel)]="value"> |
The ngModel directive placed inside the square & parentheses as shown above. This is assigned to the Template Expression. Template Expression is the property in the component class
ngModel Example
Import FormsModule
Open the app.module.ts and make the following changes
1 2 3 | import { FormsModule } from '@angular/forms'; |
Template
1 2 3 4 5 6 | <h2>Example 2</h2> <input type="text" name="value" [(ngModel)]="value"> <p> You entered {{value}}</p> <button (click)="clearValue()">Clear</button> |
Component
1 2 3 4 5 6 7 | value=""; clearValue() { this.value=""; } |
The ngModel data property sets the element’s value property and the ngModelChange event property listens for changes to the element’s value.
Run the project and see that as you modify the name, the component class model is automatically updated.
Custom Two-way binding
As we mentioned earlier the [()] to work, we need to have a property with the change event as<nameofProperty>Change.
We do not have any HTML Elements which follows the above naming conventions, but we can create a custom component
create new component and name it as counter.component.ts. copy the following code.
1 2 3 4 5 6 7 8 9 10 11 12 13 14 15 16 17 18 19 20 21 22 23 24 25 | import { Component, Input, Output, EventEmitter } from '@angular/core'; @Component({ selector: 'counter', template: ` <div> <p> Count: {{ count }} <button (click)="increment()">Increment</button> </p> </div> ` }) export class CounterComponent { @Input() count: number = 0; @Output() countChange: EventEmitter<number> = new EventEmitter<number>(); increment() { this.count++; this.countChange.emit(this.count); } } |
The component has two properties one is input property count decorated with @Input(). The other in is an event (or output property), which we decorate with @Output(). We name the input property as count. Hence the output property becomes countChange
Now we can use this component and create two-way binding to the count property using the syntax [(count)].
1 2 3 4 5 6 | <h2>Example 3</h2> <counter [(count)]="count"></counter> <p> Current Count {{count}}</p> <button (click)="clearCount()">Clear</button> |
Summary
The two-way binding is a simple, but yet powerful mechanism. We use Property binding & Event binding to achieve the two-way binding. Angular does have a [(value)] syntax to which sets up the two-way binding. It automatically sets up property binding to the value property of the element. It also sets up the event binding to valueChange Property. But since we hardly have any HTML element, which follows those naming conventions unless we create our own component. This is where ngModel directive from FormsModule steps in and provides two way binding to all the known HTML form elements.


Can you change the code under “Two way using property & event binding” to this:
You entered {{name}}
Clear
We can add a directive like the following
import { Directive, EventEmitter, HostListener, Output } from '@angular/core';
@Directive({
selector: '[appTwoWayInput]',
})
export class TwoWayInputDirective {
@Output('valueChange') update = new EventEmitter();
@HostListener('input', ['$event'])
handleInputChange(event) {
this.update.emit(event.target.value);
}
}
and bind to value of inputs
“The two way data binding nothing but both property binding & event binding applied together. Property Binding is one way from view to component. The event binding is one way from component to view”.
It is incorrectly mentioned about the property and event binding direction. It needs a correction.
Updated the article. Thanks
But as per Angular.io Docs, Property binding moves a value in one direction, from a component’s property into a target element property. And Event binding lets you listen for and respond to user actions from view to component.
Can I have the complete code through github repo
Two way using property & Event Binding
for this example getting this error
Property ‘value’ does not exist on type ‘EventTarget’.
for this line
The error is due to typescript checking types in templates.
You need to cast
$event.targetto any as shown below(input)=”name=$any($event.target).value
Also, I have updated the article again with notes
how to retrive data in table when click on submit
Hi @TEKTUTORIALSHUB,
I found something wrong in What is Two way binding section. In third paragraph, it is written like… event binding is one way from component to view and Property Binding is one way from view to component which is WRONG.
I hope u will correct it soon…
By the way, your tutorials are awesome.
Thank you _/\_
Great Content…..I’m new to Angular….
Thank you.
There’s some missing code for the last section “Custom Two-way binding”.
app.component.ts:
 import { Component } from '@angular/core';
 @Component({
 selector: 'app-root',
 templateUrl: './app.component.html',
 styleUrls: ['./app.component.css']
 })
 export class AppComponent {
 count: number = 0;
 clearCount() {
 this.count = 0;
 }
 }
Also if you generate your counter.component.ts automatically, the @Component.selector will be
app-counter, make sure to rename it tocounterto match the html in app.component.html ( )Instead of adding clearCount() to AppComponent, it should be added to CounterComponent class, as it has functionality related to the count property. Moreover, the below code should be added to the template section of CounterComponent:
Current Count {{count}}
Clear
The AppComponent html file should only have tag.