In this tutorial, learn how ASP.NET Core organizes its project or solution. We created a new ASP.NET Core project in the previous tutorial using the ASP.NET Core empty template. It created a project layout with the properties & dependencies folder and files like the program.cs, appsetting.json, appsetting.development.json, etc. The ASP.NET core solution can also contain folders like wwwroot, pages, controllers, views, models, etc, depending on the template we choose while creating the project. We will discuss the significance of the above folders and files.
Table of Contents
ASP.NET Core Solution Structure
The previous tutorial used the ASP.NET Core empty template to create a new ASP.NET Core project. You can also create a new project using the following templates.
- ASP.NET Core Empty
- ASP.NET Core Web App
- ASP.NET Core Web App (Model View Controller)
- ASP.NET Core Web API
The following is the solution structure, when we use the ASP.NET Core Empty template to create the new project.
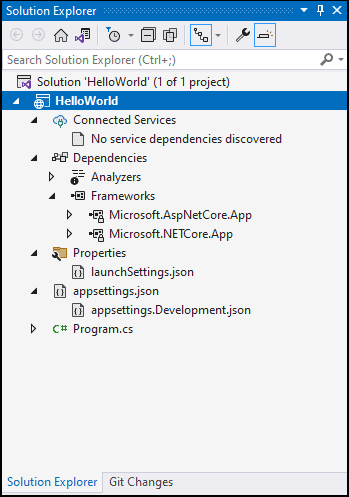
The solution contains two folders Dependencies & Properties. It has two file in the project root program.cs & appSettings.json. The older version of the ASP.NET core project also created the file startup.cs.
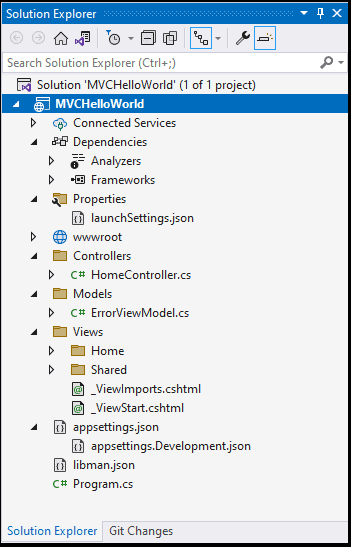
When we choose the ASP.NET Core Web App (Model View Controller) Template, the following is the structure. You can see the MVC related folders like Models, Views, & Controllers. And also the wwwroot folder..
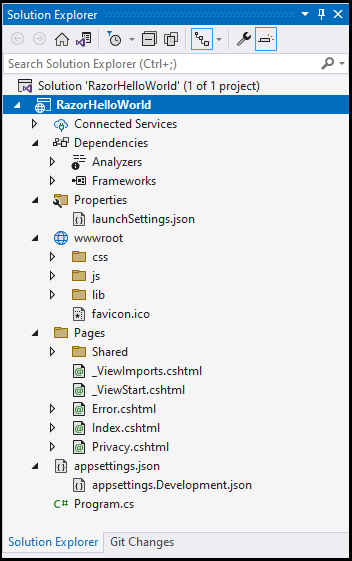
ASP.NET Core Web App template uses razor pages. You will see pages folder instead of Models, Views, & Controllers folder
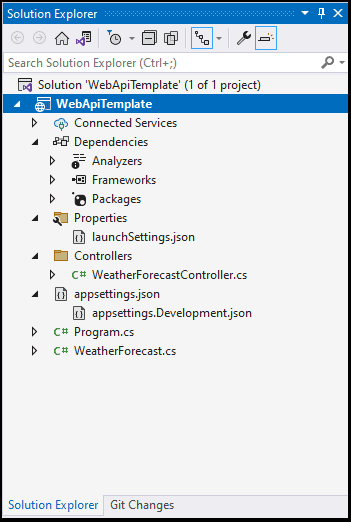
folders created when we choose the ASP.NET Core Web API template.
Properties
The Properties folder contains the file launchSettings.json. This json file contains all the project-specific settings needed to launch the application. You will find debug profile, environment variables that should be used, etc in this file. You can read more about launchSettings.
wwwroot
The wwwroot folder is new in ASP.NET Core. The Static files like HTML, CSS, JavaScript, and image files go into this folder or any subfolder under it.
The ASP.NER core treats the wwwroot folder as the root of the website. The URL http://yourDomainName.com/ points to wwwroot.
All files are served from the wwwroot folder or a subfolder under it. Place only those statics files you want to serve your users here. This is called whitelisting. Files placed in other folders are automatically blocked.
The code files should be placed outside of wwwroot. That includes all your C# files, Razor files, configuration files, etc.
You will find three subfolders under this folder. They are css, js & lib.
The css folder will contain the application CSS files.
The js folder is for the Javascript files, which is part of the App.
The lib folder is for the third-party Javascript libraries like jQuery, bootstrap, etc. These Client-Side Packages are installed using the Libman
Pages
There are two ways you can create web pages in ASP.NET core. One is the older Model-View-Controller approach. The other one is using the Razor pages. The pages folder is where all the Razor Pages will go. This folder is created only when you use the template ASP.NET Core Web App while creating the project.
Model, View, & Controller folder
These folders contain the models, views & controller related files. These folders are created if you choose the Model-View-Controller template under the Web Application.
Dependencies
This folder contains all the Dependencies of the project.
The Visual studio uses NuGet Packages for all the server-side dependencies.
For the Client-Side dependencies, the Libman is used. This is a deviation from the previous versions where NuGet is used for both for Server & Client-side dependencies.
Under the Dependencies folder, we have Packages, Frameworks & Analyzers folder.
The Packages folder will contain the server side packages that you install. This folder is created only when you install a new package. The images above does not show this folder as we have not installed any packages.
The Frameworks folder contains the framework. It shows two packages Microsoft.AspNetCore.App & Microsoft.NetCore.App. The Microsoft.NETCore.app is heart of the .NET. It contains the common features that is needed to build a .NET App (Windows, web, blazer etc). The Microsoft.AspNetCore.app package contains the features related only to ASP.NET Core.
The Analyzers folder includes packages that help Visual Studio in Analyzing the code. For example, error messages and warnings that appear as you’re typing, along with automatic code fixes, etc
libman.json
The libman.json file is created, when we install the third party packages using the libman.
Program.cs file
The Program class contains the entry point of the ASP.NET Core applications. There is no main method in this file. It is implicit. All the tasks which was done in startup class, is now moved here starting from version .NET 6.0
We configure the applications request pipeline & Middlewares in the program.cs. We also configure the services and add them to the dependency injection container.
The default program.cs file from .NET 6.0 and above.
var builder = WebApplication.CreateBuilder(args);

// Add services to the container.
builder.Services.AddControllersWithViews();

var app = builder.Build();

// Configure the HTTP request pipeline.
if (!app.Environment.IsDevelopment())
{
    app.UseExceptionHandler("/Home/Error");
    // The default HSTS value is 30 days. You may want to change this for production scenarios, see https://aka.ms/aspnetcore-hsts.
    app.UseHsts();
}

app.UseHttpsRedirection();
app.UseStaticFiles();

app.UseRouting();

app.UseAuthorization();

app.MapControllerRoute(
    name: "default",
    pattern: "{controller=Home}/{action=Index}/{id?}");

app.Run();
The following is the program.cs file from the ASP.NET Core 3.2 (up to .NET 5.0). All the tasks related to configurations are offloaded to the startup.cs file.
using System;
using System.Collections.Generic;
using System.IO;
using System.Linq;
using System.Threading.Tasks;
using Microsoft.AspNetCore;
using Microsoft.AspNetCore.Hosting;
using Microsoft.Extensions.Configuration;
using Microsoft.Extensions.Logging;

namespace HelloWorld
{
    public class Program
    {
        public static void Main(string[] args)
        {
            CreateWebHostBuilder(args).Build().Run();
        }

        public static IWebHostBuilder CreateWebHostBuilder(string[] args) =>
            WebHost.CreateDefaultBuilder(args)
                .UseStartup<Startup>();
    }
}
Startup.cs file
Startup class is where we used to configure the request pipeline & MiddleWares of ASP.NET Core applications. It is discarded in .NET 6.0 and the logic is now moved to program.cs.
You can still create the startup file .NET 6.0 and above.
AppSettings.Json
appsettings.json is one of the several ways, in which we can provide the configuration values to ASP.NET core application. We can also create environment-specific files like appsettings.development.json, appsettngs.production.json, etc. The ASP.NET Core configuration system loads the appsettings.json and also the environment-specific appsettings file based on the current environment.
New Project system
The project file (.csProj) has gone under a lot of changes. It has become a lot simpler now.
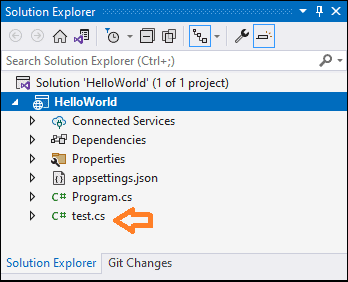
There is a direct correlation between the files in the solution folder and what is displayed in the Solution Explorer in Visual Studio. The files you add to the solution folder automatically become part of the Project.
To demonstrate this, we will add a file to the file structure in the File Explorer and see it show up in the Solution Explorer in real-time.
Open notepad and paste the following code
namespace HelloWorld
{
    public class test
    {
    }
}
Now, save this to the HelloWorld project folder.
This file is automatically picked by the visual studio and added to the Project.
The project.json, which was introduced along with ASP.NET Core 1.0 is discarded from the .NET Core 2.0
The installed NuGet packages are now listed in the .csproj file.
The .csproj files can be opened and edited directly from Visual Studio.
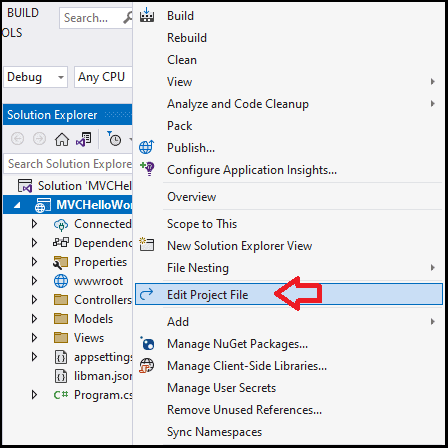
We can now right-click on the project and edit the .csproj file. There is no need to unload the project before doing this.
The new csproj file contains very few elements compared to what it was in older versions of ASP.NET.
The following is the csproj generated by ASP.NET Core Web App (Model View Controller) template. We also installed Entity Framework Core 7.0.4
<Project Sdk="Microsoft.NET.Sdk.Web">

  <PropertyGroup>
    <TargetFramework>net7.0</TargetFramework>
    <Nullable>enable</Nullable>
    <ImplicitUsings>enable</ImplicitUsings>
  </PropertyGroup>

  <ItemGroup>
    <PackageReference Include="Microsoft.EntityFrameworkCore" Version="7.0.4" />
  </ItemGroup>

</Project>
TargetFramework
The TargetFramework is net7.0, which is listed under the PropertyGroup section. You can modify it from here if you want to.
You can also change the TargetFramework from the Project Property ( Select Project -> Right-click and select Property). Any things that changed in Project Property is updated in the .csproj file
The following is the csproj generated by ASP.NET Core 2.2
<Project Sdk="Microsoft.NET.Sdk.Web">

  <PropertyGroup>
    <TargetFramework>netcoreapp2.2</TargetFramework>
    <AspNetCoreHostingModel>InProcess</AspNetCoreHostingModel>
  </PropertyGroup>


  <ItemGroup>
    <PackageReference Include="Microsoft.AspNetCore.App"/>
    <PackageReference Include="Microsoft.AspNetCore.Razor.Design" Version="2.2.0" PrivateAssets="All" />
  </ItemGroup>

</Project>
Package Manager
The NuGet is the package manager for the older versions of the Visual Studio. But from .NET Core 2.2 onwards, we have two package managers.
- NuGet for Server-side packages
- Libman for client-side packages
NuGet for Server Side
There are three ways you can add NuGet Packages to the Project
- Modifying the .csproj file
- Using NuGet Package Manager
- Via Package Manager Console
Modifying the .csproj file
Select the project and Right-click and click on Edit HelloWorld.csproj
Add the following code and save the file
<PackageReference Include="Microsoft.ApplicationInsights" Version="2.4.0" />

The NuGet Package Manager downloads and installs the dependency as soon as you save the .csproj file. The Yellow cautionary sign appears next to the assembly and it disappears when the installation is complete.
Using NuGet Package Manager
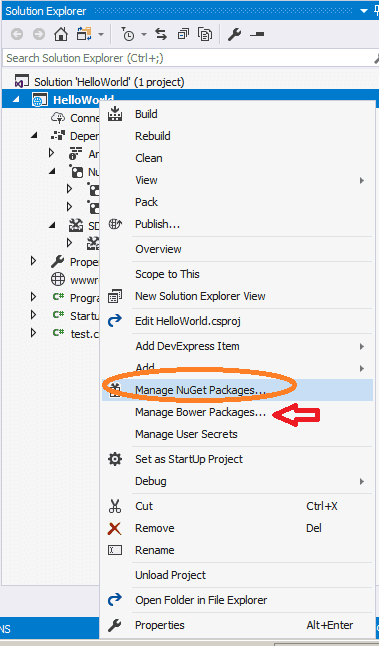
Select the Project and right-click and click on Manage NuGet Packages to install/remove NuGet Packages.
Package Manager Console
Tools -.NuGet Package Manager -> Package Manager console opens the Package Manager console windows.
Libman for Client-Side Packages
The libman is the new Client side package management tool to use in Visual Studio 2017 for ASP.NET Core projects. The VS 2017 now has built-in support for it.
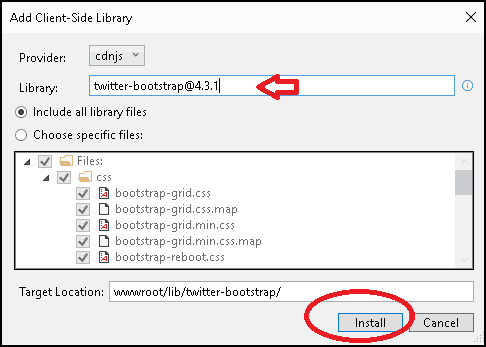
You can open it by right-clicking on the Solution and selecting the Add-> Client-Side Library option
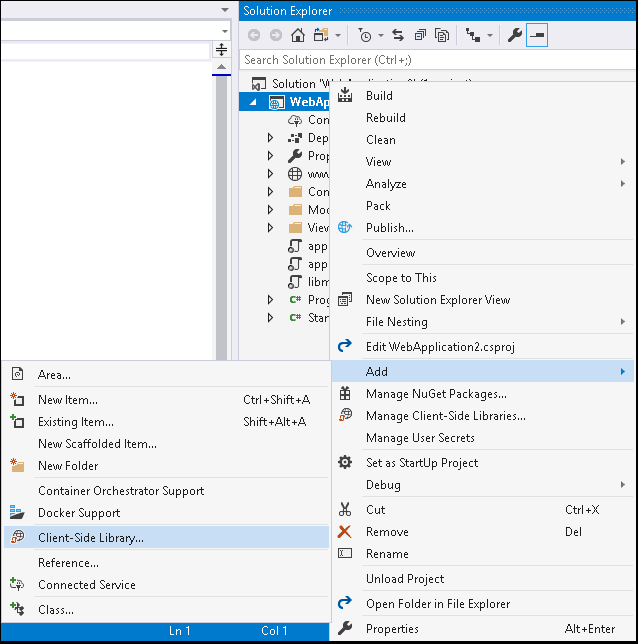
In the Add Client-side library, enter the name of the library and click on Install to install it. By default, the installed files are copied to the wwwroot/lib folder
Bower is no longer is the default of Managing the client-side packages in Visual Studio 2017 for ASP.NET Core projects.
Right Click on Project folder and click on Manage Bower Packages as shown in the image above. This opens up the Manage Bower Package page, where you can add/remove bower packages.
Installing the bower packages creates a folder name bower under dependencies folder
Summary
In this tutorial, we learned a few things about the ASP.NET Core Solution Structure or Project structure. The Visual Studio Team has made lots of improvements over the older system.


thank you
thank you
great article. need to update little bit.