In this tutorial, we will show you how to add custom fields to the user table in ASP.NET Core identity. We do that by creating a custom user table by extending the IdentityUser entity. Also, we will show you how to add these fields to the Registration form.
Table of Contents
Create a new Identity Project
Create a new project in Visual Studio 2019. Select the template ASP.NET Core Web App. under the Authentication Type select Individual Accounts. Select Target Framework as .NET 5.0. Name the project as ASPNetCoreIdentityCustomFields
Run the app to ensure that everything is ok.
Update the Connection String to use the SQL Server from appsettings.json.
"ConnectionStrings": {
    "DefaultConnection": "Server=Localhost;Database=ASPNetCoreIdentityCustomFields;Trusted_Connection=True;MultipleActiveResultSets=true"
  },
Run the migrations to create the database
update-databaseCheck the App to see if everything is ok.
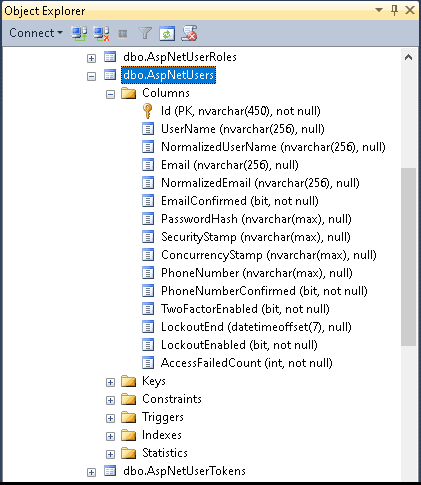
Now, open the SQL Server and explorer the tables. One of the tables is AspNetUsers table. This table represents the IdentityUser Entity
Add Custom Fields to User Entity
To Add Custom fields, we need to create a new User Entity class extending it from the IdentityUser Class. We will then add the custom fields to that class.
Create a new ApplicationUser class under the folder Data. We have added two fields firstName & lastName to the Entity
Data/ApplicationUser.cs
using Microsoft.AspNetCore.Identity;


namespace ASPNetCoreIdentityCustomFields.Data
{
    public class ApplicationUser : IdentityUser
    {
        public string firstName { get; set; }
        public string lastName { get; set; }
    }
}
Note that our ApplicationUser class extends IdentityUser class.
Configure Application to use the new User Model
We want our application to use the newly created ApplicationUser class instead of the IdentityUser class.
Open the ApplicationDbContext class from the data folder and modify it to inherit from IdentityDbContext<ApplicationUser>.
    public class ApplicationDbContext : IdentityDbContext<ApplicationUser>
    {
        public ApplicationDbContext(DbContextOptions<ApplicationDbContext> options)
            : base(options)
        {
        }
    }
Update the AddDefaultIdentity in the startup class to use the ApplicationUser instead of identityUser
services.AddDefaultIdentity<ApplicationUser>(options => options.SignIn.RequireConfirmedAccount = true)
              .AddEntityFrameworkStores<ApplicationDbContext>();
Finally, Open the _LoginPartial.cshtml
Remove the following code
@inject SignInManager<IdentityUser> SignInManager
@inject UserManager<IdentityUser> UserManager
And add this
@inject SignInManager<ApplicationUser> SignInManager
@inject UserManager<ApplicationUser> UserManager
Configure the model & Update database
We also use the ModelBuilder to configure the field lengths of FirstName & LastName Columns. Remember to call the OnModelCreating method of the base class.
using Microsoft.AspNetCore.Identity.EntityFrameworkCore;
using Microsoft.EntityFrameworkCore;

namespace ASPNetCoreIdentityCustomFields.Data
{
    public class ApplicationDbContext : IdentityDbContext<ApplicationUser>
    {
        public ApplicationDbContext(DbContextOptions<ApplicationDbContext> options)
            : base(options)
        {
        }

        protected override void OnModelCreating(ModelBuilder modelBuilder)
        {

            base.OnModelCreating(modelBuilder);

            modelBuilder.Entity<ApplicationUser>()
                .Property(e => e.firstName)
                .HasMaxLength(250);

            modelBuilder.Entity<ApplicationUser>()
                .Property(e => e.lastName)
                .HasMaxLength(250);

        }
    }
}
Finally, add the migration and update the database.
add-migration customFields
update-database
Check the database. You will find the new fields firstName & LastName in the AspNetUsers table.
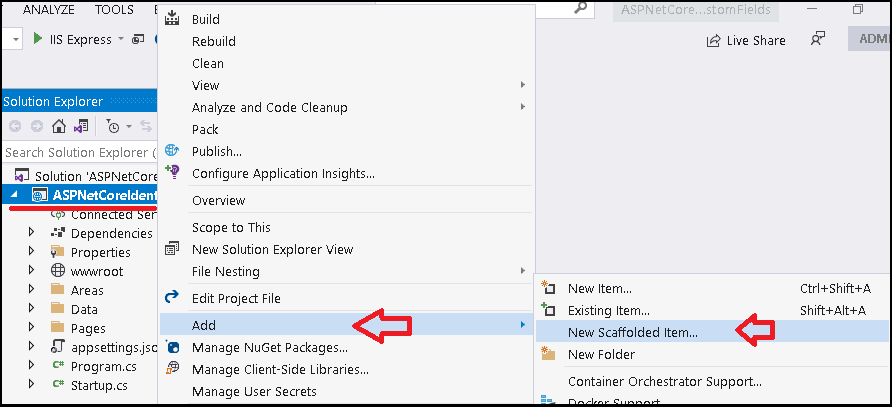
Scaffold UI Forms
The next task is to update the Register Form.
The Identity API hides the UI forms from us in the Microsoft.AspNetCore.Identity.UI namespace. But we can Scaffold it and modify it.
Follow these steps the Scaffold the Identity.
Right-click on the Solutions folder Add -> New Scaffolded Item
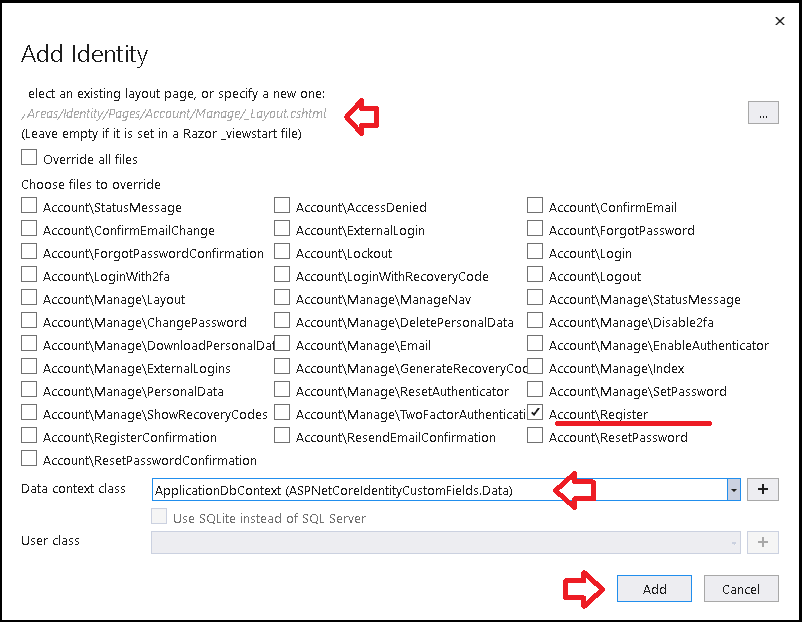
Select Identity

- Ensure that the correct Layout is chosen
- Select Account/Register
- From the dropdown select the context class i.e. ApplicationDbContext
- Click on Add
Register Page
Now Open the Areas/Identity/Pages/Accounts/Register.cshtml
Change IdentityUser to ApplicationUser wherever you find it. You will find in the declaration of SignInManager & UserManager.
    [AllowAnonymous]
    public class RegisterModel : PageModel
    {
        private readonly SignInManager<ApplicationUser> _signInManager;
        private readonly UserManager<ApplicationUser> _userManager;
        private readonly ILogger<RegisterModel> _logger;
        private readonly IEmailSender _emailSender;

        public RegisterModel(
            UserManager<ApplicationUser> userManager,
            SignInManager<ApplicationUser> signInManager,
            ILogger<RegisterModel> logger,
            IEmailSender emailSender)
        {
            _userManager = userManager;
            _signInManager = signInManager;
            _logger = logger;
            _emailSender = emailSender;
        }
Include in the InputModel
[Required]
[Display(Name = "First Name")]
public string FistName { get; set; }

[Required]
[Display(Name = "Last Name")]
public string LastName { get; set; }
You also need to import the namespace
using ASPNetCoreIdentityCustomFields.Data;And change this in the OnPostAsync method
//var user = new ApplicationUser { UserName = Input.Email, Email = Input.Email };
var user = new ApplicationUser { UserName = Input.Email, Email = Input.Email, firstName = Input.FistName, lastName = Input.LastName };
Open the Register.cshtml and add this HTML after the Email (or before)
<div class="form-group">
    <label asp-for="Input.FistName"></label>
    <input asp-for="Input.FistName" class="form-control" />
    <span asp-validation-for="Input.FistName" class="text-danger"></span>
</div>

<div class="form-group">
    <label asp-for="Input.LastName"></label>
    <input asp-for="Input.LastName" class="form-control" />
    <span asp-validation-for="Input.LastName" class="text-danger"></span>
</div>
That’s It.
Now, run the app and test the user registration form. Also, check if the fields are correctly updated.
Read More
- ASP.NET Core Tutorial
- Authentication in ASP.NET Core
- Cookie Authentication in ASP.NET Core
- Introduction to ASP.NET Core Identity
- ASP.NET Core Identity Tutorial From Scratch
- Sending Email Confirmation in ASP.NET Core
- Add Custom Fields to the user in ASP.NET Core Identity
- Change Primary key in ASP.NET Core Identity
- JWT Authentication in ASP.NET Core
- Introduction to Authorization
- Simple Authorization using Authorize attribute
- Adding & Managing Claims in ASP.NET Core Identity
- Claim Based Authorization in ASP.NET Core
- Policy-based Authorization
- Resource-Based Authorization


This broke my mind. I am in a production scenario where I am moving from an older identity approach (WebPages Authentication/Authorization) to the latest Identity solution and the identity tables in the database are NEW but the tens of business tables are legacy and I must use Database first – i.e., I do not want to go into a huge data conversion effort because I changed Identity approaches.
This worked well for me on .Net 7, but I did have to change IdentityUser to ApplicationUser in the other profile management pages by overriding those as well using the scaffolder (https://andrewlock.net/customising-aspnetcore-identity-without-editing-the-pagemodel). Only changing it on the login and registration pages leaves a lot of the other profile management pages broken, including password reset, profile editing, etc. Fixing all those things was easy by doing the scaffolded overrides, but it was still a lot that wasn’t represented here.
Thank you, this was by far the clearest explanation of how to extend the IdentityUser class and underlying database! I looked at many other articles and explanations – none of which made sense nor worked!
you need to include your reference to ASPNetCoreIdentityCustomFields.Data in the _LoginPartial page…
@using ASPNetCoreIdentityCustomFields.Data;
Can i use this in ASP. NET mvc 6
This is great! i’ve already done it but it took from me more time than i was expecting. If i saw this earlier i would have done it faster
You may also need to update the dependency injection code on the _ManageNav.cshtml file inder .AreasPagesAccountManage folder AND add a reference to your ApplicationObject in _ViewImports in the same folder.
Add “@using Survey.Data” to _ViewImports.cshtml and
change
@inject SignInManager SignInManager
to
@inject SignInManager SignInManager
Going along great until I got to this section … “Configure the model & Update database”, where exactly does this code go?
He’s using the .NET Entity Framework to handle his database work. He assumes you are doing the same. Look up “code first database design” and “.NET Entity Framework” and learn how to use database migrations.
I am getting an error “There is already an object named ‘AspNetRoles’ in the database” after I call the command update-database
same