Learn how to protect the Web API Endpoint Using JWT Authentication in ASP.NET Core. The JWT Authentication mechanism issues a digitally signed Bearer token to the Authenticated clients. The clients then need to present the token on every request in the Request header to gain access to the Protected Resources. The JWT Authentication typically used in Web API (REST API)
Table of Contents
- What is JWT Authentication
- Testing JWT Authentication in ASP.NET Core
- Create ASP.NET Core Web.API Project
- Create Rest End Point
- Setting up the database
- JWT Authentication Service
- Signing In
- Registering the Authentication Services
- Authentication Middleware
- Login & Refresh token End Points
- Testing the JWT Bearer Authentication
- Accessing the User & Claims
- Summary
- References
What is JWT Authentication
JSON Web Token (JWT) contains the claims of the user as name-value pair in the JSON Format. The issuer then digitally signs it using a private key (secret) before issuing it to the users.
JWT Token (Access Token)
JSON Web Token (JWT or Access Token) consists of three parts. Header, Payload & Signature
The Header contains information about the algorithm that the issuer uses to generate the Token.
{
 “alg”: “HS256”,
 “typ”: “JWT”
}
The Payload contains the claims of the User.
{
 “sub”: “1234567890”,
 “name”: “John Doe”,
 “iat”: 1516239022,
 "role": "Admin",
 "userdefined":"Whatever"
}
Here the sub (Subject), iat (issued at) are predefined claims. Other predefined claims are iss (issuer), aud (Audience), exp (expiration time), nbf (not before), jti (JWT ID). Some of these claims are important on security point of view.
You can add as many public claims to it as you want. role, name and userdefined are the public claims in the above example.
The Issuer then encodes the Header and Payload with a secret and creates a Signature.
The final token is in the header.payload.signature format
eyJhbGciOiJIUzI1NiIsInR5cCI6IkpXVCJ9.eyJpZCI6IjEiLCJodHRwOi8vc2NoZW1hcy54bWxzb2FwLm9yZy93cy8yMDA1LzA1L2lkZW50aXR5L2NsYWltcy9uYW1lIjoidGVzdEBnbWFpbC5jb20iLCJuYmYiOjE2MTgxMzg0NTQsImV4cCI6MTYxODEzODc1NCwiaXNzIjoiaHR0cHM6Ly9sb2NhbGhvc3Q6NDQzMTQvIiwiYXVkIjoiaHR0cHM6Ly9sb2NhbGhvc3Q6NDQzMTQvIn0.aS1RfKFxwrxqaCdiPBJfTT1qjdA2tzFvA69nifTjQoMThe Issuer issues this token to the user after he is authenticated. The User needs to present this token in the Authorization header along with every request. The Issuer then uses the secret to verify the authenticity of the token before allowing access.
Another important point is that anyone will be able to decode & read the JWT token. Hence do not store sensitive data in a token. For Example, copy the above token and paste it in https://jwt.io/. You will be able to see the decoded token.
But no one will be able to temper with the token as it is signed with a secret.
Note that the issuer does not store the token. storing the token securely falls on the User of the token.
JWT Validation
Apart from encoding & signing the token. The JWT has a few other security-related properties in the form of predefined claims.
exp claim
exp stands for the expiration date of a JWT token. The token is invalid if the expiration date lies in the Past. Without an expiration date, the token is valid till the end of time. Without an expiration date, the only way to invalidate the token is by changing the secret. But changing the secret will invalidate all the tokens. Hence it is important to set the expiration date correctly and as short as possible.
iat claim
iat claim (issued at) indicates the time at JWT has been issued. This can also be used to reject the token if it token is not fresh.
nbf claim
nbf stands for not before. It holds the timestamp and indicates that the token is valid only after this time.
iss claim
iss claim(issuer) is a string value, which indicates the identity of the issuer who issued the token.
aud claim
The aud claim stands for the audience. It is a string value and indicates the intended user of the token.
Refresh Tokens
The JWT Tokens come with an expiration date using the exp claim. Without an expiration date, the tokens are valid for a long time. The server will trust a token as long its signature is valid and the token is not expired. If any hacker gets hold of the token, he can use it to pose as a genuine user. The token is still valid, even if the user changes his password. The Only way to invalidate it is by changing the secret, which invalidates all tokens.
Hence we need to set a shorter expiration date. But that will create problems for the genuine users as they need to re-login every time the token expires to get a new token.
This is where the refresh token comes into the picture. The issuer issues refresh tokens along with the access token. Unlike the access tokens, the issuer will store the refresh tokens securely. The refresh token also expires but will have a longer duration than the access token.
After the access token expires, the user will submit the refresh token to the issuer. The issuer validates the refresh token and issues a new access token along with a new refresh token. Also deletes the old refresh token so that the user cannot re-use it again.
All these will happen behind the scene without the knowledge of the user.
Testing JWT Authentication in ASP.NET Core
We will implement the JWT Authentication in an ASP.NET Core Web API Project. To test the API we will be making use of Postman, which you can download from https://www.postman.com/ . You can learn more about it from the Postman tutorial
Create ASP.NET Core Web.API Project
Open VS2019. Create a new Project. Select ASP.NET Core Web API Template. Name the project as ASPNetCoreJwtAuth. Select .NET 5.0 as Target Framework. Choose None for Authentication Type. Untick Enable OpenAPI support.
Run the Application and check if everything is OK.
Create Rest End Point
Create a new Empty API Controller under the folder Controllers. Name it is as JWTController
The Controller has two action methods. PrivateAPI & PublicAPI. We have Authorize attribute on PrivateAPI. Hence you need to login to read the data from PrivateAPI
Controllers/JWTController
using Microsoft.AspNetCore.Authorization;
using Microsoft.AspNetCore.Mvc;
using System.Linq;

namespace ASPNetCoreJwtAuth.Controllers
{
    [Route("api/[controller]/[action]")]
    [ApiController]
    public class JWTController : ControllerBase
    {

        [HttpGet][Authorize]
        public IActionResult PrivateAPI()
        {

            var list = new[]
            {
                new { Code = 1, Name = "This end point is restricted " },
                new { Code = 2, Name = "You need to login to see this" }
            }.ToList();

            return Ok(list);
        }

        [HttpGet]
        public IActionResult PublicAPI()
        {
            var list = new[]
            {
                new { Code = 1, Name = "This end point can be accessed by Public" },
                new { Code = 2, Name = "Whatever" }
            }.ToList();

            return Ok(list);
        }


    }


}
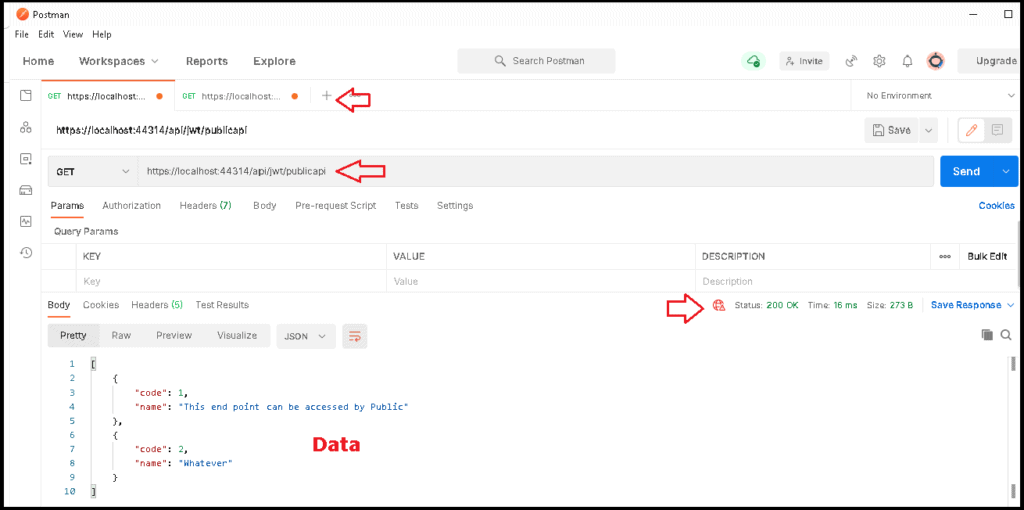
Open the Postmaster Click on + symbol to create a new Request. Enter the URL https://localhost:44314/api/jwt/publicapi and click on Send. (Remember to change the port number). In the results tab, you will see the data from the API, and also the status code of the response is 200 ok.
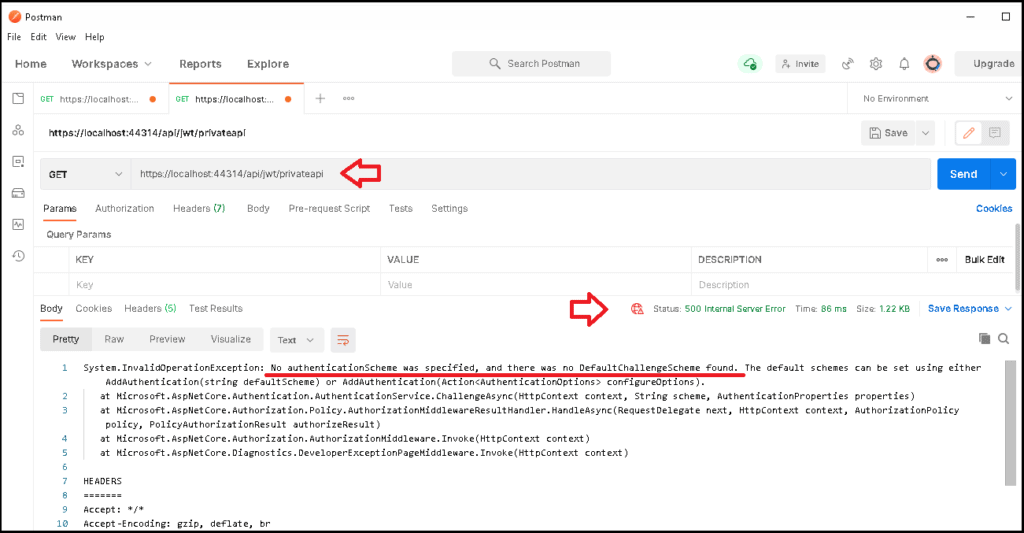
But, when we try our https://localhost:44314/api/jwt/privateAPI, we get “No authenticationScheme was specified, and there was no DefaultChallengeScheme found“. error.
This is because the Authorization Middltwere (UseAuthorization()). It tries to see if the user is authenticated & Authorized to view the privateAPI. To do that it needs to invoke the default Authentication Handler. Since our app does not have any Authentication Handlers registered, the code throws an error.
Setting up the database
Now, let us set up the database to store the User’s details & Also the refresh Tokens. We will make use of EF Core here. Run the following commands to install EF Core
Package Manager Console
Install-package Microsoft.EntityFrameworkCore.SqlServer
Install-Package Microsoft.EntityFrameworkCore.Tools
Add the connection string in the appsettings.json file
appsettings.json
"ConnectionStrings": {
  "DefaultConnection": "Server=Localhost;Database=ASPNetJwt;Trusted_Connection=True;MultipleActiveResultSets=true"
},
Create Entity Models for User & RefreshToken under the data folder
We are using the ef core seed data technique to Populate the user table with some data. Note that we are not storing the hashed Passwords, but you should not do that in real apps.
Data/User.cs
using Microsoft.EntityFrameworkCore;
using Microsoft.EntityFrameworkCore.Metadata.Builders;
using System.ComponentModel.DataAnnotations;

namespace ASPNetCoreJwtAuth.Data
{
    public class User
    {
        [Key]
        public int Id { get; set; }
        public string Email { get; set; }
        public string Password { get; set; }
    }

    public class UserConfiguration :IEntityTypeConfiguration<User>
    {
        public void Configure(EntityTypeBuilder<User> builder)
        {

            builder.HasData(
                new User { Id = 1, Email = "[email protected]", Password = "1234" },
                new User { Id = 2, Email = "[email protected]", Password = "1234" }
            );
        }
    }

}
We store the Refresh Tokens in this table.
data/RefreshToken.cs
using System;
using System.ComponentModel.DataAnnotations;

namespace ASPNetCoreJwtAuth.Data
{
    public class RefreshToken
    {
        [Key]
        public string Token { get; set; }
        public int UserId { get; set; }
        public DateTime IssuedAt { get; set; }
        public DateTime ExpiresAt { get; set; }
    }
}
DbContext class
Data/ApplicationDbContext.cs
using Microsoft.EntityFrameworkCore;

namespace ASPNetCoreJwtAuth.Data
{

    public class ApplicationDbContext : DbContext
    {
        public ApplicationDbContext(DbContextOptions<ApplicationDbContext> options)
            : base(options)
        {
        }

        protected override void OnModelCreating(ModelBuilder modelBuilder)
        {
            modelBuilder.ApplyConfiguration( new UserConfiguration());
        }

        public DbSet<User> Users { get; set; }
        public DbSet<RefreshToken> RefreshTokens { get; set; }
    }

}
Register the ApplicationDbContext int the ConfigureServices method of the startup class.
ConfigureServices at startup.cs
public void ConfigureServices(IServiceCollection services)
{


  services.AddDbContext<ApplicationDbContext>(options =>
      options.UseSqlServer(
          Configuration.GetConnectionString("DefaultConnection")));

...
Finally, run the EF Core Migrations to create the database.
add-migration jwt
update-database
JWT Authentication Service
The Microsoft.AspNetCore.Authentication.JwtBearer Package makes it easier to implement the JWT Bearer Authentication in ASP.NET Core. Hence we install it
install-package Microsoft.AspNetCore.Authentication.JwtBearerOpen the appsettings.json and add the following configuration values to create an access token & refresh token.
The secret is the key using which we are going to sign the Token. The secret is very important. Hence, you need to store it somewhere more secure than appsettings.json.
The issuer & audience settings are used to create the iss & aud claims.
accessTokenExpiration is time in minutes used to set the token expiration time using exp claim
refreshTokenExpiration is for refresh token expiration.
  "jwt": {
    "secret": "F-JaNdRfUserjd89#5*6Xn2r5usErw8x/A?D(G+KbPeShV",
    "issuer": "https://localhost:44314/",
    "audience": "https://localhost:44314/",
    "accessTokenExpiration": 5,
    "refreshTokenExpiration": 10,
  }
Create JWTAuthService in the folder Services. The purpose of the class to create access & refresh tokens.
Services/JWTAuthService.cs
using System;
using System.IdentityModel.Tokens.Jwt;
using System.Security.Claims;
using System.Security.Cryptography;
using System.Text;
using Microsoft.Extensions.Logging;
using Microsoft.IdentityModel.Tokens;

namespace ASPNetCoreJwtAuth.Services
{

    public class JWTAuthService
    {
        private readonly JwtTokenConfig _jwtTokenConfig;
        private readonly ILogger<JWTAuthService> _logger;

        public JWTAuthService(JwtTokenConfig jwtTokenConfig,
                              ILogger<JWTAuthService> logger)
        {
            _jwtTokenConfig = jwtTokenConfig;
            _logger = logger;
        }

        public string BuildToken(Claim[] claims)
        {

            var key = new SymmetricSecurityKey(Encoding.UTF8.GetBytes(_jwtTokenConfig.Secret));

            var creds = new SigningCredentials(key, SecurityAlgorithms.HmacSha256);

            var token = new JwtSecurityToken(
                    issuer: _jwtTokenConfig.Issuer,
                    audience: _jwtTokenConfig.Audience,
                    notBefore: DateTime.Now,
                    claims: claims,
                    expires: DateTime.Now.AddMinutes(_jwtTokenConfig.AccessTokenExpiration),
                    signingCredentials: creds);

            return new JwtSecurityTokenHandler().WriteToken(token);
        }

        public string BuildRefreshToken()
        {
            var randomNumber = new byte[32];
            using (var randomNumberGenerator = RandomNumberGenerator.Create())
            {
                randomNumberGenerator.GetBytes(randomNumber);
                return Convert.ToBase64String(randomNumber);
            }
        }

        public ClaimsPrincipal GetPrincipalFromToken(string token)
        {
            JwtSecurityTokenHandler tokenValidator = new JwtSecurityTokenHandler();
            var key = new SymmetricSecurityKey(Encoding.UTF8.GetBytes(_jwtTokenConfig.Secret));
            var creds = new SigningCredentials(key, SecurityAlgorithms.HmacSha256);

            var parameters= new TokenValidationParameters
                {
                    ValidateAudience = false,
                    ValidateIssuer = false,
                    ValidateIssuerSigningKey = true,
                    IssuerSigningKey = key,
                    ValidateLifetime = false
                };

            try
            {
                var principal = tokenValidator.ValidateToken(token, parameters, out var securityToken);

                if (!(securityToken is JwtSecurityToken jwtSecurityToken) || !jwtSecurityToken.Header.Alg.Equals(SecurityAlgorithms.HmacSha256, StringComparison.InvariantCultureIgnoreCase))
                {
                    _logger.LogError($"Token validation failed");
                    return null;
                }

                return principal;
            }
            catch (Exception e)
            {
                _logger.LogError($"Token validation failed: {e.Message}");
                return null;
            }
        }
    }


    public class JwtTokenConfig
    {
        public string Secret { get; set; }
        public string Issuer { get; set; }
        public string Audience { get; set; }
        public int AccessTokenExpiration { get; set; }
        public int RefreshTokenExpiration { get; set; }

    }

}
Create JWT Token
We inject the jwtTokenConfig, which reads the configuration from the appsettings.json
BuildToken method creates the access token. We need to pass the list of claims to it.
public string BuildToken(Claim[] claims)
{
We create the SigningCredentials from the Secret, which we get from appsettings.json
var key = new SymmetricSecurityKey(Encoding.UTF8.GetBytes(_jwtTokenConfig.Secret));

var creds = new SigningCredentials(key, SecurityAlgorithms.HmacSha256);
Create a new JwtSecurityToken. Value for issuer & audience from comes appsettings.json. The AccessTokenExpiration is added to the current time to get the token expires claim. We also need to pass the SigningCredentials to create the token.
var token = new JwtSecurityToken(
        issuer: _jwtTokenConfig.Issuer,
        audience: _jwtTokenConfig.Audience,
        notBefore: DateTime.Now,
        claims: claims,
        expires: DateTime.Now.AddMinutes(_jwtTokenConfig.AccessTokenExpiration),
        signingCredentials: creds);
Finally serializes the security token into a string and return it back.
return new JwtSecurityTokenHandler().WriteToken(tokenCreate Refresh Token
The method BuildRefreshToken builds the Refresh Token
There are two criteria to create a refresh token. The token must be reasonably unique & not easy to guess for anyone
Hence, we use a 32 byte long random number and convert it to base64 so that we can use it as a string
public string BuildRefreshToken()
{
    var randomNumber = new byte[32];
    using (var randomNumberGenerator = RandomNumberGenerator.Create())
    {
        randomNumberGenerator.GetBytes(randomNumber);
        return Convert.ToBase64String(randomNumber);
    }
}
The GetPrincipalFrom Token recreates the User ( ClaimsPrincipal ) from the token.
We use the ValidateToken method of JwtSecurityTokenHandler class to do that. The ValidateToken method expects us to pass the token to verify, SigningCredentials & TokenValidationParameters to it.
We use this method to verify the access token while issuing the refresh token.
public ClaimsPrincipal GetPrincipalFromToken(string token)
{
    JwtSecurityTokenHandler tokenValidator = new JwtSecurityTokenHandler();
    var key = new SymmetricSecurityKey(Encoding.UTF8.GetBytes(_jwtTokenConfig.Secret));
    var creds = new SigningCredentials(key, SecurityAlgorithms.HmacSha256);

    var parameters= new TokenValidationParameters
        {
            ValidateAudience = false,
            ValidateIssuer = false,
            ValidateIssuerSigningKey = true,
            IssuerSigningKey = key,
            ValidateLifetime = false
        };

    try
    {
        var principal = tokenValidator.ValidateToken(token, parameters, out var securityToken);

        if (!(securityToken is JwtSecurityToken jwtSecurityToken) || !jwtSecurityToken.Header.Alg.Equals(SecurityAlgorithms.HmacSha256, StringComparison.InvariantCultureIgnoreCase))
        {
            _logger.LogError($"Token validation failed");
            return null;
        }

        return principal;
    }
    catch (Exception e)
    {
        _logger.LogError($"Token validation failed: {e.Message}");
        return null;
    }
}
Signing In
The SignInManager signs in the user. It will use the JWTAuthService to create the Access & Refresh tokens.
Services/SignInManager.cs
using ASPNetCoreJwtAuth.Data;
using Microsoft.EntityFrameworkCore;
using Microsoft.Extensions.Logging;
using System;
using System.Linq;
using System.Security.Claims;

namespace ASPNetCoreJwtAuth.Services
{
    public class SignInManager
    {
        private readonly ILogger<SignInManager> _logger;
        private readonly ApplicationDbContext _ctx;
        private readonly JWTAuthService _JwtAuthService;
        private readonly JwtTokenConfig _jwtTokenConfig;

        public SignInManager(ILogger<SignInManager> logger,
                             JWTAuthService JWTAuthService,
                             JwtTokenConfig jwtTokenConfig,
                             ApplicationDbContext ctx)
        {
            _logger = logger;
            _ctx = ctx;
            _JwtAuthService = JWTAuthService;
            _jwtTokenConfig = jwtTokenConfig;
        }

        public async System.Threading.Tasks.Task<SignInResult> SignIn(string userName, string password)
        {
            _logger.LogInformation($"Validating user [{userName}]", userName);

            SignInResult result = new SignInResult();

            if (string.IsNullOrWhiteSpace(userName)) return result;
            if (string.IsNullOrWhiteSpace(password)) return result;

            var user = await _ctx.Users.Where(f => f.Email == userName && f.Password == password).FirstOrDefaultAsync();
            if (user != null)
            {

                var claims = BuildClaims(user);
                result.User = user;
                result.AccessToken= _JwtAuthService.BuildToken(claims);
                result.RefreshToken = _JwtAuthService.BuildRefreshToken();

                _ctx.RefreshTokens.Add(new RefreshToken { UserId = user.Id, Token = result.RefreshToken, IssuedAt = DateTime.Now, ExpiresAt = DateTime.Now.AddMinutes(_jwtTokenConfig.RefreshTokenExpiration) });
                _ctx.SaveChanges();

                result.Success = true;
            };

            return result;
        }

        public async System.Threading.Tasks.Task<SignInResult> RefreshToken(string AccessToken, string RefreshToken)
        {

            ClaimsPrincipal claimsPrincipal = _JwtAuthService.GetPrincipalFromToken(AccessToken);
            SignInResult result = new SignInResult();

            if (claimsPrincipal == null) return result;

            string id = claimsPrincipal.Claims.First(c => c.Type == "id").Value;
            var user = await _ctx.Users.FindAsync(Convert.ToInt32(id));

            if (user == null) return result;

            var token= await _ctx.RefreshTokens
                    .Where(f => f.UserId == user.Id
                            && f.Token==RefreshToken
                            && f.ExpiresAt >= DateTime.Now)
                    .FirstOrDefaultAsync();

            if (token == null) return result;

            var claims = BuildClaims(user);

            result.User = user;
            result.AccessToken = _JwtAuthService.BuildToken(claims);
            result.RefreshToken = _JwtAuthService.BuildRefreshToken();

            _ctx.RefreshTokens.Remove(token);
            _ctx.RefreshTokens.Add(new RefreshToken { UserId = user.Id, Token = result.RefreshToken, IssuedAt=DateTime.Now , ExpiresAt=DateTime.Now.AddMinutes(_jwtTokenConfig.RefreshTokenExpiration) });
            _ctx.SaveChanges();

            result.Success = true;

            return result;
        }

        private Claim[] BuildClaims(User user)
        {
            //User is Valid
            var claims = new[]
            {
                new Claim("id",user.Id.ToString()),
                new Claim(ClaimTypes.Name,user.Email)

                //Add Custom Claims here
            };

            return claims;
        }

    }

    public class SignInResult
    {
        public bool Success { get; set; }
        public User User { get; set; }
        public string AccessToken { get; set; }
        public string RefreshToken { get; set; }

        public SignInResult()
        {
            Success = false;
        }
    }
}
We sign in the user using the SignIn Method.
SignIn(string userName, string password)We query the database to check to see if the user with the given email & password exists.
var user = await _ctx.Users.Where(f => f.Email == userName && f.Password == password).FirstOrDefaultAsync();
If the user exists. we will build the claim.
var claims = BuildClaims(user);We use JwtAuthService to build the Access token & Refresh token
result.AccessToken= _JwtAuthService.BuildToken(claims);
result.RefreshToken = _JwtAuthService.BuildRefreshToken();
Save the RefreshTokens to database
_ctx.RefreshTokens.Add(new RefreshToken { UserId = user.Id, Token = result.RefreshToken, IssuedAt = DateTime.Now, ExpiresAt = DateTime.Now.AddMinutes(_jwtTokenConfig.RefreshTokenExpiration) });
_ctx.SaveChanges();
RefreshToken method validates current Access Token & Refresh Token and generates the new Access token & Refresh token
RefreshToken(string AccessToken, string RefreshToken)First, we use the current Access Token to re-create the claimsPrincipal.
ClaimsPrincipal claimsPrincipal = _JwtAuthService.GetPrincipalFromToken(AccessToken);We access the id of the user from the claimsPrincipal and query to check if the user exists.
string id = claimsPrincipal.Claims.First(c => c.Type == "id").Value;
var user = await _ctx.Users.FindAsync(Convert.ToInt32(id));
Next, we query the RefreshTokens table to check to of the Refresh token belongs to the user and not yet expired.
var token= await _ctx.RefreshTokens
        .Where(f => f.UserId == user.Id
                && f.Token==RefreshToken
                && f.ExpiresAt >= DateTime.Now)
        .FirstOrDefaultAsync();
If all is ok, we build the Claims and create a new Access token, and Refresh token. The old Refresh token is deleted and the new token is saved to the database in its place.
var claims = BuildClaims(user);

result.User = user;
result.AccessToken = _JwtAuthService.BuildToken(claims);
result.RefreshToken = _JwtAuthService.BuildRefreshToken();

_ctx.RefreshTokens.Remove(token);
_ctx.RefreshTokens.Add(new RefreshToken { UserId = user.Id, Token = result.RefreshToken, IssuedAt=DateTime.Now , ExpiresAt=DateTime.Now.AddMinutes(_jwtTokenConfig.RefreshTokenExpiration) });
_ctx.SaveChanges();
Adding Claims
BuildClaims method builds the claims of the user. Here you can add additional claims to it.
private Claim[] BuildClaims(User user)
{
    //User is Valid
    var claims = new[]
    {
        new Claim("id",user.Id.ToString()),
        new Claim(ClaimTypes.Name,user.Email)

        //Add Custom Claims here
    };

    return claims;
}
Registering the Authentication Services
Now, we need to register the JWT bearer token authentication handler in the ConfigureServices method.
startup.cs
public void ConfigureServices(IServiceCollection services)
{

    services.AddDbContext<ApplicationDbContext>(options =>
        options.UseSqlServer(
Configuration.GetConnectionString("DefaultConnection")));

    services.AddScoped<JWTAuthService>();
    services.AddScoped<SignInManager>();

    var jwtTokenConfig = Configuration.GetSection("jwt").Get<JwtTokenConfig>();
    services.AddSingleton(jwtTokenConfig);

    services.AddAuthentication(x =>
    {
        x.DefaultAuthenticateScheme = JwtBearerDefaults.AuthenticationScheme;
        x.DefaultChallengeScheme = JwtBearerDefaults.AuthenticationScheme;
    }).AddJwtBearer(x =>
    {
        x.RequireHttpsMetadata = true;
        x.SaveToken = true;
        x.TokenValidationParameters = new TokenValidationParameters
        {
            ValidateIssuer = true,
            ValidIssuer = jwtTokenConfig.Issuer,
            ValidateAudience = true,
            ValidAudience = jwtTokenConfig.Audience,
            ValidateIssuerSigningKey = true,
            RequireExpirationTime = false,
            ValidateLifetime = true,
            ClockSkew = TimeSpan.Zero,
            IssuerSigningKey = new SymmetricSecurityKey(Encoding.ASCII.GetBytes(jwtTokenConfig.Secret))
        };
    });


    services.AddControllers();
}
JWTAuthService & SignInManager is registered in DI container
services.AddScoped<JWTAuthService>();
services.AddScoped<SignInManager>();
jwtTokenConfig will read from jwt section of the appsettings.json. We also register as a Singleton service, so that you can access it in other services & controllers.
var jwtTokenConfig = Configuration.GetSection("jwt").Get<JwtTokenConfig>();
services.AddSingleton(jwtTokenConfig)
Finally, we register the JwtBearer Authentication handler using the AddJwtBearer
services.AddAuthentication(x =>
{
    x.DefaultAuthenticateScheme = JwtBearerDefaults.AuthenticationScheme;
    x.DefaultChallengeScheme = JwtBearerDefaults.AuthenticationScheme;
}).AddJwtBearer(x =>
{
    x.RequireHttpsMetadata = true;
    x.SaveToken = true;
    x.TokenValidationParameters = new TokenValidationParameters
    {
        ValidateIssuer = true,
        ValidIssuer = jwtTokenConfig.Issuer,
        ValidateAudience = true,
        ValidAudience = jwtTokenConfig.Audience,
        ValidateIssuerSigningKey = true,
        RequireExpirationTime = false,
        ValidateLifetime = true,
        ClockSkew = TimeSpan.Zero,
        IssuerSigningKey = new SymmetricSecurityKey(Encoding.ASCII.GetBytes(jwtTokenConfig.Secret))
    };
});
Authentication Middleware
public void Configure(IApplicationBuilder app, IWebHostEnvironment env)
{
    if (env.IsDevelopment())
    {
        app.UseDeveloperExceptionPage();
    }

    app.UseHttpsRedirection();

    app.UseRouting();
    app.UseAuthentication();
    app.UseAuthorization();

    app.UseEndpoints(endpoints =>
    {
        endpoints.MapControllers();
    });
}
Login & Refresh token End Points
Finally, let us build the login & Refresh token endpoints. Create the AccountController under the folder Controllers.
Controllers/AccountController.cs
using ASPNetCoreJwtAuth.Services;
using Microsoft.AspNetCore.Authorization;
using Microsoft.AspNetCore.Http;
using Microsoft.AspNetCore.Mvc;
using Microsoft.Extensions.Logging;
using System;
using System.Collections.Generic;
using System.ComponentModel.DataAnnotations;
using System.Linq;
using System.Security.Claims;
using System.Threading.Tasks;

namespace ASPNetCoreJwtAuth.Controllers
{
    [Route("api/[controller]")]
    [ApiController]
    public class AccountController : ControllerBase
    {
        private readonly ILogger<AccountController> _logger;
        private readonly SignInManager _signInManager;

        public AccountController(ILogger<AccountController> logger,
                                SignInManager signInManager,
                                JWTAuthService jwtAuthManager)
        {
            _logger = logger;
            _signInManager = signInManager;
        }


        [AllowAnonymous]
        [HttpPost("login")]
        public async Task<ActionResult> Login([FromBody] LoginRequest request)
        {

            if (!ModelState.IsValid) { return BadRequest(ModelState); }

            var result= await _signInManager.SignIn(request.UserName, request.Password);

            if (!result.Success) return Unauthorized();

            _logger.LogInformation($"User [{request.UserName}] logged in the system.");

            return Ok(new LoginResult
            {
                UserName = result.User.Email,
                AccessToken = result.AccessToken,
                RefreshToken = result.RefreshToken
            });
        }


        [HttpPost("refreshtoken")]
        public async Task<ActionResult> RefreshToken([FromBody] RefreshTokenRequest request)
        {
            if (!ModelState.IsValid) { return BadRequest(ModelState); }

            var result = await _signInManager.RefreshToken(request.AccessToken, request.RefreshToken);

            if (!result.Success) return Unauthorized();

            return Ok(new LoginResult
            {
                UserName = result.User.Email,
                AccessToken = result.AccessToken,
                RefreshToken = result.RefreshToken
            });
        }

    }

    public class LoginRequest
    {
        [Required]
        public string UserName { get; set; }

        [Required]
        public string Password { get; set; }
    }

    public class LoginResult
    {
        public string UserName { get; set; }
        public string AccessToken { get; set; }
        public string RefreshToken { get; set; }
    }

    public class RefreshTokenRequest
    {
        public string AccessToken { get; set; }
        public string RefreshToken { get; set; }
    }

}
Testing the JWT Bearer Authentication
Finally, we are ready to test our application
Open the postman and create a new request with following
URL      :  https://localhost:<PortNo>/api/account/login
Type     :  Post
Headers  :  Content-Type = application/json
Body     :  Type  Raw
{
    "username": "[email protected]",
    "password": "1234"
}
And click on Send.
The Request will hit the api/account/login end point logins the user and returns Access & Refresh Token
Enter an invalid password and you should get the 401 Unauthorized response

Now, create a new request
URL   : https://localhost:<PortNo>/api/jwt/privateapi
Type  : Get
Authorisation Type : Bearer
Token : Copy the token from the login request 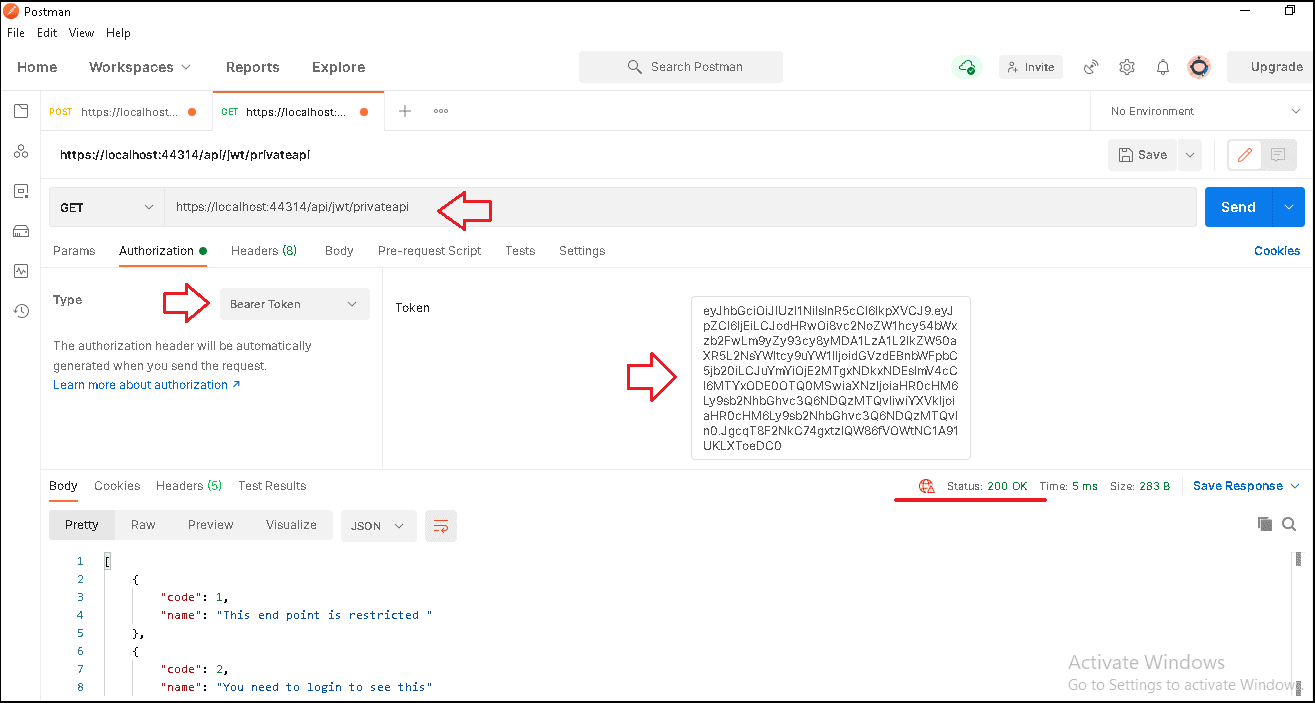
Change the token and send the request again and you will get the 401 Unauthorized response
Wait for 5 mins for the token to get expired and try again and you will get the 401 Unauthorized response.
To test the Refresh Token create a new Request. Change the Access token & Refresh token
URL  : https://localhost:<PortNo>/api/account/refreshtoken
Type : POST
Header : Content-Type = application/json
Body : Raw
{
    "accessToken":"Copy Access token here",
    "refreshToken":"Copy refresh token here"
}
You should be able to see the new Access & Refresh Token, provided the refresh token is not expired (10 min).
Accessing the User & Claims
We Read the ClaimsPrincipal from User Property of the HttpContext object
Remember we registered the Authentication Middleware in the Middleware pipeline using the UseAuthentication() Method.
When the Request arrives at the Authentication Middleware, it invokes the Default Authentication Handler to read the request and populate the HttpContext.User property
Remember in ConfigureServices , we registered the JWT Bearer Authentication handler and set it as default (DefaultAuthenticateScheme).
services.AddAuthentication(x =>
{
    x.DefaultAuthenticateScheme = JwtBearerDefaults.AuthenticationScheme;
    x.DefaultChallengeScheme = JwtBearerDefaults.AuthenticationScheme;
}).AddJwtBearer(x =>
Authentication Middleware invokes the AuthenticateAsync() method of the JWT Bearer Authentication handler to read the JWT token and uses it to populate the HttpContext.User property
All you need is to access the HTTPContext to the User & Claims.
For Example, in a Controller class, you can directly use the User or HttpContext as they are already available in the ControllerBase Class.
public IActionResult PrivateAPI()
{

    var list = new[]
    {
        new { Name = "This end point is restricted " },
        new { Name = $"Current Logged in User {User.Identity.Name} "      }
    }.ToList();

    foreach (var claim in HttpContext.User.Claims)
    {
        list.Add(new { Name = claim.Value });
    }

    return Ok(list);
}
Summary
This tutorial showed you how to implement the JWT Authentication in ASP.NET Core. We used Postman to test our endpoints. You can build the Login & Register form in Front End tools like Angular /React Native etc.
References
Read More
- ASP.NET Core Tutorial
- Authentication in ASP.NET Core
- Cookie Authentication in ASP.NET Core
- Introduction to ASP.NET Core Identity
- ASP.NET Core Identity Tutorial From Scratch
- Sending Email Confirmation in ASP.NET Core
- Add Custom Fields to the user in ASP.NET Core Identity
- Change Primary key in ASP.NET Core Identity
- JWT Authentication in ASP.NET Core
- Introduction to Authorization
- Simple Authorization using Authorize attribute
- Adding & Managing Claims in ASP.NET Core Identity
- Claim Based Authorization in ASP.NET Core
- Policy-based Authorization
- Resource-Based Authorization


“JSON Web Token (JWT) contains the claims of the user as name-value pair in the JSON Format. The issuer then digitally signs it using a private key (secret) before issuing it to the users.”
– What means ‘Issuer’?
Issuer is ASP.NET Core Web API in this scenario and that create token. then web api distrubite token to clients therefore naming as “Issuer”.
Thanks for the tutorial, it’s very good, so far I haven’t found anything similar. I’m trying to do it but I get lost with the code, could you share the source code to study it.
Thanks a lot
Tell me how can I pay you for this wonderful work..
Thanks a lot for your tutorial!
Authorization Type-> Authorization
And _ctx.Users didn’t work here, was giving error because there were no Users on the context.
so I added a DbSetUsers, error gone, but gave error on Postman, so I changed the DbSet to DbSet User and all worked okay.