In this tutorial, we will show you how to add Claims in ASP.NET Core Identity. The Claim is a piece of information about the user. A User can have multiple claims. A Single claim can also have multiple values. The Identity API stores the Claims in the AspNetUserClaims (Entity name is IdentityUserClaim) table. The User Manager Class of Identity API Provides the methods like AddClaimAsync, ReplaceClaimAsync & RemoveClaimAsync, which we will use to add/remove claims.
Table of Contents
Create Project
In the last tutorial, we created AuthzExample project to show how to use Authorize Attribute in MVC Controller & Razor Pages. We continue from where we left in that project and show you how to use the AddClaimAsync, ReplaceClaimAsync & RemoveClaimAsync to manage claims.
Adding Users Form
Go to Areas/Identity/Pages folder. Create a new folder Admin
Right-click on the Admin folder and click on Add new Scaffolded Item. Select Razor Pages Empty Template. Name the Template as Users
The Users page retrieves the list of users and displays them.
Areas/Identity/Pages/Admin/Users.cshtml.cs
using System;
using System.Collections.Generic;
using System.Linq;
using System.Threading.Tasks;
using AuthzExample.Data;
using Microsoft.AspNetCore.Identity;
using Microsoft.AspNetCore.Mvc;
using Microsoft.AspNetCore.Mvc.RazorPages;

namespace AuthzExample.Areas.Identity.Pages.Admin
{
    public class UsersModel : PageModel
    {
        public ApplicationDbContext _DbCtx { get; set; }

        public IEnumerable<IdentityUser> Users { get; set; }
                        = Enumerable.Empty<IdentityUser>();

        public UsersModel(ApplicationDbContext dbCtx)
        {
            _DbCtx = dbCtx;
        }

        public void OnGet()
        {
            Users = _DbCtx.Users.ToList();
        }
    }
}
Areas/Identity/Pages/Admin/Users.cshtml
@page
@model AuthzExample.Areas.Identity.Pages.Admin.UsersModel
@{
}
<div class="m-2">

    <table class="table table-sm table-striped table-bordered">
        <thead>
            <tr><th>Username</th><th>Normalized</th><th /></tr>
        </thead>
        <tbody>
            @foreach (var user in Model.Users)
            {
                <tr>
                    <td>@user.UserName</td>
                    <td>@user.NormalizedUserName</td>
                    <td>
                        <a asp-page="Claims" asp-route-id="@user.Id">Manage Claims</a>
                    </td>
                </tr>
            }
        </tbody>
    </table>

</div>
Add the menu link to the Users Page in the Layout Page.
Views/Shared/_Layout.cshtml
<li class="nav-item">
    <a class="nav-link text-dark" asp-area="Identity" asp-page="/Admin/Users">Users</a>
</li>
Now, run the App. Register a few users. Under the user’s menu, you should be able to see all the registered users.
Claims
Before adding claims, we need to define the Claim Types. Create ApplicationClaimTypes.cs under the folder Data
Data/ApplicationClaimTypes.cs
using System;
using System.Collections.Generic;

namespace AuthzExample.Data
{
    public static class ApplicationClaimTypes
    {
        public static List<String> AppClaimTypes = new List<String>() {
            "Admin","Employee","DOB","User","VIP","Disabled"
        };

    }
}
Adding/Deleting/Updating Claims
Go to Areas/Identity/Pages folder. Create _ViewImports.cshtml file. Import the necessary imports, set the namespace & add the TagHelper
Areas/Identity/Pages/_ViewImports.cshtml
@using Microsoft.AspNetCore.Identity
@using AuthzExample.Data
@namespace AuthzExample.Pages
@addTagHelper *, Microsoft.AspNetCore.Mvc.TagHelpers
Now go to Areas/Identity/Pages/Admin folder. Create a new Empty Razor Page Claims
The Claims form contains the forms to edit & delete the Claims. At the bottom of the screen, we have Form to create the Claim.
Areas/Identity/Pages/Admin/Claims.cshtml
@page "{id?}"
@model AuthzExample.Areas.Identity.Pages.Admin.ClaimsModel
@{
    int FormId = 0;
}

<div asp-validation-summary="All" class="text-danger m-2"></div>

<table class="table table-sm table-striped table-bordered">
    <thead><tr><th>Type</th><th>Value</th><th>Modify</th></tr></thead>
    <tbody>

        @foreach (var c in Model.Claims)
        {
            FormId++;

            <tr>
                <td>@c.Type</td>
                <td>@c.Value</td>
                <td>
                    <form method="post" id=@("editForm"+FormId)>
                        <input type="hidden" name="type" value="@c.Type" />
                        <input type="hidden" name="oldValue" value="@c.Value" />
                        <input class="form-control" name="value" value="@c.Value" />
                    </form>
                </td>
                <td>

                    <button type="submit" form=@("editForm"+FormId)
                            class="btn btn-sm btn-warning"
                            asp-page-handler="editClaim">
                        Edit
                    </button>

                    <button type="submit" form=@("editForm"+FormId)
                            class="btn btn-sm btn-danger"
                            asp-page-handler="DeleteClaim">
                        Delete
                    </button>

                </td>
            </tr>
        }
    </tbody>
</table>


<h1>Add New Claim</h1>
<form method="post" id="addForm">
    <div class="row">
        <div class="col">
            <select class="form-control" name="type">
                @foreach (var claimType in
                            ApplicationClaimTypes.AppClaimTypes)
                {
                    <option value="@claimType">
                        @claimType
                    </option>
                }
            </select>

        </div>

        <div class="col">
            <input class="form-control" name="value" />

        </div>

        <div class="col">
            <button asp-page-handler="AddClaim" type="submit"
                    class="btn btn-sm btn-success">
                Add
            </button>

        </div>
    </div>
</form>
Creates a variable FormId, which we increment by one for each iteration. We use this to create a unique Id for each form
@{
    int FormId = 0;
}
We loop through each claim of the user
@foreach (var c in Model.Claims)
{
    FormId++;
And create a form to edit each claim. Note that we used id=@("editForm"+FormId) to generate a unique id to this form.
<form method="post" id=@("editForm"+FormId)>
    <input type="hidden" name="type" value="@c.Type" />
    <input type="hidden" name="oldValue" value="@c.Value" />
    <input class="form-control" name="value" value="@c.Value" />
</form>
Finally, We have buttons for Edit & Delete. Both use the different page handlers editClaim & DeleteClaim.
<button type="submit" form=@("editForm"+FormId)
        class="btn btn-sm btn-warning"
        asp-page-handler="editClaim">
    Edit
</button>

<button type="submit" form=@("editForm"+FormId)
        class="btn btn-sm btn-danger"
        asp-page-handler="DeleteClaim">
    Delete
</button>
And at the bottom, we have Add New Claim Form.
<h1>Add New Claim</h1>
<form method="post" id="addForm">
The following is the complete code of the Page Model class.
Areas/Identity/Pages/Admin/Claims.cshtml.cs
using System.Collections.Generic;
using System.Security.Claims;
using System.Threading.Tasks;
using Microsoft.AspNetCore.Mvc;
using Microsoft.AspNetCore.Identity;
using System.ComponentModel.DataAnnotations;
using Microsoft.AspNetCore.Authorization;
using Microsoft.AspNetCore.Mvc.RazorPages;
using System.Linq;

namespace AuthzExample.Areas.Identity.Pages.Admin
{
    public class ClaimsModel : PageModel
    {
        public ClaimsModel(UserManager<IdentityUser> mgr)
        {
            UserManager = mgr;
        }


        public UserManager<IdentityUser> UserManager { get; set; }

        [BindProperty(SupportsGet = true)]
        public string Id { get; set; }

        public IEnumerable<Claim> Claims { get; set; }

        public async Task<IActionResult> OnGetAsync()
        {
            if (string.IsNullOrEmpty(Id))
            {
                //Redirect to NotFound
                return RedirectToPage("/");
            }
            IdentityUser user = await UserManager.FindByIdAsync(Id);
            Claims = await UserManager.GetClaimsAsync(user);
            return Page();
        }

        public async Task<IActionResult> OnPostAddClaimAsync([Required] string type,
                                                             [Required] string value)
        {

            IdentityUser user = await UserManager.FindByIdAsync(Id);

            if (ModelState.IsValid)
            {
                var claim = new Claim(type, value);
                var result = await UserManager.AddClaimAsync(user, claim);
                if (!result.Succeeded)
                {
                    foreach (var err in result.Errors)
                    {
                        ModelState.AddModelError(string.Empty, err.Description);
                    }
                }
            }
            Claims = await UserManager.GetClaimsAsync(user);
            return RedirectToPage();
        }

        public async Task<IActionResult> OnPostEditClaimAsync([Required] string type,
                                                              [Required] string value,
                                                              [Required] string oldValue)
        {
            IdentityUser user = await UserManager.FindByIdAsync(Id);
            if (ModelState.IsValid)
            {
                var claimNew = new Claim(type, value);
                var claimOld = new Claim(type, oldValue);
                var result = await UserManager.ReplaceClaimAsync(user, claimOld, claimNew);
            }
            Claims = await UserManager.GetClaimsAsync(user);
            return RedirectToPage();
        }

        public async Task<IActionResult> OnPostDeleteClaimAsync([Required] string type,
                                                                [Required] string value)
        {
            IdentityUser user = await UserManager.FindByIdAsync(Id);
            if (ModelState.IsValid)
            {
                var claim = new Claim(type, value);
                var result = await UserManager.RemoveClaimAsync(user, claim);
            }
            Claims = await UserManager.GetClaimsAsync(user);
            return RedirectToPage();

        }
    }
}
In the OnGetAsync method, we retrieve all the claims of the User to display it.
IdentityUser user = await UserManager.FindByIdAsync(Id);
Claims = await UserManager.GetClaimsAsync(user);
To add a new claim, first create new Claim object using the type & value. Then call the AddClaimAsync method save it to the database.
IdentityUser user = await UserManager.FindByIdAsync(Id);

if (ModelState.IsValid)
{
    var claim = new Claim(type, value);
    var result = await UserManager.AddClaimAsync(user, claim);
To Edit a claim, we need to construct both the existing claim & the new claim object. Use the ReplaceClaimAsync to replace the old with the new one.
IdentityUser user = await UserManager.FindByIdAsync(Id);
if (ModelState.IsValid)
{
    var claimNew = new Claim(type, value);
    var claimOld = new Claim(type, oldValue);
    var result = await UserManager.ReplaceClaimAsync(user, claimOld, claimNew);
To delete call the RemoveClaimAsync with claim object that you want to delete.
IdentityUser user = await UserManager.FindByIdAsync(Id);
if (ModelState.IsValid)
{
    var claim = new Claim(type, value);
    var result = await UserManager.RemoveClaimAsync(user, claim);
That’s it. Now you can run the app and test it.
Viewing the Claims of the Logged in User
The Claims from the AspNetUserClaims table are automatically included in the cookies when we login into the system using the Identity API. But If you have built the Cookie-based authentication system or Implemented JWT Bearer token authentication, then you need to include the claims in the cookies or in the JWT Token
The Authentication Middleware extracts the cookies (or tokens) and updates the User Property of the Context with the claims. You can read the claims from it as shown below
Views/Home/Index.html
@if (User.Identity.IsAuthenticated)
{
<p>User: @User.Identity.Name;</p>
<table class="table table-sm">
@foreach (var claim in User.Claims)
{
<tr>
<td>@claim.Type</td>
<td>@claim.Value</td>
</tr>
}
</table>
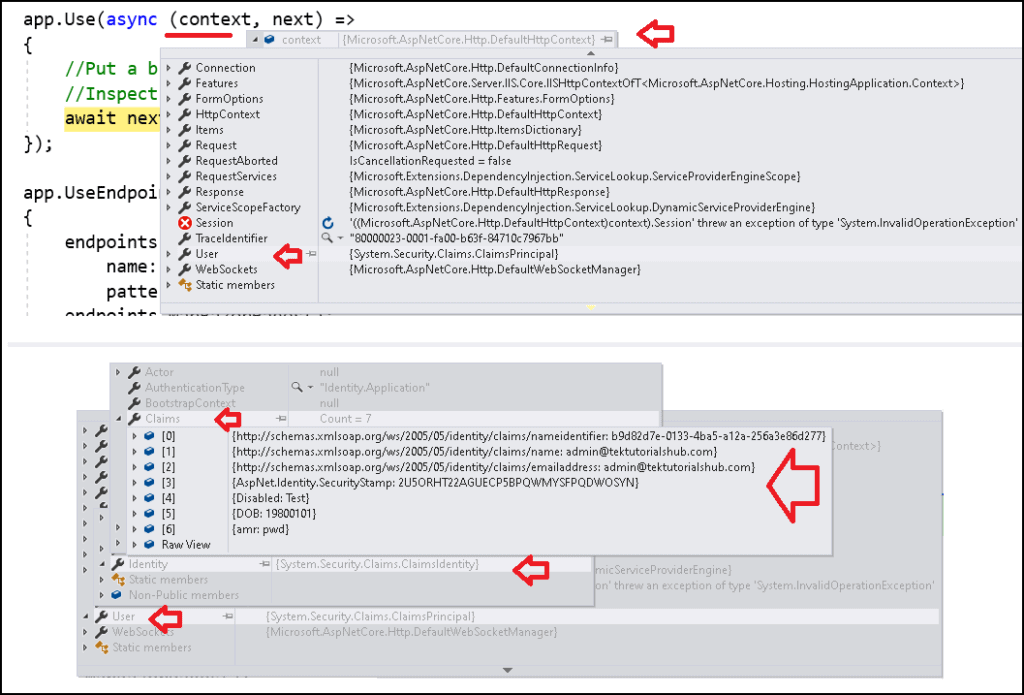
}Another way to view the claim is by adding a middleware just be before the app.UseEndpoints and add a breakpoint and inspect the context object.
app.Use(async (context, next) =>
{
    //Put a breakpoint here
    //Inspect the context.user.identies object
    await next.Invoke();
});
References
Read More
- ASP.NET Core Tutorial
- Authentication in ASP.NET Core
- Cookie Authentication in ASP.NET Core
- Introduction to ASP.NET Core Identity
- ASP.NET Core Identity Tutorial From Scratch
- Sending Email Confirmation in ASP.NET Core
- Add Custom Fields to the user in ASP.NET Core Identity
- Change Primary key in ASP.NET Core Identity
- JWT Authentication in ASP.NET Core
- Introduction to Authorization
- Simple Authorization using Authorize attribute
- Adding & Managing Claims in ASP.NET Core Identity
- Claim Based Authorization in ASP.NET Core
- Policy-based Authorization
- Resource-Based Authorization


ID is null on OnPostAddClaimAsync. Any idea why?