In this Introduction to ASP.NET Core Identity, let us learn how to use Identity API to add login functionality to a web application. We will learn what is ASP.NET Core Identity is Its Architecture & How to Create an ASP.NET Core Project with identity Enabled. Next, we will dive deep into the Identity Code, Scaffold Identity UI, and examine the register, login & logout functionalities.
Table of Contents
What is ASP.NET Core Identity
ASP.NET Core Identity is a fully-featured membership system for creating and maintaining user logins. Using Identity API, you can sign in & sign out users, reset their passwords, lockout users & Implement Multi-Factor Authentication. It can also integrate with external login providers like Microsoft Account, Facebook, Google, etc.
The Identity API Uses the Cookies Authentication. Our tutorial Cookie Authentication in ASP.NET Core. shows how to implement Cookie authentication without identity. We recommend you read it first because the Identity system uses the same technique.
The Identity API contains a lot of helper classes, which hides the complexities of managing the users. It has classes to register users, authenticate them by validating their passwords, manage roles and claims etc. It also contains the login form, registration form, password reset forms, etc.
With ASP.NET Core Identity, you need not write any code, which helps you get started quickly in App Development.
What ASP.NET Core Identity System can do
- Database schema for storing users, claims & Roles.
- UI for logging in, creating, and managing users
- Create/Modify/Delete User
- Create/Modify/Delete User Claims
- Password validation and rules.
- Password Hashing
- User account lockout
- Generating password-reset tokens.
- Multi Factor Authentication
- Managing External Identity providers (for example Facebook, Google, Twitter).
ASP.NET Core Identity Architecture
ASP.NET Core Identity consists of two main category of classes. They are Managers & Stores.
Managers
The Managers manage the identity related data such as creating a user, adding roles, etc. It has classes like UserManager, RoleManager, SignInManager, etc.
User Manager
User Manager contains the methods to create, delete, update the users. It uses the stores to persist the data to the database
SignIn Manager
SignIn Manager is responsible for login and log out the user from the application. It contains the methods like SignInAsync, SignOutAsync etc. On Sign In, it creates a new ClaimsPrincipal from the User data. It sets the HttpContext.User property to the new ClaimsPrincipal. Then it serializes the principal, encrypts it, and stores it as a cookie.
This server sends cookie to the browser with the response. Browser returns it back to the server on every request.
Stores
Stores persists the users, roles, etc. to the data source.
The ASP.NET Core Identity API uses the Entity Framework Core to store the user information in SQL Server Database. But you can change it to use a different database or ORM
The Identity system decouples the Stores & Managers from each other. Hence, we can easily change the database providers without disrupting the entire application
The following diagram shows how your web application interacts with the managers and stores
Creating a Project with ASP.NET Core Identity
Create a new project in Visual Studio 2019. select the Template ASP.NET Core Web App. under the Authentication Type select Individual Accounts. Select Target Framework as .NET 5.0
Individual Accounts option installs the ASP.NET Core Identity with EF Core

Setting Up Database
The Identity API uses the Entity Framework Core and SQL Server.
First, we need to update the connection string in ASP.NET Core. Open the appsettings.json and update the connection string to point to the correct database
appsettings.json
  "ConnectionStrings": {
    "DefaultConnection": "Server=Localhost;Database=ASPNetCoreIdentity;Trusted_Connection=True;MultipleActiveResultSets=true"
  },
The Template includes add-migration script (Under Data folder). All you need to run the update-database to create the database
Package Manager Console
update-databaseNow, open the SQL Server and explorer the tables.
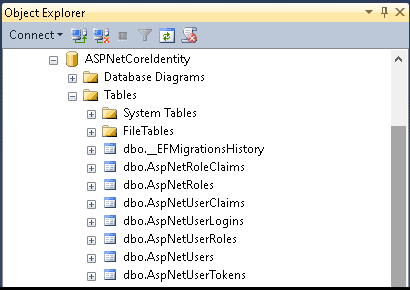
The following tables shows the entity name, table name and their purpose
| Entity | Table Name | Remarks |
|---|---|---|
| IdentityUser | AspNetUsers | Primary table to store user information |
| IdentityUserClaim | AspNetUserClaims | tables holds the claims associated with the user. |
| IdentityUserLogin | AspNetUserLogins | table holds the information about 3rd party/external logins |
| IdentityUserToken | AspNetUserTokens | is for storing tokens received from the external login providers. |
| IdentityUserRole | AspNetUserRoles | table contains the roles assigned to the user |
| IdentityRole | AspNetRoles | tables to store the roles |
| IdentityRoleClaim | AspNetRoleClaims | The claims that are assigned to the Role |
Important table among them is AspNetUsers table.
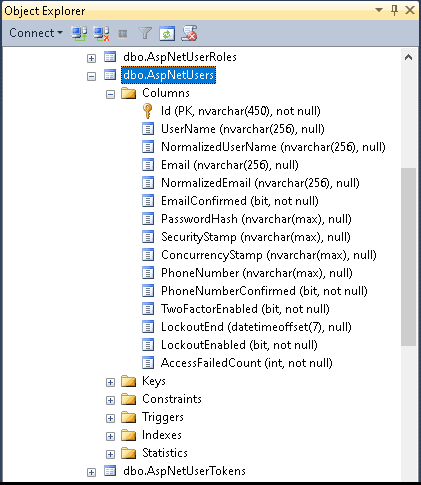
Note that id field is a GUID column.
Running & Testing the Application
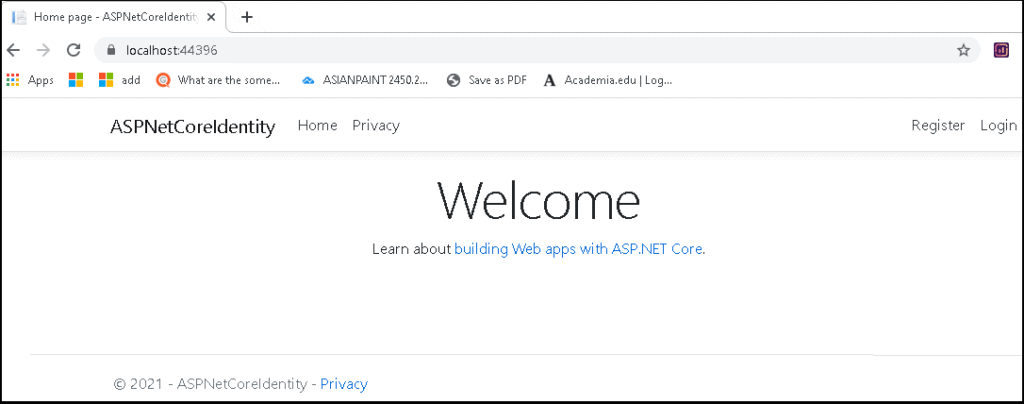
Once, the database is created and ready, you can run the App.
You will see the following screen.
Registering a new user
Click on Register Link to Register a new User. Note the URL /Identity/Account/Register
The Password is verified using the predefined configuration. You can change the password validation rules as per your apps requirements.
On successful registration the Identity API can send the Confirmation Email. But to do that we need to configure the email sender service. Otherwise, you will get the link to confirm the email in the registration confirmation screen
You can also use external service to Register the User. But to do that we need to configure them.
User Login
Clicking on the Login Link takes you to /Identity/Account/login URL.
Login Form allows us to login either providing the Email & Password or using the external providers (provided they are configured).
Option to reset a forgotten password is available in Login form. The API Also Provides the option to resend the confirmation mail.
User Profile
Once logged in the app will display the user name & logout menu link.
Click on the User name to open the Manage Account Screen. Here you will get options to
- Edit Your Profile
- Modify Email
- Change Password
- Enable Two-factor authentication
- Download or delete Personal data
Logout
Logout, will logs you out of the system.
Explore the Project
Now, let us look at the files installed by the Template
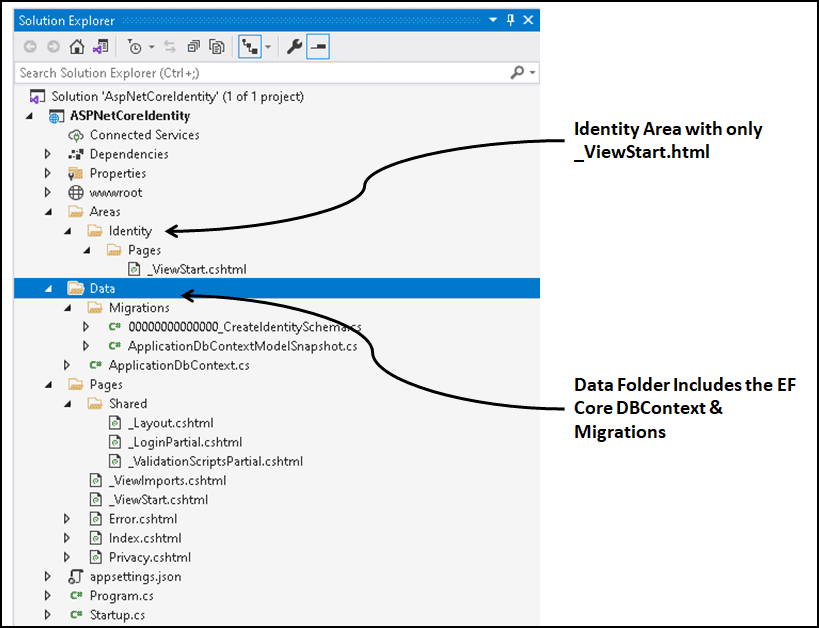
IdentityDbContext
The Context class ApplicationDbContext is in the Data folder. The Data folder also contains the migrations for configuring the database.
The Code of the ApplicationDbContext is shown below.
Data/ApplicationDbContext.cs
using Microsoft.AspNetCore.Identity.EntityFrameworkCore;
using Microsoft.EntityFrameworkCore;

namespace ASPNetCoreIdentity.Data
{
    public class ApplicationDbContext : IdentityDbContext
    {
        public ApplicationDbContext(DbContextOptions<ApplicationDbContext> options)
            : base(options)
        {
        }
    }
}
The ApplicationDbContext inherits from the IdentityDbContext. which in turn inherits from the DBContext.
The IdentityDbContext contains the DbSet Properties for the IdentityRole, IdentityRoleClaim, IdentityUser, IdentityUserClaim, IdentityUserLogin, IdentityUserRole , IdentityUserToken Entities. You can find the properties of these entities from the Identity Entities.
Startup class
The ConfigureServices method of the startup class configures the identity & ApplicationDbContext related services.
Startup.cs
public void ConfigureServices(IServiceCollection services)
{
    services.AddDbContext<ApplicationDbContext>(options =>
        options.UseSqlServer(
            Configuration.GetConnectionString("DefaultConnection")));

    services.AddDatabaseDeveloperPageExceptionFilter();

    services.AddDefaultIdentity<IdentityUser>(
        options => options.SignIn.RequireConfirmedAccount = true)
        .AddEntityFrameworkStores<ApplicationDbContext>();

    services.AddRazorPages();
}
AddDefaultIdentity configures the Identity Services. You can make use of options to configure the behavior of the Identity API.
The AddEntityFrameworkStores configures the Identity to use the Entity Framework Core. We also need to specify the type of the Context that we are going to use to the Stores.
Authentication Middleware
The Identity API includes the Authentication middleware in the Middleware pipeline.
Authentication Middleware authenticates the user. We add it to the middleware pipeline by using the UseAuthentication extension method.
One of the important task that is performed by the built-in authentication middleware is to read the cookies and construct the ClaimsPrincipal and update the User object in the HttpContext. The Authentication Middleware uses the Default Authentication Handler i.e. Cookie Authentication Handler to read the Cookies from the response and construct the ClaimsPrincipal
This will make the all the middleware’s which appear after the UseAuthentication() is aware that the user is authenticated.
We must invoke the UseAuthentication
- After
UseRouting, so that route information is available for authentication decisions. - Before
UseEndpoints&UseAuthorization, so that users are authenticated before accessing the endpoints.
Startup.cs
app.UseRouting();

app.UseAuthentication();
app.UseAuthorization();

app.UseEndpoints(endpoints =>
{
    endpoints.MapRazorPages();
});
Where is UI ?
All UI Forms are now part of the Razor class library in the namespace Microsoft.AspNetCore.Identity.UI. That is why you will not find them in Project. This is a new feature introduced in ASP.NET Core 2.1
Scaffold Identity UI in ASP.NET Core
The Identity Razor class library hides all the UI Forms, Services etc. But what if you want to modify or customize them. The ASP.NET Core provides an option to Scaffold the Identity UI and extract the source code and add it out project.
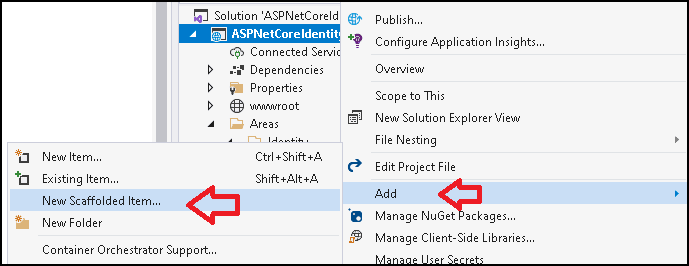
To do that,
- Right Click on Project
- Click Add
- Click New Scaffolded Item
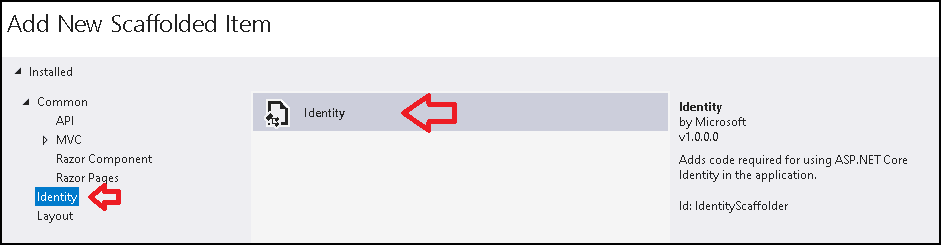
In the Add New Scaffolded Item dialog box select Identity. Click on Add
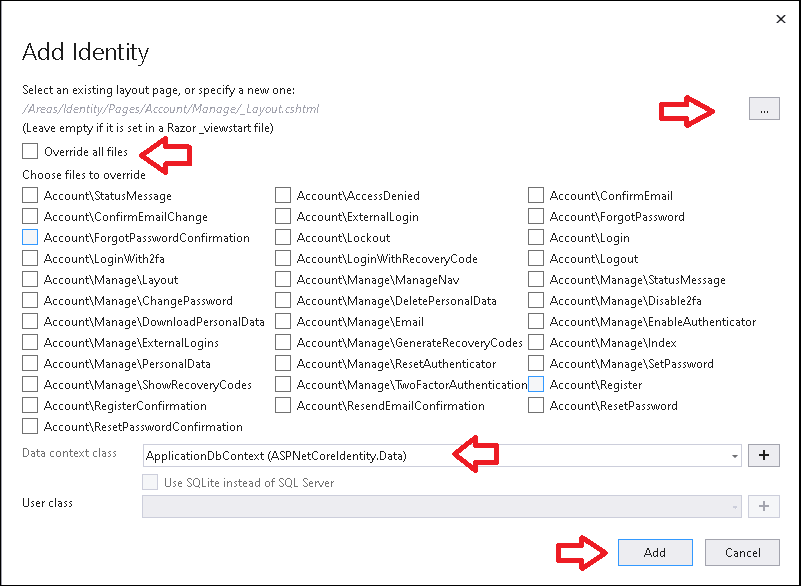
This will bring you to Add Identity Dialog Box
- You can select a different layout page than the default.
Override all filescopies everything. You can also Import only those you need by selecting the individual item. For this tutorial selectOverride all files.- Select the Data Context class, that you will be using for the identity. Select
ApplicationDbContextfrom the drop down - Also select the user class, if you overridden it in you application
- Click Add, when Finished
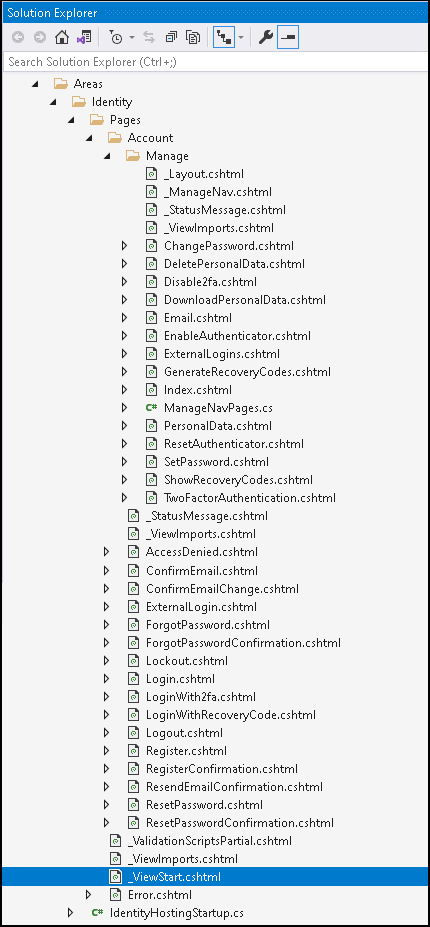
The following files are added to the Project.
Examining the Code
Register Form
Areas/Identity/Pages/Accounts/Register.cshtml.cs
using System;
using System.Collections.Generic;
using System.ComponentModel.DataAnnotations;
using System.Linq;
using System.Text;
using System.Text.Encodings.Web;
using System.Threading.Tasks;
using Microsoft.AspNetCore.Authentication;
using Microsoft.AspNetCore.Authorization;
using Microsoft.AspNetCore.Identity;
using Microsoft.AspNetCore.Identity.UI.Services;
using Microsoft.AspNetCore.Mvc;
using Microsoft.AspNetCore.Mvc.RazorPages;
using Microsoft.AspNetCore.WebUtilities;
using Microsoft.Extensions.Logging;

namespace ASPNetCoreIdentity.Areas.Identity.Pages.Account
{
    [AllowAnonymous]
    public class RegisterModel : PageModel
    {
        private readonly SignInManager<IdentityUser> _signInManager;
        private readonly UserManager<IdentityUser> _userManager;
        private readonly ILogger<RegisterModel> _logger;
        private readonly IEmailSender _emailSender;

        public RegisterModel(
            UserManager<IdentityUser> userManager,
            SignInManager<IdentityUser> signInManager,
            ILogger<RegisterModel> logger,
            IEmailSender emailSender)
        {
            _userManager = userManager;
            _signInManager = signInManager;
            _logger = logger;
            _emailSender = emailSender;
        }

        [BindProperty]
        public InputModel Input { get; set; }

        public string ReturnUrl { get; set; }

        public IList<AuthenticationScheme> ExternalLogins { get; set; }

        public class InputModel
        {
            [Required]
            [EmailAddress]
            [Display(Name = "Email")]
            public string Email { get; set; }

            [Required]
            [StringLength(100, ErrorMessage = "The {0} must be at least {2} and at max {1} characters long.", MinimumLength = 6)]
            [DataType(DataType.Password)]
            [Display(Name = "Password")]
            public string Password { get; set; }

            [DataType(DataType.Password)]
            [Display(Name = "Confirm password")]
            [Compare("Password", ErrorMessage = "The password and confirmation password do not match.")]
            public string ConfirmPassword { get; set; }
        }

        public async Task OnGetAsync(string returnUrl = null)
        {
            ReturnUrl = returnUrl;
            ExternalLogins = (await _signInManager.GetExternalAuthenticationSchemesAsync()).ToList();
        }

        public async Task<IActionResult> OnPostAsync(string returnUrl = null)
        {
            returnUrl ??= Url.Content("~/");
            ExternalLogins = (await _signInManager.GetExternalAuthenticationSchemesAsync()).ToList();
            if (ModelState.IsValid)
            {
                var user = new IdentityUser { UserName = Input.Email, Email = Input.Email };
                var result = await _userManager.CreateAsync(user, Input.Password);
                if (result.Succeeded)
                {
                    _logger.LogInformation("User created a new account with password.");

                    var code = await _userManager.GenerateEmailConfirmationTokenAsync(user);
                    code = WebEncoders.Base64UrlEncode(Encoding.UTF8.GetBytes(code));
                    var callbackUrl = Url.Page(
                        "/Account/ConfirmEmail",
                        pageHandler: null,
                        values: new { area = "Identity", userId = user.Id, code = code, returnUrl = returnUrl },
                        protocol: Request.Scheme);

                    await _emailSender.SendEmailAsync(Input.Email, "Confirm your email",
                        $"Please confirm your account by <a href='{HtmlEncoder.Default.Encode(callbackUrl)}'>clicking here</a>.");

                    if (_userManager.Options.SignIn.RequireConfirmedAccount)
                    {
                        return RedirectToPage("RegisterConfirmation", new { email = Input.Email, returnUrl = returnUrl });
                    }
                    else
                    {
                        await _signInManager.SignInAsync(user, isPersistent: false);
                        return LocalRedirect(returnUrl);
                    }
                }
                foreach (var error in result.Errors)
                {
                    ModelState.AddModelError(string.Empty, error.Description);
                }
            }

            // If we got this far, something failed, redisplay form
            return Page();
        }
    }
}
The Register form is decorated with AllowAnonymous so that anybody can access this page.
SignInManager and UserManager is injected into the Register Form
A new user is registered by clicking on the Register button, which will invoke the OnPostAsync method
Creating User
The UserManager.CreateAsync() method registers the new user
var user = new IdentityUser { UserName = Input.Email, Email = Input.Email };
var result = await _userManager.CreateAsync(user, Input.Password);
Sending Confirmation Email
GenerateEmailConfirmationTokenAsync() creates the Email Confirmation code. Using the code the Url.Page method generates the Email Confirmation link ( callbackUrl)
var code = await _userManager.GenerateEmailConfirmationTokenAsync(user);
code = WebEncoders.Base64UrlEncode(Encoding.UTF8.GetBytes(code));
var callbackUrl = Url.Page(
    "/Account/ConfirmEmail",
    pageHandler: null,
    values: new { area = "Identity", userId = user.Id, code = code, returnUrl = returnUrl },
    protocol: Request.Scheme);
The Email Confirmation link (callbackUrl) is in the following format.
https://localhost:44396/Identity/Account/ConfirmEmail?userId=<id>&code=<code>Where <id> is the Id of the User and the <code> is the Email Confirmation code.
SendEmailAsync sends the Confirmation mail with the above URL to the users email. The user is expected to click on the above link to confirm his account.
await _emailSender.SendEmailAsync(Input.Email, "Confirm your email",
    $"Please confirm your account by <a href='{HtmlEncoder.Default.Encode(callbackUrl)}'>clicking here</a>.");
Note that mail is sent only if we have configure the email service. Since, we have not done it no email is sent for now.
Winding up
At this point user information is validated, stored in the database and email confirmation link is sent to his email box
But the account is not yet confirmed. Here we have two options depending the value of Options.SignIn.RequireConfirmedAccount
If the RequireConfirmedAccount is
- set to true, then the user is not logged in but re directed to Registration Confirmation page.
- set to false, then the user is automatically logged in without confirmation using the
SignInAsyncmethod.
if (_userManager.Options.SignIn.RequireConfirmedAccount)
{
    return RedirectToPage("RegisterConfirmation", new { email = Input.Email, returnUrl = returnUrl });
}
else
{
    await _signInManager.SignInAsync(user, isPersistent: false);
    return LocalRedirect(returnUrl);
}
RegisterConfirmation Form
The Identity API directs user the RegisterConfirmation Page after the successful registration provided the RequireConfirmedAccount is set true.
Areas/Identity/Pages/Accounts/RegisterConfirmation.cshtml
using Microsoft.AspNetCore.Authorization;
using System.Text;
using System.Threading.Tasks;
using Microsoft.AspNetCore.Identity;
using Microsoft.AspNetCore.Identity.UI.Services;
using Microsoft.AspNetCore.Mvc;
using Microsoft.AspNetCore.Mvc.RazorPages;
using Microsoft.AspNetCore.WebUtilities;

namespace ASPNetCoreIdentity.Areas.Identity.Pages.Account
{
    [AllowAnonymous]
    public class RegisterConfirmationModel : PageModel
    {
        private readonly UserManager<IdentityUser> _userManager;
        private readonly IEmailSender _sender;

        public RegisterConfirmationModel(UserManager<IdentityUser> userManager, IEmailSender sender)
        {
            _userManager = userManager;
            _sender = sender;
        }

        public string Email { get; set; }

        public bool DisplayConfirmAccountLink { get; set; }

        public string EmailConfirmationUrl { get; set; }

        public async Task<IActionResult> OnGetAsync(string email, string returnUrl = null)
        {
            if (email == null)
            {
                return RedirectToPage("/Index");
            }

            var user = await _userManager.FindByEmailAsync(email);
            if (user == null)
            {
                return NotFound($"Unable to load user with email '{email}'.");
            }

            Email = email;
            // Once you add a real email sender, you should remove this code that lets you confirm the account
            DisplayConfirmAccountLink = true;
            if (DisplayConfirmAccountLink)
            {
                var userId = await _userManager.GetUserIdAsync(user);
                var code = await _userManager.GenerateEmailConfirmationTokenAsync(user);
                code = WebEncoders.Base64UrlEncode(Encoding.UTF8.GetBytes(code));
                EmailConfirmationUrl = Url.Page(
                    "/Account/ConfirmEmail",
                    pageHandler: null,
                    values: new { area = "Identity", userId = userId, code = code, returnUrl = returnUrl },
                    protocol: Request.Scheme);
            }

            return Page();
        }
    }
}
Ideally, this page should inform the user that he needs to confirm his email before login into the system.
But during testing or development, you might not have an email service set up. Hence the identity API provides displays the Email Confirmation link in this form. It allows us to confirm the account.
The code generates and displays the email confirmation link when DisplayConfirmAccountLink is true. You can click on the link and confirm your account
Remember to remove this code when you add a real email sender
// Once you add a real email sender, you should remove this code that lets you confirm the account
DisplayConfirmAccountLink = true;
if (DisplayConfirmAccountLink)
{
    var userId = await _userManager.GetUserIdAsync(user);
    var code = await _userManager.GenerateEmailConfirmationTokenAsync(user);
    code = WebEncoders.Base64UrlEncode(Encoding.UTF8.GetBytes(code));
    EmailConfirmationUrl = Url.Page(
        "/Account/ConfirmEmail",
        pageHandler: null,
        values: new { area = "Identity", userId = userId, code = code, returnUrl = returnUrl },
        protocol: Request.Scheme);
}
Login Form
The Login form code is as follows.
Areas/Identity/Pages/Account/Login.cshtml.cs
using System;
using System.Collections.Generic;
using System.ComponentModel.DataAnnotations;
using System.Linq;
using System.Text.Encodings.Web;
using System.Threading.Tasks;
using Microsoft.AspNetCore.Authorization;
using Microsoft.AspNetCore.Authentication;
using Microsoft.AspNetCore.Identity;
using Microsoft.AspNetCore.Identity.UI.Services;
using Microsoft.AspNetCore.Mvc;
using Microsoft.AspNetCore.Mvc.RazorPages;
using Microsoft.Extensions.Logging;

namespace ASPNetCoreIdentity.Areas.Identity.Pages.Account
{
    [AllowAnonymous]
    public class LoginModel : PageModel
    {
        private readonly UserManager<IdentityUser> _userManager;
        private readonly SignInManager<IdentityUser> _signInManager;
        private readonly ILogger<LoginModel> _logger;

        public LoginModel(SignInManager<IdentityUser> signInManager,
            ILogger<LoginModel> logger,
            UserManager<IdentityUser> userManager)
        {
            _userManager = userManager;
            _signInManager = signInManager;
            _logger = logger;
        }

        [BindProperty]
        public InputModel Input { get; set; }

        public IList<AuthenticationScheme> ExternalLogins { get; set; }

        public string ReturnUrl { get; set; }

        [TempData]
        public string ErrorMessage { get; set; }

        public class InputModel
        {
            [Required]
            [EmailAddress]
            public string Email { get; set; }

            [Required]
            [DataType(DataType.Password)]
            public string Password { get; set; }

            [Display(Name = "Remember me?")]
            public bool RememberMe { get; set; }
        }

        public async Task OnGetAsync(string returnUrl = null)
        {
            if (!string.IsNullOrEmpty(ErrorMessage))
            {
                ModelState.AddModelError(string.Empty, ErrorMessage);
            }

            returnUrl ??= Url.Content("~/");

            // Clear the existing external cookie to ensure a clean login process
            await HttpContext.SignOutAsync(IdentityConstants.ExternalScheme);

            ExternalLogins = (await _signInManager.GetExternalAuthenticationSchemesAsync()).ToList();

            ReturnUrl = returnUrl;
        }

        public async Task<IActionResult> OnPostAsync(string returnUrl = null)
        {
            returnUrl ??= Url.Content("~/");

            ExternalLogins = (await _signInManager.GetExternalAuthenticationSchemesAsync()).ToList();

            if (ModelState.IsValid)
            {
                // This doesn't count login failures towards account lockout
                // To enable password failures to trigger account lockout, set lockoutOnFailure: true
                var result = await _signInManager.PasswordSignInAsync(Input.Email, Input.Password, Input.RememberMe, lockoutOnFailure: false);
                if (result.Succeeded)
                {
                    _logger.LogInformation("User logged in.");
                    return LocalRedirect(returnUrl);
                }
                if (result.RequiresTwoFactor)
                {
                    return RedirectToPage("./LoginWith2fa", new { ReturnUrl = returnUrl, RememberMe = Input.RememberMe });
                }
                if (result.IsLockedOut)
                {
                    _logger.LogWarning("User account locked out.");
                    return RedirectToPage("./Lockout");
                }
                else
                {
                    ModelState.AddModelError(string.Empty, "Invalid login attempt.");
                    return Page();
                }
            }

            // If we got this far, something failed, redisplay form
            return Page();
        }
    }
}
AllowAnonymous decorator allows anyone to access the login form
When the form loads (OnGetAsync), it clears the existing external cookie by invoking the SignOutAsync method on the HTTPContext object.
It also loads the ExternalLogins so as to display them in the login screen.
OnPostAsync method is executes when the user clicks on login button.
It then calls the PasswordSignInAsync method with email & password to sign in the user.
The PasswordSignInAsync method does the following
- Verify the user exists and password matches
- Password / email does not match then returns with
Succeededset to false - If 2 factor authentication enabled for the user, the returns with
RequiresTwoFactorset totrue - In case user has exceeds the
MaxFailedAccessAttempts, then is returns withIsLockedOutset true. - If all is ok
- Creates the
ClaimsIdentitywithClaimsof the User. - Creates the
ClaimsPrincipalfrom theClaimsIdentity - Invokes the
HTTPContext.SignInAsyncmethod with theClaimsPrincipaland logs in the user. - Returns with
Succeededset to true
- Creates the
- Password / email does not match then returns with
var result = await _signInManager.PasswordSignInAsync(Input.Email, Input.Password, Input.RememberMe, lockoutOnFailure: false);
If the PasswordSignInAsync returns Succeeded, then it redirect to the returnUrl and the user is logged in.
if (result.Succeeded)
{
    _logger.LogInformation("User logged in.");
    return LocalRedirect(returnUrl);
}
In the case of RequiresTwoFactor then the user is redirected to LoginWith2fa
if (result.RequiresTwoFactor)
{
    return RedirectToPage("./LoginWith2fa", new { ReturnUrl = returnUrl, RememberMe = Input.RememberMe });
}
If PasswordSignInAsync returns IsLockedOut then the Lockout URL is displayed to the user.
if (result.IsLockedOut)
{
    _logger.LogWarning("User account locked out.");
    return RedirectToPage("./Lockout");
}
If fails to login then it displays the login failed error message.
Logout Form
Areas/Identity/Pages/Account/Logout.cshtml.cs
using System.Threading.Tasks;
using Microsoft.AspNetCore.Authorization;
using Microsoft.AspNetCore.Identity;
using Microsoft.AspNetCore.Mvc;
using Microsoft.AspNetCore.Mvc.RazorPages;
using Microsoft.Extensions.Logging;

namespace ASPNetCoreIdentityAPIIntro.Areas.Identity.Pages.Account
{
    [AllowAnonymous]
    public class LogoutModel : PageModel
    {
        private readonly SignInManager<IdentityUser> _signInManager;
        private readonly ILogger<LogoutModel> _logger;

        public LogoutModel(SignInManager<IdentityUser> signInManager, ILogger<LogoutModel> logger)
        {
            _signInManager = signInManager;
            _logger = logger;
        }

        public void OnGet()
        {
        }

        public async Task<IActionResult> OnPost(string returnUrl = null)
        {
            await _signInManager.SignOutAsync();
            _logger.LogInformation("User logged out.");
            if (returnUrl != null)
            {
                return LocalRedirect(returnUrl);
            }
            else
            {
                return RedirectToPage();
            }
        }
    }
}
The logout calls the SignOutAsync to remove all cookies from the context.
await _signInManager.SignOutAsync();Summary
This tutorial introduced you to ASP.NET Core Identity API. We showed how to create an ASP.NET Core web app using ASP.NET Core Identity for managing the User Accounts. Identity API hides the UI Forms from us. But you can scaffold them and add them to your project. We later looked at the register, login & logout form and learned how identity works under the hood.
Read More
- ASP.NET Core Tutorial
- Authentication in ASP.NET Core
- Cookie Authentication in ASP.NET Core
- Introduction to ASP.NET Core Identity
- ASP.NET Core Identity Tutorial From Scratch
- Sending Email Confirmation in ASP.NET Core
- Add Custom Fields to the user in ASP.NET Core Identity
- Change Primary key in ASP.NET Core Identity
- JWT Authentication in ASP.NET Core
- Introduction to Authorization
- Simple Authorization using Authorize attribute
- Adding & Managing Claims in ASP.NET Core Identity
- Claim Based Authorization in ASP.NET Core
- Policy-based Authorization
- Resource-Based Authorization

Thanks
Congratulations!
You explained very well!
The Introduction to ASP.NET Core Identity
….