In this tutorial. we are going to look at the Policy-based Authorization in ASP.NET Core. We learned Claim based authorization in the previous tutorial. We can create simple policies using that approach and it is sufficient to handle most of the situations. But if we run into complex authorization requirements, then we need to build a custom policy-based authorization.
Table of Contents
Authorization Policies are the backbone of the ASP.NET Core Authorization Framework. Even when you use claim-based or role-based authorization, you are actually using Policy-based Authorization.
A Policy defines a collection of requirements, that the user must satisfy in order to access a resource. The user must satisfy all the requirements.
We Add the policy using the AddAuthorization method in the ConfigureServices of the startup class.
services.AddAuthorization(options =>
{
    options.AddPolicy("AdminOnly", policy => policy.RequireClaim("Admin"));

});
The policies can be simple as calling RequireClaim on policy builder. You can also create complex policies by creating requirements and handlers.
The following examples show the Simple Authorization Policies using claims & Roles.
Policy with Single Claim
The following policy creates an AdminOnly Policy. The user must have the Admin claim. The value of the Claim does not matter here.
options.AddPolicy("AdminOnly", policy => policy.RequireClaim("Admin"));Policy with Single Claim & Value
The following is the ITOnly Policy, which requires the user the have a claim Permission with the value IT. The Permission claim with any other value is not allowed.
options.AddPolicy("ITOnly", policy => policy.RequireClaim("Permission", "IT"));Policy with Multiple Claims
You can chain multiple Claims together as shown below. The SuperIT policy requires user the have Permission claim with Value IT and separate IT claim. The user must satisfy both conditions.
options.AddPolicy("SuperIT",
        policy => policy.RequireClaim("Permission", "IT")
.RequireClaim("IT"));This policy is similar to adding Authorize attribute.
options.AddPolicy("AuthUsers", policy => policy.RequireAuthenticatedUser());Policy using a Role
options.AddPolicy("AdminRole", policy => policy.RequireRole("AdminRole"));Policy using a User Name
options.AddPolicy("BobOnly", policy => policy.RequireUserName("Bob"));We apply the policy using the Authorize attribute.
The following code applies the AdminOnly policy to the SomeSecureAction
[Authorize(Policy = "AdminOnly")]
public IActionResult SomeSecureAction()
{
    return View();
}
Custom Policy using a Func
The Policies, we created above are simple and straightforward. But if you have little complex authorization requirements, then you can create a custom function and use the method in RequireAssertion
The custom lambda function must return a true if the policy is satisfied.
options.AddPolicy(
        "SuperUser",
        policyBuilder => policyBuilder.RequireAssertion(
            context => context.User.HasClaim(claim => claim.Type == "Admin")
                || context.User.HasClaim(claim => claim.Type == "IT")
                || context.User.IsInRole("CEO"))
    );
Custom Policy using requirement & Handlers
We can create a custom Policy by using the Authorization Requirement & Authorization Handler.
The Authorization Requirement defines the collection of conditions that the policy must evaluate. For the Policy to be successful, it must satisfy all the requirements. It is similar to AND Condition. If one of the requirements fails. then the policy fails.
The following diagram describes the structure of a Policy using Requirement. The Policy contains three requirements.
For The policy to be successful all three requirements must return success. It is like a AND Condition. If one of them fails, then the Policy fails.
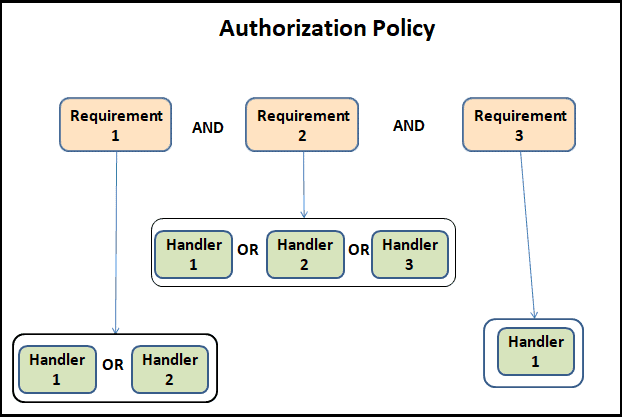
The authorization handler contains the logic to checks to see if the requirement is Valid. An Authorization Requirement can contain more than one Authorization Handler.
An Authorization Handler can return one of the three values
- Fail
- Succeded
- Do Nothing.
If one of the handlers return fail, then the requirement fails. It Fails irrespective of the results of other handlers.
If None of the requirement handlers fails, but at least one of the requirement handler returns Success then the requirement is Success.
If none of the requirement handlers return a value, then the requirement fails.
Note that all the handlers are invoked, irrespective of the outcome.
Now, let us understand it with an example
Example of Requirement & Requirement handler
Consider the following example.
To create a new product in a portal the user must satisfy the following conditions.
- The user is an employee of the Organization. Carry an
Employeeclaim. - The user is a VIP Customer. Carry an
VIPClaim. - But, the user is not allowed to post if his account is disabled due to bad reviews. The disabled account carry
Disabledclaim.
The above conditions represent a policy. We call it as canManageProduct policy
Each of the above statements is our Handlers. Hence we have three handlers
- IsEmployeeHandler
- IsVIPCustomerHandler
- IsAccountNotDisabledHandler
We can, in fact, create a single handler and test all of the above. That will serve our purpose for this tutorial. But in a real-world application, you need to look at reusing the handlers in another requirement. Hence it makes sense to split it up into smaller pieces.
In the above, if IsEmployeeHandler OR IsVIPCustomerHandler returns true, then the user can edit the Product. Hence these two falls under a single requirement.
But the IsAccountNotDisabledHandler is different. If the Account is disabled, then the user must not be allowed to create the Product. Hence it must return Fail
IsAllowedToManageProductRequirementIsEmployeeHandlerreturnssucesselse nothingIsVIPCustomerHandlerreturnssucesselse nothingIsAccountNotDisabledHandlerreturnsfailelse nothing
Another way to build the requirement is by creating the two requirements.
IsAllowedToManageProductRequirementIsEmployeeHandlerreturnssucesselse nothingIsVIPCustomerHandlerreturnssucesselse nothing
IsAccountEnabledRequirementIsAccountNotDisabledHandlerreturnstrueelse nothing
In the second method, we can make use of IsAccountEnabledRequirement in another Policy.
Now, let us implement it in an example project. We will use the project that we created in Adding & Managing Claims in ASP.NET Core Identity. The Project has a CRUD option for the product table and also option to add /remove claims of the user
Create a folder Authorization under the solution root.
Under Authorization folder create the class IsAllowedToEditProductRequirement
A Requirement class must implement IAuthorizationRequirement from the Microsoft.AspNetCore.Authorization namespace. IAuthorizationRequirement does not contain any methods or properties. Hence we do not need to implement anything.
using Microsoft.AspNetCore.Authorization;

namespace AuthzExample.Authorization
{
    public class IsAccountEnabledRequirement : IAuthorizationRequirement
    {
    }
}
If the Requirement needs any input, then you can add a public constructor with the input.
Similarly, create the IsAccountEnabledRequirement class.
using Microsoft.AspNetCore.Authorization;

namespace AuthzExample.Authorization
{
    public class IsAllowedToManageProductRequirement : IAuthorizationRequirement
    {
    }
}The handlers must inherit from the AuthorizationHandler. It has one method HandleRequirementAsync, which we must implement in our handler class.
The following code shows the signature of the HandleRequirementAsync. We get the context and the requirement that is being checked as the parameter. The context class has User (ClaimPrincipal) object. We use that to check whether the user has any claim.
protected override Task HandleRequirementAsync(AuthorizationHandlerContext context,
                                                IsAllowedToEditProductRequirement requirement)
{
    throw new System.NotImplementedException();
}
If the user passes the requirement, then the handler must call the context.Succeed method before returning.
If the user fails the requirement, then the handler must call the context.Fail() before returning.
If the user neither fails nor passes, then the handler must just return.
The following listing shows the codes of our Handler classes.
All the handlers are similar in nature. They access the User object from the context class and check if the user has a certain claim.
Authorization/IsEmployeeHandler.cs
using Microsoft.AspNetCore.Authorization;
using System.Threading.Tasks;

namespace AuthzExample.Authorization
{
    public class IsEmployeeHandler : AuthorizationHandler<IsAllowedToManageProductRequirement>
    {
        protected override Task HandleRequirementAsync(AuthorizationHandlerContext context,
                                                       IsAllowedToManageProductRequirement requirement)
        {
            if (context.User.HasClaim(f => f.Type == "Employee"))
            {
                context.Succeed(requirement);
            }
            return Task.CompletedTask;
        }
    }
}
Authorization/IsVIPCustomerHandler.cs
using Microsoft.AspNetCore.Authorization;
using System.Linq;
using System.Threading.Tasks;

namespace AuthzExample.Authorization
{
    public class IsVIPCustomerHandler : AuthorizationHandler<IsAllowedToManageProductRequirement>
    {
        protected override Task HandleRequirementAsync(AuthorizationHandlerContext context,
                                                       IsAllowedToManageProductRequirement requirement)
        {
            if (context.User.HasClaim(f => f.Type == "VIP"))
            {
                context.Succeed(requirement);
            }

            return Task.CompletedTask;
        }
    }
}
Authorization/IsAccountNotDisabledHandler.cs
using Microsoft.AspNetCore.Authorization;
using System.Linq;
using System.Threading.Tasks;

namespace AuthzExample.Authorization
{
    public class IsAccountNotDisabledHandler : AuthorizationHandler<IsAccountEnabledRequirement>
    {
        protected override Task HandleRequirementAsync(AuthorizationHandlerContext context,
                                                       IsAccountEnabledRequirement requirement)
        {
            if (context.User.HasClaim(f => f.Type == "Disabled"))
            {
                context.Fail();
            } else
            {
                context.Succeed(requirement);
            }
            return Task.CompletedTask;
        }
    }
}
Registering the Handlers
The next step is to register the handlers in DI. We use the AddSingleton to register them. But if the handlers inject any of the other services, which has a different lifetime scope, then you may have to use it.
services.AddSingleton<IAuthorizationHandler, IsAccountNotDisabledHandler>();
services.AddSingleton<IAuthorizationHandler, IsEmployeeHandler>();
services.AddSingleton<IAuthorizationHandler, IsVIPCustomerHandler>();
Create the Policy based on Requirement
Finally, We create the canManageProduct Policy using the requirement.
services.AddAuthorization(options =>
{
    options.AddPolicy("canManageProduct",
        policyBuilder =>
            policyBuilder.AddRequirements(
                new IsAccountEnabledRequirement(),
                new IsAllowedToManageProductRequirement()
            ));
});
Applying the Policy
Apply the policy on any controller using the Authorize attribute as shown below.
namespace AuthzExample.Controllers
{
    [Authorize(Policy = "canManageProduct")]
    public class MVCProductsController : Controller
Thats it.
Testing the Application
Now, run the app. Register and log in.
Try Creating a new Product, you will see the Access denied page.
Add the Employee Claim, logout and login. Now you will be able to create a new product
Add the disabled Claim, logout, and log in. Now, you will see the Access denied page while creating the new product..
References
Read More
- ASP.NET Core Tutorial
- Authentication in ASP.NET Core
- Cookie Authentication in ASP.NET Core
- Introduction to ASP.NET Core Identity
- ASP.NET Core Identity Tutorial From Scratch
- Sending Email Confirmation in ASP.NET Core
- Add Custom Fields to the user in ASP.NET Core Identity
- Change Primary key in ASP.NET Core Identity
- JWT Authentication in ASP.NET Core
- Introduction to Authorization
- Simple Authorization using Authorize attribute
- Adding & Managing Claims in ASP.NET Core Identity
- Claim Based Authorization in ASP.NET Core
- Policy-based Authorization
- Resource-Based Authorization

How to show hide button based on Policy ?
How will your code know what handler to call for each of the requirements?