In this tutorial, we will cover the basics of Authentication in ASP.NET Core. We will learn what is Claim, ClaimsIdentity, ClaimsPrincipal, Principal, Identity etc. We also lean the difference between Authentication & Authorization etc. Learn how ASP.NET Core handles the Authentication using Authentication Handlers, Authentication Scheme & Authentication Middleware, etc. Also, we will learn how to Unauthenticated Request, Signing In & Authenticating the Subsequent Requests.
Table of Contents
What is Authentication
Authentication is the process of verifying the identity of an individual. It is about determining who the user is.
For Example, Companies Provide ID Card to Employees on joining. An Employee needs to present or scan their ID at the entrance to enter the workplace. The ID uniquely identifies the employee, without which the entry is denied.
Similarly, in a web application, we need to create the users in the system. We need to assign a Unique ID (like user name or email) and a secret (Password). The user must enter the ID & password at the login screen. Only if he presents the valid credentials, he authenticated and allowed.
There are many ways to handle Authentication in web applications. For Example
- Cookie-Based authentication
- Token-Based authentication
- Third-party access(OAuth, API-token)
- OpenId
- SAML
Authorization determines what the user allowed to do.
For Example, the Employee does not have access to everything inside the workplace. He can enter only those departments for which he has authorization. For Example, the Server Room access is only for IT Personnel. Only finance people can access financial related information.
Similarly, when a user is logged in he is authenticated. But he may not have authority to browse the Admin Area. Only the users with Admin Rights (or Claims) can access the Admin Area.
However, before determining what the user is can do, you must know who the user is. Hence the authentication comes first, before authorization.
Claims, ClaimsIdentity & ClaimsPrincipal
The ASP.NET Core uses claims-based authentication. To understand it, first, we need to understand what is a Claim, ClaimsIdentity & ClaimsPrincipal
Claim
A Claim is a piece of information about the user. It is consists of a Claim type and an optional value. We store it in the form of name-value pair. A Claim can be anything for example Name Claim, Email Claim, Role Claim, PhoneNumber Claim, etc.
The Authorization Module uses the Claims to check whether the user has the rights to access the resources.
ClaimsIdentity
The ClaimsIdentity is a collection of Claims.
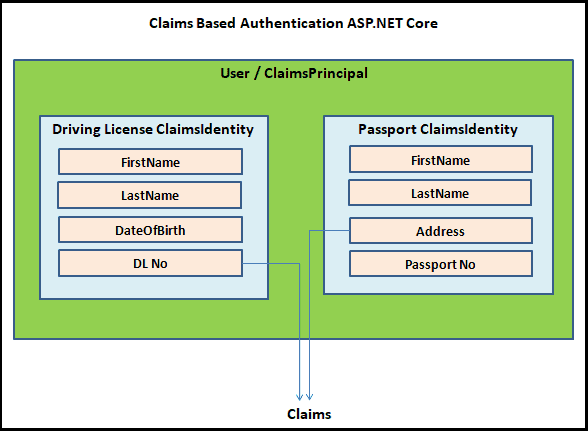
For Example take your driving license. It has claims like FirstName, LastName, DateOfBirth etc. Hence the driving license is the ClaimsIdentity.
ClaimsPrincipal
ClaimsPrincipal contains a collection of ClaimsIdentity. You can think of the ClaimsPrincipal (or Principal or Identity) as the user of your app.
A User can have more than one ClaimsIdentity. For Example, both driving license & Passport.
A driving license is a ClaimsIdentity with claims like FirstName, LastName, DateOfBirth & DLNo, etc Passport is another ClaimsIdentity with claims like FirstName, LastName, Address, PassportNo, etc.
Both identifies the same user or ClaimsPrincipal.
Reading the ClaimsPrincipal
We Read the ClaimsPrincipal from User Property of the HttpContext object
Every Request that we receive will have a HttpContext object. It holds the information about the current HTTP request.
The HttpContext object also exposes the ClaimsPrincipal as the User property.
It is the Authentication Middleware that populates the User Property. Remember we register the Authentication Middleware in the Middleware pipeline using the UseAuthentication() Method
There are several ways, in which users can sign in to the system. Cookie-Based authentication & JWT Token-Based authentication are the popular ones. But How does our Authentication Middleware know which one to use to populate the User Property ?.
Well it uses the Authentication Scheme & Authentication Handlers
Authentication Basics
The ASP.NET Code uses the Authentication Handlers to handle the Authentication.
Authentication Handlers
A Authentication Handler is responsible for
- Authenticate a user ( Using the AuthenticateAsync() method ).
- If the User is unauthenticated, redirect the user to the login page (Challenge the current request using the
ChallengeAsync()method) - If User is Authenticated, but not authorized then Forbid the Current Request (Using the
ForbidAsync()method)
An Authentication Handler must implement the interface IAuthenticationHandler. The Interface consists of three methods. AuthenticateAsync(), ChallengeAsync(), & ForbidAsync()
We register the authentication handler using the using the AddAuthentication extension method.
The following example, adds both Cookie Authentication & JwtBearer Authentication handler in the ConfigureServices method of the startup class
startup.cs
public void ConfigureServices(IServiceCollection services)
{
   ...

   services.AddAuthentication()
      .AddJwtBearer()
      .AddCookie();

   ..
   ..
}
The AuthenticateAsync() method of the Authentication Handlers is responsible for constructing the ClaimsPrincipal from the Request and return it to the Authentication Middleware. The Authentication middleware then sets the HttpContext.User Property with the ClaimsPrincipal
For Example, AuthenticateAsync() method of the cookie authentication handler must read the cookies from the current request, construct the ClaimsPrincipal, and return it. Similarly, the JWT bearer handler must deserialize and validate the JWT bearer token, construct the ClaimsPrincipal and return it.
Authentication Scheme
Each Authentication handler that we register using the AddAuthentication method becomes a new Authentication Scheme
A Authentication scheme consists of
- A unique Name, which identifies the Authentication scheme
- Authentication Handler
- Options for configuring that specific instance of the handler
In the example, we have registered two authentication schemes. But neither, we have given them any name nor configured any of their options.
   services.AddAuthentication()
      .AddJwtBearer()
      .AddCookie();
Each of those Authentication handlers comes with their own defaults. The Cookie Authentication handler defines all its defaults in the CookieAuthenticationDefaults class. Similarly, the JwtBearer uses the JwtBearerDefaults class
The Default name for Cookie Authentication is “Cookies” (CookieAuthenticationDefaults.AuthenticationScheme) and for JwtBearer Authentication handler uses the “Bearer”.(JwtBearerDefaults.AuthenticationScheme)
The following code is the same as the one above.
services.AddAuthentication()
    .AddJwtBearer("Bearer")
    .AddCookie("Cookies");
You can also define a particular handler more than once. The Example below defines the Cookie Authentication twice but gives both of them different names. Hence now we have three Authentication schemes
services.AddAuthentication()
    .AddJwtBearer("Bearer")
    .AddCookie("Cookies")
    .AddCookie("Cookies2")
Default Authentication scheme
When we use more than one Authentication Schemes, we also need to configure one of them as default authentication. We do that by providing the Authentication scheme name as the first argument to the AddAuthentication method
The following example, sets the Cookies2 as the default Authentication scheme.
services.AddAuthentication("Cookies2")
    .AddJwtBearer("Bearer")
    .AddCookie("Cookies")
    .AddCookie("Cookies2")
This code sets the “Cookies” as the default Authentication scheme.
services.AddAuthentication(CookieAuthenticationDefaults.AuthenticationScheme)
    .AddJwtBearer("Bearer")
    .AddCookie("Cookies")
    .AddCookie("Cookies2")
Authentication Handler Options
Each Authentication handler comes with options, which you can configure to fine tune the Authentication Handler
Configuring the Cookie Authentication Handler.
services.AddAuthentication(CookieAuthenticationDefaults.AuthenticationScheme)
    .AddCookie("Cookies", options =>
    {
        options.LoginPath = "/Account/Login";
        options.LogoutPath = "/Account/Logout";
        options.AccessDeniedPath = "/Account/AccessDenied";
        options.ReturnUrlParameter = "ReturnUrl";
    });
Configuring the JWT bearer Authentication Handler
services.AddAuthentication(x =>
    .AddJwtBearer(x =>
    {
        x.RequireHttpsMetadata = true;
        x.SaveToken = true;
        x.TokenValidationParameters = new TokenValidationParameters
        {
            ValidateIssuer = true,
            ValidIssuer = jwtTokenConfig.Issuer,
            ValidateAudience = true,
            ValidAudience = jwtTokenConfig.Audience,
            ValidateIssuerSigningKey = true,
            RequireExpirationTime = false,
            ValidateLifetime = true,
            ClockSkew = TimeSpan.Zero,
            IssuerSigningKey = new SymmetricSecurityKey(Encoding.ASCII.GetBytes(jwtTokenConfig.Secret))
        };
    });
Authentication Middleware
UseAuthentication() registers the Authentication Middleware.
The main purpose of the Authentication Middleware is to update the HttpContext.User Property with the ClaimsPrincipal. To do that, it uses the default Authentication Handler and invokes the AuthenticateAsync() method. As mentioned earlier, The AuthenticateAsync() method of the Authentication Handler must return the ClaimsPrincipal.
We place the Authentication Middleware after EndPoint Routing. Hence it knows which controller action method is handling the request.
It must come before Authorization Middleware ( UseAuthorization()) & End Point Middleware (UseEndPoints()).
All middleware’s which appear after the UseAuthentication() in the middleware pipeline can check whether the user is authenticated by inspecting the HttpContext.User Property
startup.cs
    app.UseRouting();

    app.UseAuthentication();
    app.UseAuthorization();

    app.UseEndpoints(endpoints =>
    {
        endpoints.MapRazorPages();
});Unauthenticated Request
When a request arrives from a user who is unauthenticated to a page that is protected.
- The Request reaches the Authentication Middleware.
- The Authentication Middleware checks to see if a proper credential present in the request. It will use the default authentication handler to do that. It could be a Cookies handler/ Jwt handler. Since it does not find any credential, it will set the User Property to an anonymous user.
- Authorization Middleware (
UseAuthorization()) checks to see if the destination page needs Authorization.- If No then the user is allowed to visit the Page
- If Yes it invokes the
ChallengeAsync()on the Authentication Handler. It redirects the user to Login Page
Signing In
- User Presents the Id & Password in the Login Form and clicks on the Login button
- The Request hits the sign-in endpoint after going through the Authentication & Authorization Middlewares. Hence the sign-in endpoint must have
Allowanonymousdecorator else request will never reach it. - Users id & password is validated against the database
- If the Cookie Authentication handler is used
- Creates a
ClaimsPrincipalof the user with the claims of the User - Use the
HttpContext.SignInAsyncto creates an encrypted cookie and adds it to the current response. - The Response is returned to the Browser
- The Browser stores the cookie
- Creates a
- If the JWT Bearer Authentication handler is used
- Creates a JWT Token of the user with the claims of the User
- JWT Token is sent to the user as a response
- The Users reads the token and stores it in Local storage, session storage, or even in cookies
- The user is now authenticated
Authenticating the Subsequent Requests
- The user makes a request to protect the page.
- If you are using cookie authentication, then you do not have to do anything. The Browser will automatically include the cookie with every request. But in the case of the JWT token, you need to include the token in
Authorizationheader. - The Request reaches the Authentication Middleware. It will use the default Authenticate handler to read the cookie / JWT Token and constructs the
ClaimsIdentityand updates theHttpContext.Userproperty with it - The Authorization Middleware sees that the user is authenticated by inspecting the
HttpContext.Userproperty and allows access to it.
Reference
Read More
- ASP.NET Core Tutorial
- Authentication in ASP.NET Core
- Cookie Authentication in ASP.NET Core
- Introduction to ASP.NET Core Identity
- ASP.NET Core Identity Tutorial From Scratch
- Sending Email Confirmation in ASP.NET Core
- Add Custom Fields to the user in ASP.NET Core Identity
- Change Primary key in ASP.NET Core Identity
- JWT Authentication in ASP.NET Core
- Introduction to Authorization
- Simple Authorization using Authorize attribute
- Adding & Managing Claims in ASP.NET Core Identity
- Claim Based Authorization in ASP.NET Core
- Policy-based Authorization
- Resource-Based Authorization


Even after watching many video tutorial. Your explanation beats them
Great!
Your way of explaining is a design pattern!!!!!!!!!!!
Thanks
very understandable and explains the essential what is needed!
This is the best and clearly explain article.
This is the best article i have read,
clearly explained the process end to end!!!
Excellent article. clearly explained the process end to end.
I did not find a better article in internet.
Thanks a ton.
This is the best article i have read, thanks very much.