In this ASP.NET Core Identity Tutorial, we will show you how to create ASP.NET Core web application with Identity from scratch. We will build an ASP.NET Core application without Authentication and add the identity-related Components. Let us add User Registration & Login & logout Forms. This will help you understand the ASP.NET Core Identity API better.
The Tutorial works on ASP.NET Core 2.1 or later.
Table of Contents
ASP.NET Core Identity
ASP.NET Core Identity is a fully featured membership system for creating and maintaining user logins. Using Identity API, you can sign in & sign out users, reset their passwords , lockout users & Implement Multi Factor Authentication. It can also integrate with the external login providers like Microsoft Account, Facebook, Google, etc.
When we create a new application, we can install the ASP.NET Core identity by choosing the Individual Accounts under the Authentication Type Option. Most of the Identity related services and UI forms like Register, Login & Logout are automatically created for us.
In this tutorial, we will create the project with No Authentication and then we will add the Identity API. In this way you will learn the Identity API better.
The Identity API uses cookie Authentication. We have also have a tutorial about User Registration & login Using Cookie Authentication. That tutorial does not use the identity API. The Identity API uses the techniques mentioned in the tutorial. Hence we advices you to go through it first.
The Two important Identity services are User Manager and Sign In Manager.
User Manager
The UserManager is a concrete class that manages the user. This Class Creates, Updates, and Deletes the Users. It has methods to find a user by User ID, User Name, and email. UserManager also provides the functionality for adding Claims, removing Claims, add and removing roles, etc. It also generates password hash, Validates Users etc.
Sign In Manager
SignInManager is a concrete class which handles the user sign in from the application.
The SignInManager is responsible for Authenticating a user, i .e signing in and signing out a user. It issues the authentication cookie to the user.
Create new ASP.NET Core Project
Open a New Project in Visual Studio 2019.
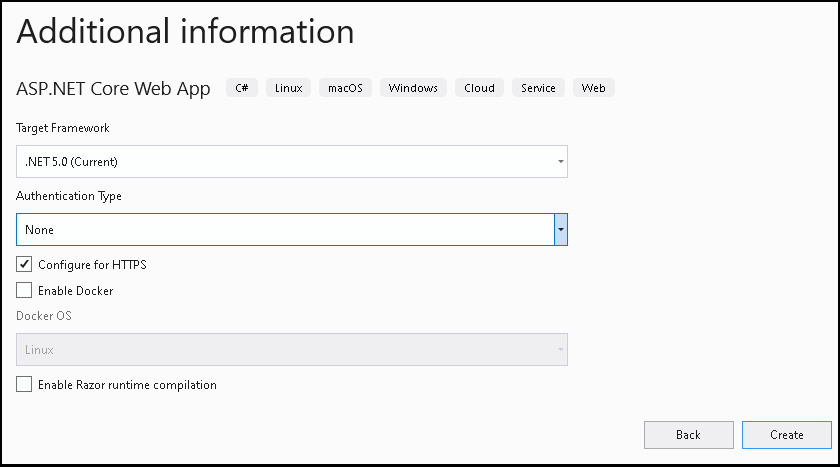
Choose ASP.NET Core Web App Template and name the Project as ASPNetCoreIdentity
Choose the Platform as .NET 5.0. Select Authentication as No Authentication. Click OK to create the new Project
Run the project to check if everything is alright.
Installing Identity API
Next step is to install the Identity API.
Install-Package Microsoft.AspNetCore.IdentityWe will be using Entity Framework Core with Identity. Hence we need to install Identity EF Core Package.
Install-Package Microsoft.AspNetCore.Identity.EntityFrameworkCoreSQL Server is going to be our database.
Install-package Microsoft.EntityFrameworkCore.SqlServerNeed EF Core Tools to generate EF Core Migrations
Install-Package Microsoft.EntityFrameworkCore.ToolsPreparing the Database
Connection String
The Database Connection strings are stored in appsettings.json file. Open the and add the connection string as follows
appsettings.json
  "ConnectionStrings": {
    "DefaultConnection": "Server=LocalHost;Database=ASPNetCoreIdentity;Trusted_Connection=True;MultipleActiveResultSets=true"
  },
Identity Models
The Microsoft.AspNetCore.Identity namespace contains the Entity Models of the Identity API. They are
IdentityRoleIdentityRoleClaimIdentityUserIdentityUserClaimIdentityUserLoginIdentityUserRoleIdentityUserToken
You can inspect the properties directly from the Identity API Source Code
For Example, the following is the IdentityUser entity model.
IdentityUser.cs
 public class IdentityUser<TKey> where TKey : IEquatable<TKey>
    {

        [PersonalData]
        public virtual TKey Id { get; set; }
        public virtual string UserName { get; set; }
        public virtual string NormalizedUserName { get; set; }

        [ProtectedPersonalData]
        public virtual string Email { get; set; }
        public virtual string NormalizedEmail { get; set; }

        [PersonalData]
        public virtual bool EmailConfirmed { get; set; }
        public virtual string PasswordHash { get; set; }

        public virtual string SecurityStamp { get; set; }
        public virtual string ConcurrencyStamp { get; set; }

        [ProtectedPersonalData]
        public virtual string PhoneNumber { get; set; }

        [PersonalData]
        public virtual bool PhoneNumberConfirmed { get; set; }

        [PersonalData]
        public virtual bool TwoFactorEnabled { get; set; }

        public virtual DateTimeOffset? LockoutEnd { get; set; }

        public virtual bool LockoutEnabled { get; set; }

        public virtual int AccessFailedCount { get; set; }
    }
This class captures the important information about the user.
Note that we need to specify the Type, that we use for the Primary Key. The Identity API by default uses string type for Id and stores GUID values in it.
If you want, you can also add additional properties to the above fields. To do that you need to create another class (for example, ApplicationUser) and inherit from the IdentityUser. Add the properties you wish to add to the ApplicationUser class. Use the ApplicationUser class instead of the IdentityUser everywhere.
Database Context
The DBContext is the class, which provides API to interact between EF Core entity models and the database. We usually create our context class inheriting from the DBContext class.
ASP.NET Core Identity API already implements IdentityDbContext class, which inherits from the DBContext class. It already includes the DbSet Properties for the Identity Models.
Hence we create the our applications DbContext class, inheriting from the IdentityDbContext
Go to the Project folder create a folder Data.
In the Data folder create a class ApplicationDbContext.cs and add the following code
Data/ApplicationDbContext.cs
using Microsoft.AspNetCore.Identity;
using Microsoft.AspNetCore.Identity.EntityFrameworkCore;
using Microsoft.EntityFrameworkCore;

namespace ASPNetCoreIdentity.Data
{
    public class ApplicationDbContext : IdentityDbContext<IdentityUser, IdentityRole, string>
    {
        public ApplicationDbContext(DbContextOptions<ApplicationDbContext> options)
    : base(options)
        {
        }
    }
}
Note that we need to specify the types that we use for User, Role and Type of Primary Key to the IdentityDbContext.
public class ApplicationDbContext : IdentityDbContext<IdentityUser, IdentityRole, string>If, you have overridden these types in the application, then use those Types here.
Registering the DBContext in Startup
The ASP.NET core uses dependency injection framework, where you can simply ask for the required services in the constructor of the class. To do that first we need to configure the services in the startup class
Open the Startup class from the root folder
Locate the ConfigureServices method. This is where we are going to configure all the services for dependency injection
using ASPNetCoreIdentity.Data;
using Microsoft.EntityFrameworkCore;

public void ConfigureServices(IServiceCollection services)
{

    services.AddDbContext<ApplicationDbContext>(options =>
        options.UseSqlServer(
            Configuration.GetConnectionString("DefaultConnection")));

    services.AddRazorPages();
}
The AddDbContext expects us to provide the Type that we will use for Context class, which is ApplicationDbContext.
services.AddDbContext<ApplicationDbContext>The options.UseSqlServer lets us use the SQL Server
The connection string is retrieved from the Configuration.GetConnectionString(“DefaultConnection”)
Migrations
Next, step is to create the database. To do that we use the EF Core Migrations. Run the add-migration and then update-database to create the database
add-migration v1
update-database
Open and inspect the database. You will see following tables.
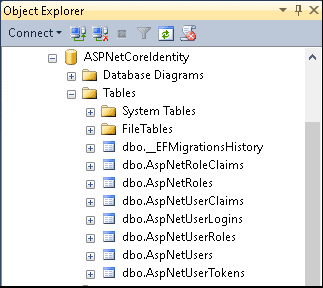
The following table explains the role of each table with their entity name
| Entity | Table Name | Remarks |
|---|---|---|
| IdentityUser | AspNetUsers | Primary table to store user information |
| IdentityUserClaim | AspNetUserClaims | tables holds the claims associated with the user. |
| IdentityUserLogin | AspNetUserLogins | table holds the information about 3rd party/external logins |
| IdentityUserToken | AspNetUserTokens | is for storing tokens received from the external login providers. |
| IdentityUserRole | AspNetUserRoles | table contains the roles assigned to the user |
| IdentityRole | AspNetRoles | tables to store the roles |
| IdentityRoleClaim | AspNetRoleClaims | The claims that are assigned to the Role |
Run the App and check everything is working again
Registering the Identity Services
In the startup class, we also need to register the Identity related services. To do that we use the AddIdentity extension method
Locate the ConfigureServices method in the startup class and add the following code before the AddRazorPages() method.
services.AddIdentity<IdentityUser, IdentityRole>(
        options => {
            options.SignIn.RequireConfirmedAccount = false;

            //Other options go here
        }
        )
    .AddEntityFrameworkStores<ApplicationDbContext>();
AddIdentity method takes types used for User (IdentityUser) & Roles (IdentityRole). If you have overridden them in your code, then use them
The AddIdentity method registers various services like UserValidator, PasswordValidator, PasswordHasher, UserManager, Cookie-based authentication schemes. SignInManager etc. We can inject these services in our controller, Razor pages or views via Dependency Injection
You can also specify the the various options that you can set to customize the identity. We set the RequireConfirmedAccount to false. Otherwise, the user is not allowed to login until we send a email confirmation link to him and he confirms it by clicking on it.
        options => {
            options.SignIn.RequireConfirmedAccount = false;

        }
Finally AddEntityFrameworkStores takes types used for the context (ApplicationDbContext) and registers the stores related services.
Authentication Middleware
Authentication Middleware reads the authentication cookies from the incoming request and construct the ClaimsPrincipal and update the User object in the HttpContext.
This will make the all the middleware’s which appear after the UseAuthentication() is aware that the user is authenticated.
We must invoke the UseAuthentication
- After
UseRouting, so that route information is available for authentication decisions. - Before
UseEndpoints&UseAuthorization, so that users are authenticated before accessing the endpoints.
Open the startup class and locate the Configure method. Add the UseAuthentication after the UseRouting method
startup.cs
public void Configure(IApplicationBuilder app, IWebHostEnvironment env)
{
    if (env.IsDevelopment())
    {
        app.UseDeveloperExceptionPage();
    }
    else
    {
        app.UseExceptionHandler("/Error");
        // The default HSTS value is 30 days. You may want to change this for production scenarios, see https://aka.ms/aspnetcore-hsts.
        app.UseHsts();
    }

    app.UseHttpsRedirection();
    app.UseStaticFiles();

    app.UseRouting();
    app.UseAuthentication();
    app.UseAuthorization();

    app.UseEndpoints(endpoints =>
    {
        endpoints.MapRazorPages();
    });
}
Building the UI
Next, let use build User Registration, Login & Logout Forms. But before that, we need to add the scripts needed for client side validation and few layout changes.
We are structuring the our application in line with how Identity API works. The Identity API creates the Area Identity and all the razor pages are added to the folder Account. Hence we also follow that.
Under the solutions node create the folder Areas/Identity/Pages/Account
Under the folder Areas/Identity/Pages add a new Partial Razor page _ValidationScriptsPartial.cshtml. This page includes the scripts that we need to perform the client side validation. We will add this Partial Page to register & login pages.
Areas/Identity/Pages/_ValidationScriptsPartial.cshtml
<environment include="Development">
    <script src="~/Identity/lib/jquery-validation/dist/jquery.validate.js"></script>
    <script src="~/Identity/lib/jquery-validation-unobtrusive/jquery.validate.unobtrusive.js"></script>
</environment>
<environment exclude="Development">
    <script src="https://ajax.aspnetcdn.com/ajax/jquery.validate/1.17.0/jquery.validate.min.js"
            asp-fallback-src="~/Identity/lib/jquery-validation/dist/jquery.validate.min.js"
            asp-fallback-test="window.jQuery && window.jQuery.validator"
            crossorigin="anonymous"
            integrity="sha384-rZfj/ogBloos6wzLGpPkkOr/gpkBNLZ6b6yLy4o+ok+t/SAKlL5mvXLr0OXNi1Hp">
    </script>
    <script src="https://ajax.aspnetcdn.com/ajax/jquery.validation.unobtrusive/3.2.9/jquery.validate.unobtrusive.min.js"
            asp-fallback-src="~/Identity/lib/jquery-validation-unobtrusive/jquery.validate.unobtrusive.min.js"
            asp-fallback-test="window.jQuery && window.jQuery.validator && window.jQuery.validator.unobtrusive"
            crossorigin="anonymous"
            integrity="sha384-ifv0TYDWxBHzvAk2Z0n8R434FL1Rlv/Av18DXE43N/1rvHyOG4izKst0f2iSLdds">
    </script>
</environment>
Under the folder Areas/Identity/Pages add another Partial Page _ViewImports.cshtml.
_ViewImports uses the Razor directives to import namespaces and use dependency injection. All the Views & Razor pages in the folder and its sub folder will use it. We do not have to import these name spaces in every razor pages or views.
Areas/Identity/Pages/_ViewImports.cshtml
@using Microsoft.AspNetCore.Identity
@using ASPNetCoreIdentity.Areas.Identity
@using ASPNetCoreIdentity.Areas.Identity.Pages
@addTagHelper *, Microsoft.AspNetCore.Mvc.TagHelpers
Next, add _ViewStart.cshtml. Here we set the Layout page for all Pages under the Areas/Identity/Pages/ folder.
Areas/Identity/Pages/_ViewStart.cshtml
@{
    Layout = "/Pages/Shared/_Layout.cshtml";
}
Similarly, another _ViewImports file in the Accounts folder.
Areas/Identity/Pages/Accounts/_ViewImports.cshtml
@using ASPNetCoreIdentity.Areas.Identity.Pages.AccountProtecting the Page
Now, open the Pages/Privacy.cshtml.cs Page.
Add the Authorize attribute to PrivacyModel class as shown below. With the Authorize attribute, only the authenticated user can access the Privacy page.
    [Authorize]
    public class PrivacyModel : PageModel
    {
Run the App and navigate to Privacy Page.
As expected the Privacy page does not open. Instead the user is redirected to the /Account/Login URL. Since the /Account/Login does not exist, the browser throws the 404 error.
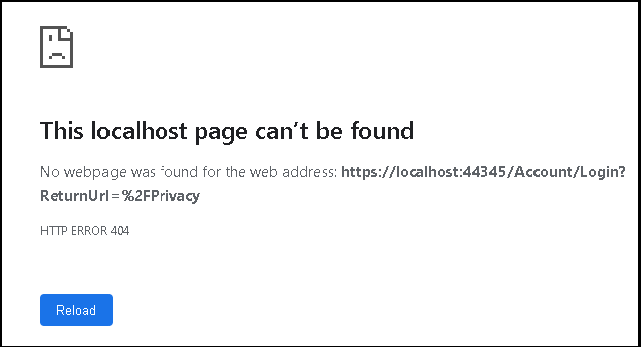
How does it know to redirect the user to /Account/Login Page.
The /Account/Login is the default page, where Cookie Authentication middleware redirects the User, if he is not authenticated. We can change it in the startup class.
The Identity API defines its login, logout & AccessDenied pages to /Identity/Account/ URL. Add the following code before the AddRazorPages() method in the ConfigureServices method of the startup class.
services.ConfigureApplicationCookie(options =>
{
    // Cookie settings
    options.Cookie.HttpOnly = true;
    //options.Cookie.Expiration

    options.ExpireTimeSpan = TimeSpan.FromMinutes(5);
    options.LoginPath = "/Identity/Account/Login";
    options.LogoutPath = "/Identity/Account/Logout";
    options.AccessDeniedPath = "/Identity/Account/AccessDenied";
    options.SlidingExpiration = true;
    //options.ReturnUrlParameter=""
});
The Privacy page now redirects us to the /Identity/Account/Login page instead of /Account/Login.
Let us create a menu option for Register.
Under Views -> Shared Create a Partial View _LoginPartial.cshtml and add the following code.
Views/Shared/_LoginPartial.cshtml
<ul class="navbar-nav">

    <li class="nav-item">
        <a class="nav-link text-dark" asp-area="Identity" asp-page="/Account/Login">Login</a>
    </li>

    <li class="nav-item">
        <a class="nav-link text-dark" asp-area="Identity" asp-page="/Account/Register">Register</a>
    </li>
</ul>
Our Application uses the Views/Shared/_layout.cshtml as the common layout.
Locate the <div class="navbar-collapse in the above file and copy the following code after that div element.
Views/Shared/_layout.cshtml
<partial name="_LoginPartial" />User Registration
Create a new Razor Page Register under the folder Areas/Identity/Pages/Account
Areas/Identity/Pages/Account/Register.cshtml
@page
@model RegisterModel
@{
    ViewData["Title"] = "Register";
}

<h1>@ViewData["Title"]</h1>

<div class="row">
    <div class="col-md-4">
        <form asp-route-returnUrl="@Model.ReturnUrl" method="post">
            <h4>Create a new account.</h4>
            <hr />
            <div asp-validation-summary="All" class="text-danger"></div>
            <div class="form-group">
                <label asp-for="Input.Email"></label>
                <input asp-for="Input.Email" class="form-control" />
                <span asp-validation-for="Input.Email" class="text-danger"></span>
            </div>
            <div class="form-group">
                <label asp-for="Input.Password"></label>
                <input asp-for="Input.Password" class="form-control" />
                <span asp-validation-for="Input.Password" class="text-danger"></span>
            </div>
            <div class="form-group">
                <label asp-for="Input.ConfirmPassword"></label>
                <input asp-for="Input.ConfirmPassword" class="form-control" />
                <span asp-validation-for="Input.ConfirmPassword" class="text-danger"></span>
            </div>
            <button type="submit" class="btn btn-primary">Register</button>
        </form>
    </div>


</div>

@section Scripts {
    <partial name="_ValidationScriptsPartial" />
}
Note that we have included the _ValidationScriptsPartial in Scripts Section.
Areas/Identity/Pages/Account/Register.cshtml.cs
using System.Collections.Generic;
using System.ComponentModel.DataAnnotations;
using System.Threading.Tasks;
using Microsoft.AspNetCore.Authentication;
using Microsoft.AspNetCore.Authorization;
using Microsoft.AspNetCore.Identity;
using Microsoft.AspNetCore.Mvc;
using Microsoft.AspNetCore.Mvc.RazorPages;
using Microsoft.Extensions.Logging;

namespace ASPNetCoreIdentity.Areas.Identity.Pages.Account
{
    [AllowAnonymous]
    public class RegisterModel : PageModel
    {
        private readonly SignInManager<IdentityUser> _signInManager;
        private readonly UserManager<IdentityUser> _userManager;
        private readonly ILogger<RegisterModel> _logger;

        public RegisterModel(
            UserManager<IdentityUser> userManager,
            SignInManager<IdentityUser> signInManager,
            ILogger<RegisterModel> logger)
        {
            _userManager = userManager;
            _signInManager = signInManager;
            _logger = logger;
        }

        [BindProperty]
        public InputModel Input { get; set; }

        public string ReturnUrl { get; set; }

        public IList<AuthenticationScheme> ExternalLogins { get; set; }

        public class InputModel
        {
            [Required]
            [EmailAddress]
            [Display(Name = "Email")]
            public string Email { get; set; }

            [Required]
            [StringLength(100, ErrorMessage = "The {0} must be at least {2} and at max {1} characters long.", MinimumLength = 6)]
            [DataType(DataType.Password)]
            [Display(Name = "Password")]
            public string Password { get; set; }

            [DataType(DataType.Password)]
            [Display(Name = "Confirm password")]
            [Compare("Password", ErrorMessage = "The password and confirmation password do not match.")]
            public string ConfirmPassword { get; set; }
        }

        public async Task OnGetAsync(string returnUrl = null)
        {
            ReturnUrl = returnUrl;
        }

        public async Task<IActionResult> OnPostAsync(string returnUrl = null)
        {
            returnUrl ??= Url.Content("~/");
            if (ModelState.IsValid)
            {
                var user = new IdentityUser { UserName = Input.Email, Email = Input.Email };
                var result = await _userManager.CreateAsync(user, Input.Password);
                if (result.Succeeded)
                {
                    _logger.LogInformation("User created a new account with password.");

                    await _signInManager.SignInAsync(user, isPersistent: false);
                    return LocalRedirect(returnUrl);
                }
                foreach (var error in result.Errors)
                {
                    ModelState.AddModelError(string.Empty, error.Description);
                }
            }

            // If we got this far, something failed, redisplay form
            return Page();
        }
    }
}
Decorate with AllowAnonymous so that anyone can view the page
We Inject UserManager & SignInManager into our Razor Page.
On GET Request, we read the ReturnUrl, so that we can redirect the user to the page where he came from, once he registers successfully.
When User registers OnPostAsync method executes
After the Model is validated, new IdentityUser is created and CreateAsync method of the UserManager creates the new user.
var user = new IdentityUser { UserName = Input.Email, Email = Input.Email };
var result = await _userManager.CreateAsync(user, Input.Password);
If the Registration is successful, the SignInAsync method of SignInManager Signs in the user. The user is redirected to the ReturnUrl
The Identity API has the ability to generate & send the email confirmation links. We have intentionally, omitted that from here.
Password Validation
Now, run the app and enter password as 123456. You will see the password validation message.
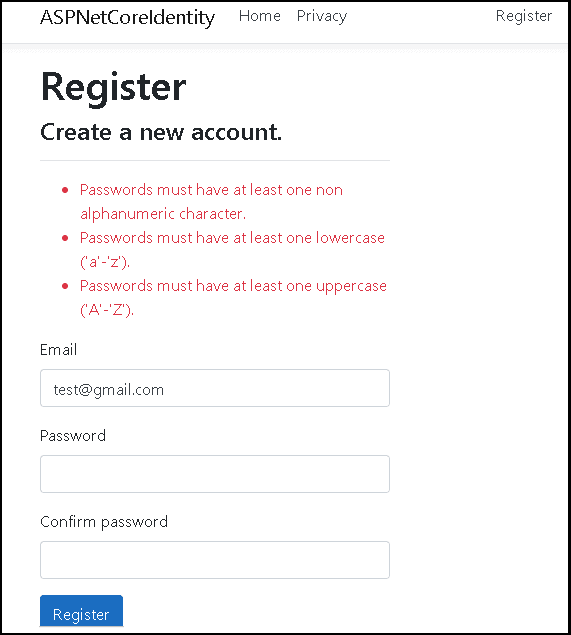
The password validation happens at client side as well as server side. The Client Side validation done using the _ValidationScriptsPartial.
At the server side CreateAsync method runs the password & other validations, before creating the User.
We can set options for validating the Passwords while configuring the Identity Services in the startup class. If we do not specify it, then the Identity Services will use the defaults.
You can change the defaults as shown below.
services.AddIdentity<IdentityUser, IdentityRole>(
        options => {
                options.SignIn.RequireConfirmedAccount = false;

                options.Password.RequireDigit = true;
                options.Password.RequireLowercase = true;
                options.Password.RequireNonAlphanumeric = true;
                options.Password.RequireUppercase = true;
                options.Password.RequiredLength = 6;
                options.Password.RequiredUniqueChars = 1;
            }
        )
    .AddEntityFrameworkStores<ApplicationDbContext>();
Login Form
Create a new Razor Page Login under the folder Areas/Identity/Pages/Account
Areas/Identity/Pages/Account/Login.cshtml
@page
@model LoginModel

@{
    ViewData["Title"] = "Log in";
}

<h1>@ViewData["Title"]</h1>
<div class="row">
    <div class="col-md-4">
        <section>
            <form id="account" method="post">
                <h4>Use a local account to log in.</h4>
                <hr />
                <div asp-validation-summary="All" class="text-danger"></div>
                <div class="form-group">
                    <label asp-for="Input.Email"></label>
                    <input asp-for="Input.Email" class="form-control" />
                    <span asp-validation-for="Input.Email" class="text-danger"></span>
                </div>
                <div class="form-group">
                    <label asp-for="Input.Password"></label>
                    <input asp-for="Input.Password" class="form-control" />
                    <span asp-validation-for="Input.Password" class="text-danger"></span>
                </div>
                <div class="form-group">
                    <div class="checkbox">
                        <label asp-for="Input.RememberMe">
                            <input asp-for="Input.RememberMe" />
                            @Html.DisplayNameFor(m => m.Input.RememberMe)
                        </label>
                    </div>
                </div>
                <div class="form-group">
                    <button type="submit" class="btn btn-primary">Log in</button>
                </div>
            </form>
        </section>
    </div>
</div>

@section Scripts {
    <partial name="_ValidationScriptsPartial" />
}
Areas/Identity/Pages/Account/Login.cshtml.cs
using System.Collections.Generic;
using System.ComponentModel.DataAnnotations;
using System.Linq;
using System.Threading.Tasks;
using Microsoft.AspNetCore.Authentication;
using Microsoft.AspNetCore.Authorization;
using Microsoft.AspNetCore.Identity;
using Microsoft.AspNetCore.Mvc;
using Microsoft.AspNetCore.Mvc.RazorPages;
using Microsoft.Extensions.Logging;

namespace ASPNetCoreIdentity.Areas.Identity.Pages.Account
{
    [AllowAnonymous]
    public class LoginModel : PageModel
    {
        private readonly UserManager<IdentityUser> _userManager;
        private readonly SignInManager<IdentityUser> _signInManager;
        private readonly ILogger<LoginModel> _logger;

        public LoginModel(SignInManager<IdentityUser> signInManager,
            ILogger<LoginModel> logger,
            UserManager<IdentityUser> userManager)
        {
            _userManager = userManager;
            _signInManager = signInManager;
            _logger = logger;
        }

        [BindProperty]
        public InputModel Input { get; set; }

        public IList<AuthenticationScheme> ExternalLogins { get; set; }

        public string ReturnUrl { get; set; }

        [TempData]
        public string ErrorMessage { get; set; }

        public class InputModel
        {
            [Required]
            [EmailAddress]
            public string Email { get; set; }

            [Required]
            [DataType(DataType.Password)]
            public string Password { get; set; }

            [Display(Name = "Remember me?")]
            public bool RememberMe { get; set; }
        }

        public async Task OnGetAsync(string returnUrl = null)
        {
            if (!string.IsNullOrEmpty(ErrorMessage))
            {
                ModelState.AddModelError(string.Empty, ErrorMessage);
            }

            returnUrl ??= Url.Content("~/");

            // Clear the existing external cookie to ensure a clean login process
            await HttpContext.SignOutAsync(IdentityConstants.ExternalScheme);

            ReturnUrl = returnUrl;
        }

        public async Task<IActionResult> OnPostAsync(string returnUrl = null)
        {
            returnUrl ??= Url.Content("~/");


            if (ModelState.IsValid)
            {
                // This doesn't count login failures towards account lockout
                // To enable password failures to trigger account lockout, set lockoutOnFailure: true
                var result = await _signInManager.PasswordSignInAsync(Input.Email, Input.Password, Input.RememberMe, lockoutOnFailure: false);
                if (result.Succeeded)
                {
                    _logger.LogInformation("User logged in.");
                    return LocalRedirect(returnUrl);
                }
                else
                {
                    ModelState.AddModelError(string.Empty, "Invalid login attempt.");
                    return Page();
                }
            }

            // If we got this far, something failed, redisplay form
            return Page();
        }
    }
}
Decorate with AllowAnonymous so that anyone can view the page
We Inject UserManager & SignInManager into our Razor Page.
On GET Request, we read the ReturnUrl, so that we can redirect the user to the page where he came from, once he registers successfully.
We use the SignOutAsync() method of the HttpContext, which clears the existing external cookie if any to ensure a clean login process. Note that user is not logged out.
HttpContext.SignOutAsync(IdentityConstants.ExternalScheme);When User registers OnPostAsync method executes
Once the model is validated, we sign in the user using the PasswordSignInAsync method of the SignInManager.
The PasswordSignInAsync method does the following
- Verify the user exists and password matches
- Password / email does not match then returns with
Succeededset to false - Creates the
ClaimsIdentitywithClaimsof the User. - Creates the
ClaimsPrincipalfrom theClaimsIdentity - Invokes the
HTTPContext.SignInAsyncmethod with theClaimsPrincipal. - Returns with
Succeededset to true
var result = await _signInManager.PasswordSignInAsync(Input.Email, Input.Password, Input.RememberMe, lockoutOnFailure: false);The SignInAsync method creates an encrypted cookie and adds it to the current response. The Current response is returned to User. The User browser reads the cookie from the response and stores it securely. When user sends another request to the server, the browser sends the cookie along with the request.
The Authentication Middleware ( Registered with UseAuthentication() in the startup class ) reads the Cookie, decrypts it and recreates the ClaimsPrincipal. It then updates the User property of HttpContext with ClaimsPrincipal.
To access the ClaimsPrincipal of the current user all you need to do is the access the HttpContext.User property
Now, run the app & check register & login functions
Displaying the Login User Name
To check if the User is logged in or not, we can use the User Property. The User Property is nothing but an instance of ClaimsPrincipal. It is automatically injected into the Controller Or Razor Pages.
The User.Identity.Name returns the current user name, We use that to display the user name
Modify the _LoginPartial.cshtml to show the login & Register link only if the user is not logged in. If he is logged in, then show the Logout link.
_LoginPartial.cshtml
@using Microsoft.AspNetCore.Identity
@inject SignInManager<IdentityUser> SignInManager
@inject UserManager<IdentityUser> UserManager

<ul class="navbar-nav">
@if (SignInManager.IsSignedIn(User))
{
    <li class="nav-item">
        <a  class="nav-link text-dark" asp-area="Identity" asp-page="/Account/Manage/Index" title="Manage">Hello @User.Identity.Name!</a>
    </li>
    <li class="nav-item">
        <form  class="form-inline" asp-area="Identity" asp-page="/Account/Logout" asp-route-returnUrl="@Url.Action("Index", "Home", new { area = "" })">
            <button  type="submit" class="nav-link btn btn-link text-dark">Logout</button>
        </form>
    </li>
}
else
{
    <li class="nav-item">
        <a class="nav-link text-dark" asp-area="Identity" asp-page="/Account/Register">Register</a>
    </li>
    <li class="nav-item">
        <a class="nav-link text-dark" asp-area="Identity" asp-page="/Account/Login">Login</a>
    </li>
}
</ul>
Logout
Create the Logout Razor Page under the folder Areas/Identity/Pages/Account/
Areas/Identity/Pages/Account/Logout.cshtml
@page
@model LogoutModel
@{
    ViewData["Title"] = "Log out";
}

<header>
    <h1>@ViewData["Title"]</h1>
    @{
        if (User.Identity.IsAuthenticated)
        {
            <form class="form-inline" asp-area="Identity" asp-page="/Account/Logout" asp-route-returnUrl="@Url.Page("/", new { area = "" })" method="post">
                <button type="submit" class="nav-link btn btn-link text-dark">Click here to Logout</button>
            </form>
        }
        else
        {
            <p>You have successfully logged out of the application.</p>
        }
    }
</header>
Areas/Identity/Pages/Account/Logout.cshtml.cs
using System;
using System.Collections.Generic;
using System.Linq;
using System.Threading.Tasks;
using Microsoft.AspNetCore.Authorization;
using Microsoft.AspNetCore.Identity;
using Microsoft.AspNetCore.Mvc;
using Microsoft.AspNetCore.Mvc.RazorPages;
using Microsoft.Extensions.Logging;

namespace ASPNetCoreIdentity.Areas.Identity.Pages.Account
{
    [AllowAnonymous]
    public class LogoutModel : PageModel
    {
        private readonly SignInManager<IdentityUser> _signInManager;
        private readonly ILogger<LogoutModel> _logger;

        public LogoutModel(SignInManager<IdentityUser> signInManager, ILogger<LogoutModel> logger)
        {
            _signInManager = signInManager;
            _logger = logger;
        }

        public void OnGet()
        {
        }

        public async Task<IActionResult> OnPost(string returnUrl = null)
        {
            await _signInManager.SignOutAsync();
            _logger.LogInformation("User logged out.");
            if (returnUrl != null)
            {
                return LocalRedirect(returnUrl);
            }
            else
            {
                return RedirectToPage();
            }
        }
    }
}
SignOutAsync() method of the SignInManager removes the authentication cookie from the context & response. This will automatically logs out the user.
Summary
This ASP.NET Core Identity Tutorial showed how to implement Identity without using the template. We Built Login, Logout & User Registration forms. The Identity API has lots of features to offer apart from login & logout. We will cover that in our next tutorial
Reference
Introduction to Identity on ASP.NET Core
Read More
- ASP.NET Core Tutorial
- Authentication in ASP.NET Core
- Cookie Authentication in ASP.NET Core
- Introduction to ASP.NET Core Identity
- ASP.NET Core Identity Tutorial From Scratch
- Sending Email Confirmation in ASP.NET Core
- Add Custom Fields to the user in ASP.NET Core Identity
- Change Primary key in ASP.NET Core Identity
- JWT Authentication in ASP.NET Core
- Introduction to Authorization
- Simple Authorization using Authorize attribute
- Adding & Managing Claims in ASP.NET Core Identity
- Claim Based Authorization in ASP.NET Core
- Policy-based Authorization
- Resource-Based Authorization


The best article about Identity, great job! Thanks!
I am a bit confused about where which file is located, could you please show a screenshot of your Solution Explorer with all folders expanded?
This was a total lifesaver. Thank you
Great tutorial, but you have some typos that caused me a lot of confusion initially. When setting up folders the Identity Area you interchangeably use “Account” and “Accounts”. Otherwise love the content.