In this tutorial let us learn how to build a user registration / login & logout form using Cookie Authentication in ASP.NET Core. We will building it from scratch without using any third party libraries or ASP.NET Core identity. We will explore the ASP.NET Core identity in the next tutorial.
Table of Contents
Create a New Application
Create a new ASP.NET Core web application either using Razor pages or ASP.NET Core MVC. For this tutorial, we are going to use the Razor pages (ASP.NET Core Web App). But you can as well use the MVC. We are using Visual Studio 2019 & .NET 5.0.
While creating the Project ensure that, you have selected Authentication Type as None. Also, name the project as AspNetCoreCookieAuthentication.
Run the app and check everything is ok.
User Entity
We will use the Entity Framework core to store the data in SQL Server. Hence, we need to Install the following packages.
Package Manager Console
1 2 3 4 | Install-package Microsoft.EntityFrameworkCore.SqlServer Install-Package Microsoft.EntityFrameworkCore.Tools |
Create a folder Data under the solution root and add the User.cs file. The User entity contains the Email & Password, which we will use to login the user into application.
Data/User.cs
1 2 3 4 5 6 7 8 9 10 11 12 13 14 15 16 17 | using System.ComponentModel.DataAnnotations; namespace AspNetCoreCookieAuthentication.Data { public class User { [Key] public int Id { get; set; } public string Email { get; set; } public string Password { get; set; } } } |
Under the data folder create the context class ApplicationDbContext.cs. Note that we have a DbSet Property of the User Entity.
Data/ApplicationDbContext.cs
1 2 3 4 5 6 7 8 9 10 11 12 13 14 15 16 | using Microsoft.EntityFrameworkCore; namespace AspNetCoreCookieAuthentication.Data { public class ApplicationDbContext : DbContext { public ApplicationDbContext(DbContextOptions<ApplicationDbContext> options) : base(options) { } public DbSet<User> Users { get; set; } } } |
Add the connection string in appsettings.json
appsettings.json
1 2 3 4 5 | "ConnectionStrings": { "DefaultConnection": "Server=Localhost;Database=ASPNetCookie;Trusted_Connection=True;MultipleActiveResultSets=true" }, |
Inject the DbContext in the Startup class using the AddDbContext extension method.
Startup.cs
1 2 3 4 5 6 | services.AddDbContext<ApplicationDbContext>(options => options.UseSqlServer( Configuration.GetConnectionString("DefaultConnection"))); |
Finally, Create the Database using EF Core Migration commands. You need to run the add-migration to create the migration script & update-database to create the database
Package Manager Console
1 2 3 4 | add-migration cookie update-database |
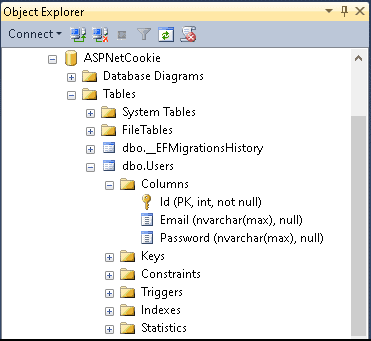
Open the SQL Server and verify that the database ASPNetCookie is created with table User.
Securing the Product Page
Now, let us add Product Page. Select the Pages folder add a new Empty Razor page Product.cshtml.
We want only the logged in to our application to access the Product page. To do that we need to apply [Authorize] attribute to a controller, action, or Razor Page. This will stop the unauthenticated users from accessing the page
Product.cshtml
1 2 3 4 5 6 7 8 9 10 11 12 | @page @model AspNetCoreCookieAuthentication.Pages.ProductModel @{ } <h1>@ViewData["Title"]</h1> <h2>Product Page</h2> <p>Only authroized users can access this page</p> |
Product.cshtml.cs
1 2 3 4 5 6 7 8 9 10 11 12 13 14 15 16 17 18 19 20 21 | using System; using System.Collections.Generic; using System.Linq; using System.Threading.Tasks; using Microsoft.AspNetCore.Authorization; using Microsoft.AspNetCore.Mvc; using Microsoft.AspNetCore.Mvc.RazorPages; namespace AspNetCoreCookieAuthentication.Pages { [Authorize] public class ProductModel : PageModel { public void OnGet() { } } } |
We need to add a menu link to the Product Page in Home Page. Also we need to add menu link for Register & Login
Create the _LoginPartial.html under the folder Pages/Shared. We are going to add the menu link to Register & Login Pages here.
Pages/Shared/_LoginPartial.html
1 2 3 4 5 6 7 8 9 10 11 12 | <ul class="navbar-nav"> <li class="nav-item"> <a class="nav-link text-dark" asp-area="" asp-page="/Account/Register">Register</a> </li> <li class="nav-item"> <a class="nav-link text-dark" asp-area="" asp-page="/Account/Login">Login</a> </li> </ul> |
Open the layout.cshtml. Place the <partial name="_LoginPartial" />. Also add the link to Product Page. Relevant part of the _Layout.cshtml is shown below.
_Layout.cshtml
1 2 3 4 5 6 7 8 9 10 11 12 13 14 15 16 17 | <div class="navbar-collapse collapse d-sm-inline-flex justify-content-between"> <ul class="navbar-nav flex-grow-1"> <li class="nav-item"> <a class="nav-link text-dark" asp-area="" asp-page="/Index">Home</a> </li> <li class="nav-item"> <a class="nav-link text-dark" asp-area="" asp-page="/Privacy">Privacy</a> </li> <li class="nav-item"> <a class="nav-link text-dark" asp-area="" asp-page="/Product">Product</a> </li> </ul> <partial name="_LoginPartial" /> </div> |
Now, our application is setup. Run the Application. Click on the Product Link and you will see the error
An unhandled exception occurred while processing the request.
InvalidOperationException: No authenticationScheme was specified, and there was no DefaultChallengeScheme found.
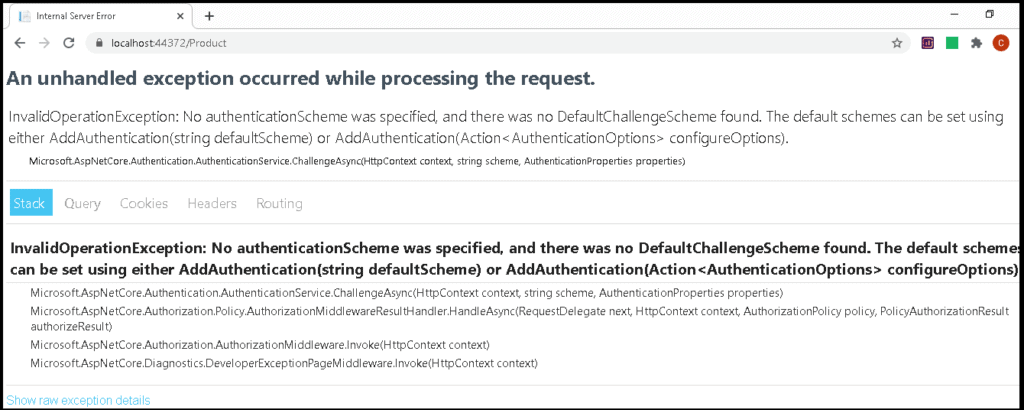
This is because, we have not configured any authentication services yet.
To make use of cookie authentication, we need to register the Cookie Authentication handler. This we do in AddAuthentication extension method
AddAuthentication
The AddAuthentication method returns the Authentication Builder, which we use to the register the Authentication handlers.
For Example, the following codes adds the Cookie Authentication handler using the method AddCookie
1 2 3 4 | services.AddAuthentication() .AddCookie(); |
You can add more than one Authentication handlers using AddAuthentication. The following example, adds both Cookie Authentication & JwtBearer Authentication handler
1 2 3 4 5 6 | services.AddAuthentication() .AddJwtBearer() .AddCookie(); |
Authentication scheme
Each handler that we add using the AddAuthentication becomes a new Authentication Scheme
A Authentication scheme consists of
- A unique Name, which identifies the Authentication scheme
- Authentication Handler
- Options for configuring that specific instance of the handler
In the code above, we have registered two authentication schemes. But neither, we have given them any name nor configured any of their options.
In such scenarios, these handlers registers the Authentication schemes using the Defaults. The Cookie Authentication handler defines all its defaults in the CookieAuthenticationDefaults class. Similarly, the JwtBearer uses the JwtBearerDefaults class
For Example, the Cookie Authentication uses the name “Cookies” (CookieAuthenticationDefaults.AuthenticationScheme) , while JwtBearer Authentication handler uses the “Bearer”. (JwtBearerDefaults.AuthenticationScheme)
The above code can also be written as follows, where we have provided the scheme name as the first argument. We have used the default names, but you can use any name you like.
1 2 3 4 5 6 7 | services.AddAuthentication() .AddJwtBearer("Bearer", options => { }) .AddCookie("Cookies"); |
Default Authentication scheme
When we use more than one Authentication Schemes, we also need to configure the default authentication scheme to use. We do that by specifying the Scheme name as the first argument to the AddAuthentication method.
In the example, we set the CookieAuthentication as the default. Wherever we do not mention the Authentication scheme, it will use the default scheme
1 2 3 4 5 | services.AddAuthentication(CookieAuthenticationDefaults.AuthenticationScheme) .AddJwtBearer() .AddCookie(); |
Using Authentication Scheme
Authentication scheme name needs to be specified ,whenever you need to Authenticate the user. And if we do not specify it, then the default scheme is used.
For Example, the Authorize attribute accepts the argument AuthenticationSchemes, where you can specify the scheme to use to handle the authentication of the page or action.
1 2 3 4 5 6 7 8 9 10 11 12 | namespace AspNetCoreCookieAuthentication.Pages { [Authorize(AuthenticationSchemes ="Cookies")] public class ProductModel : PageModel { public void OnGet() { } } } |
Specifying the Authentication scheme is optional here. If you do not specify it, then the default Authentication scheme is used.
Finally, our Authentication code is looks at shown below
1 2 3 4 | services.AddAuthentication(CookieAuthenticationDefaults.AuthenticationScheme) .AddCookie(); |
Now run the application and click on Products link. You will see page can’t be found error.
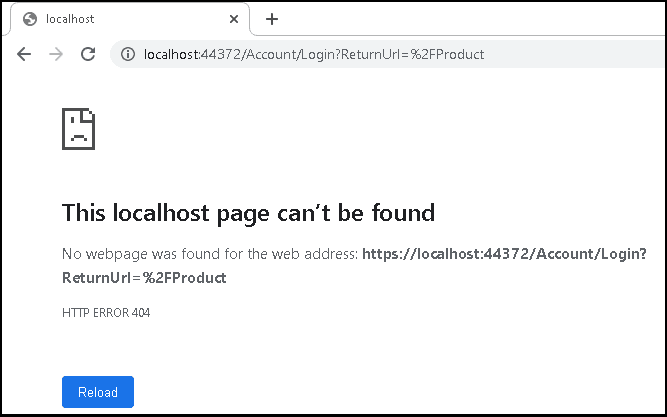
The error says that we cannot access the https://localhost:44372/account/login page.
Only authorized users can access the Products Page. Since we are not authorized, we are redirected to the /account/login. page. Since we are yet to create the login page, we get the 404 error.
The /account/login is the default login page. It is configured in the CookieAuthenticationDefaults class. The following are the defaults defined in that class
1 2 3 4 5 6 7 8 | AuthenticationScheme = "Cookies" CookiePrefix = ".AspNetCore." LoginPath = "/Account/Login" LogoutPath = /Account/Logout" AccessDeniedPath = "/Account/AccessDenied" ReturnUrlParameter = "ReturnUrl" |
You can change it if you wish to
1 2 3 4 5 6 7 8 9 10 | services.AddAuthentication(CookieAuthenticationDefaults.AuthenticationScheme) .AddCookie("Cookies", options => { options.LoginPath = "/Account/Login"; options.LogoutPath = "/Account/Logout"; options.AccessDeniedPath = "/Account/AccessDenied"; options.ReturnUrlParameter = "ReturnUrl"; }); |
User Register Form
The Register form asks for the Email & Password. On Clicking Register button it will save it to the Users table. Note that we are not Hashing the password. In real world, you must not store the password in plain text.
Once the user is registered, he is redirected to registration confirmation page.
Go to to Pages folder and create a new folder Account. Create the following files.
Pages/Account/_ViewImports.cshtml
1 2 3 4 | @using AspNetCoreCookieAuthentication @addTagHelper *, Microsoft.AspNetCore.Mvc.TagHelpers |
Pages/Account/Register.cshtml
1 2 3 4 5 6 7 8 9 10 11 12 13 14 15 16 17 18 19 20 21 22 23 24 25 26 27 28 29 30 31 32 33 34 35 36 37 38 39 | @page @model RegisterModel @{ ViewData["Title"] = "Register"; } <h1>@ViewData["Title"]</h1> <div class="row"> <div class="col-md-4"> <form asp-route-returnUrl="@Model.ReturnUrl" method="post"> <h4>Create a new account.</h4> <hr /> <div asp-validation-summary="All" class="text-danger"></div> <div class="form-group"> <label asp-for="Input.Email"></label> <input asp-for="Input.Email" class="form-control" /> <span asp-validation-for="Input.Email" class="text-danger"></span> </div> <div class="form-group"> <label asp-for="Input.Password"></label> <input asp-for="Input.Password" class="form-control" /> <span asp-validation-for="Input.Password" class="text-danger"></span> </div> <div class="form-group"> <label asp-for="Input.ConfirmPassword"></label> <input asp-for="Input.ConfirmPassword" class="form-control" /> <span asp-validation-for="Input.ConfirmPassword" class="text-danger"></span> </div> <button type="submit" class="btn btn-primary">Register</button> </form> </div> </div> @section Scripts { <partial name="_ValidationScriptsPartial" /> } |
Pages/Account/Register.cshtml.cs
1 2 3 4 5 6 7 8 9 10 11 12 13 14 15 16 17 18 19 20 21 22 23 24 25 26 27 28 29 30 31 32 33 34 35 36 37 38 39 40 41 42 43 44 45 46 47 48 49 50 51 52 53 54 55 56 57 58 59 60 61 62 63 64 65 66 67 68 69 70 71 72 73 74 75 76 77 78 79 80 81 82 | using System.Collections.Generic; using System.ComponentModel.DataAnnotations; using System.Linq; using System.Threading.Tasks; using AspNetCoreCookieAuthentication.Data; using Microsoft.AspNetCore.Authentication; using Microsoft.AspNetCore.Authorization; using Microsoft.AspNetCore.Mvc; using Microsoft.AspNetCore.Mvc.RazorPages; namespace AspNetCoreCookieAuthentication.Pages.Account { [AllowAnonymous] public class RegisterModel : PageModel { private readonly ApplicationDbContext Db; public RegisterModel(ApplicationDbContext Db) { this.Db = Db; } [BindProperty] public InputModel Input { get; set; } public string ReturnUrl { get; set; } public IList<AuthenticationScheme> ExternalLogins { get; set; } public class InputModel { [Required] [EmailAddress] [Display(Name = "Email")] public string Email { get; set; } [Required] [StringLength(100, ErrorMessage = "The {0} must be at least {2} and at max {1} characters long.", MinimumLength = 6)] [DataType(DataType.Password)] [Display(Name = "Password")] public string Password { get; set; } [DataType(DataType.Password)] [Display(Name = "Confirm password")] [Compare("Password", ErrorMessage = "The password and confirmation password do not match.")] public string ConfirmPassword { get; set; } } public async Task OnGetAsync(string returnUrl = null) { ReturnUrl = returnUrl; } public async Task<IActionResult> OnPostAsync(string returnUrl = null) { returnUrl ??= Url.Content("~/"); if (ModelState.IsValid) { var user = Db.Users.Where(f => f.Email == Input.Email).FirstOrDefault(); if (user != null) { ModelState.AddModelError(string.Empty, Input.Email + " Alrready exists" ); } else { user = new User { Email = Input.Email, Password = Input.Password }; Db.Users.Add(user); await Db.SaveChangesAsync(); return RedirectToPage("RegisterConfirmation", new { email = Input.Email }); } } return Page(); } } } |
Pages/Account/RegisterConfirmation.cshtml
1 2 3 4 5 6 7 8 9 10 11 12 | @page @model RegisterConfirmationModel @{ ViewData["Title"] = "Register confirmation"; } <h1>@ViewData["Title"]</h1> <p> You account with email @Model.Email is registered sucessfully. </p> |
Pages/Account/RegisterConfirmation.cshtml.cs
1 2 3 4 5 6 7 8 9 10 11 12 13 14 15 16 17 18 19 20 21 22 23 24 25 26 27 28 29 30 31 32 33 34 35 36 37 38 39 40 41 42 43 44 | using Microsoft.AspNetCore.Authorization; using System.Threading.Tasks; using Microsoft.AspNetCore.Mvc; using Microsoft.AspNetCore.Mvc.RazorPages; using AspNetCoreCookieAuthentication.Data; using System.Linq; namespace AspNetCoreCookieAuthentication.Pages.Account { [AllowAnonymous] public class RegisterConfirmationModel : PageModel { private readonly ApplicationDbContext Db; public RegisterConfirmationModel(ApplicationDbContext Db) { this.Db = Db; } public string Email { get; set; } public async Task<IActionResult> OnGetAsync(string email) { if (email == null) { return RedirectToPage("/Index"); } var user = Db.Users.Where(f=> f.Email==email).FirstOrDefault() ; if (user == null) { return NotFound($"Unable to load user with email '{email}'."); } Email = email; return Page(); } } } |
Run the App and verify you are able to register the users.
Login Form
Now, let us create the Login Form in Pages/Account/ folder
Pages/Account/Login.cshtml
1 2 3 4 5 6 7 8 9 10 11 12 13 14 15 16 17 18 19 20 21 22 23 24 25 26 27 28 29 30 31 32 33 34 35 36 37 38 39 40 | @page @model LoginModel @{ ViewData["Title"] = "Log in"; } <h1>@ViewData["Title"]</h1> <div class="row"> <div class="col-md-4"> <section> <form id="account" method="post"> <h4>Use a local account to log in.</h4> <hr /> <div asp-validation-summary="All" class="text-danger"></div> <div class="form-group"> <label asp-for="Input.Email"></label> <input asp-for="Input.Email" class="form-control" /> <span asp-validation-for="Input.Email" class="text-danger"></span> </div> <div class="form-group"> <label asp-for="Input.Password"></label> <input asp-for="Input.Password" class="form-control" /> <span asp-validation-for="Input.Password" class="text-danger"></span> </div> <div class="form-group"> <button type="submit" class="btn btn-primary">Log in</button> </div> </form> </section> </div> </div> @section Scripts { <partial name="_ValidationScriptsPartial" /> } |
Pages/Account/Login.cshtml.cs
1 2 3 4 5 6 7 8 9 10 11 12 13 14 15 16 17 18 19 20 21 22 23 24 25 26 27 28 29 30 31 32 33 34 35 36 37 38 39 40 41 42 43 44 45 46 47 48 49 50 51 52 53 54 55 56 57 58 59 60 61 62 63 64 65 66 67 68 69 70 71 72 73 74 75 76 77 78 79 80 81 82 83 84 85 86 87 88 89 90 | using System.Collections.Generic; using System.ComponentModel.DataAnnotations; using System.Linq; using System.Threading.Tasks; using Microsoft.AspNetCore.Authorization; using Microsoft.AspNetCore.Authentication; using Microsoft.AspNetCore.Mvc; using Microsoft.AspNetCore.Mvc.RazorPages; using AspNetCoreCookieAuthentication.Data; using System.Security.Claims; using Microsoft.AspNetCore.Authentication.Cookies; namespace AspNetCoreCookieAuthentication.Pages.Account { [AllowAnonymous] public class LoginModel : PageModel { private readonly ApplicationDbContext Db; public LoginModel(ApplicationDbContext Db) { this.Db = Db; } [BindProperty] public InputModel Input { get; set; } public string ReturnUrl { get; set; } public class InputModel { [Required] [EmailAddress] public string Email { get; set; } [Required] [DataType(DataType.Password)] public string Password { get; set; } } public async Task OnGetAsync(string returnUrl = null) { returnUrl ??= Url.Content("~/"); await HttpContext.SignOutAsync(CookieAuthenticationDefaults.AuthenticationScheme); ReturnUrl = returnUrl; } public async Task<IActionResult> OnPostAsync(string returnUrl = null) { returnUrl ??= Url.Content("~/"); if (ModelState.IsValid) { var user = Db.Users.Where(f => f.Email == Input.Email && f.Password == Input.Password).FirstOrDefault(); if (user == null) { ModelState.AddModelError(string.Empty, "Invalid Email or Password"); return Page(); } var claims = new List<Claim> { new Claim(ClaimTypes.NameIdentifier, user.Id.ToString()), new Claim(ClaimTypes.Name, user.Email), new Claim("UserDefined", "whatever"), }; var identity = new ClaimsIdentity(claims, CookieAuthenticationDefaults.AuthenticationScheme); var principal = new ClaimsPrincipal(identity); await HttpContext.SignInAsync(CookieAuthenticationDefaults.AuthenticationScheme, principal, new AuthenticationProperties { IsPersistent = true }); return LocalRedirect(returnUrl); } return Page(); } } } |
First, We are check to see if the user with the chosen password exists in the database.
1 2 3 4 5 6 7 8 | var user = Db.Users.Where(f => f.Email == Input.Email && f.Password == Input.Password).FirstOrDefault(); if (user == null) { ModelState.AddModelError(string.Empty, "Invalid Email or Password"); return Page(); } |
Next, we need to add the Claims of the user to Claims collection.
A Claim is a piece of information about the user. It is consist of Claim type and optional value. It is stored in the form of name value pair. A Claim can be anything for example Name, Email, Roles, Phone Number, etc.
The ASP.NET Core uses the Claim based authorization. We attach the claims to a controller or an action using the Authorization Policies. The user is allowed only if they have the right claim.
1 2 3 4 5 6 7 8 | var claims = new List<Claim> { new Claim(ClaimTypes.NameIdentifier, user.Id.ToString()), new Claim(ClaimTypes.Name, user.Email), new Claim("UserDefined", "whatever"), }; |
Create the ClaimsIdentity using the Claims collection. We also need to specify the Authentication Scheme.
1 2 3 | var identity = new ClaimsIdentity(claims, CookieAuthenticationDefaults.AuthenticationScheme); |
Create the ClaimsPrincipal from the ClaimsIdentity. A ClaimsPrincipal can contain more than one ClaimsIdentity.
1 2 3 | var principal = new ClaimsPrincipal(identity); |
Finally call SignInAsync of the HttpContext with the ClaimsPrincipal.
SignInAsync creates an encrypted cookie and adds it to the current response. There are few options like AllowRefresh, ExpiresUtc, IsPersistent, IssuedUtc & RedirectUri that you can set.
1 2 3 4 5 6 7 8 9 10 11 12 13 14 15 16 17 18 19 20 21 22 23 24 25 26 27 28 | await HttpContext.SignInAsync(CookieAuthenticationDefaults.AuthenticationScheme, principal, new AuthenticationProperties { IsPersistent = true }); //AllowRefresh = <bool>, // Refreshing the authentication session should be allowed. //ExpiresUtc = DateTimeOffset.UtcNow.AddMinutes(10), // The time at which the authentication ticket expires. A // value set here overrides the ExpireTimeSpan option of // CookieAuthenticationOptions set with AddCookie. //IsPersistent = true, // Whether the authentication session is persisted across // multiple requests. When used with cookies, controls // whether the cookie's lifetime is absolute (matching the // lifetime of the authentication ticket) or session-based. //IssuedUtc = <DateTimeOffset>, // The time at which the authentication ticket was issued. //RedirectUri = <string> // The full path or absolute URI to be used as an http // redirect response value. |
Now, Run the Application. Create a new User and login. Now click on Product Page. But you are still directed to login Page.
Authentication Middleware
Authentication Middleware authenticates the user. We add it to the middleware pipeline by using the UseAuthentication extension method.
One of the important task that is performed by the built-in authentication middleware is to read the cookies and construct the ClaimsPrincipal and update the User object in the HttpContext.
This will make the all the middleware’s which appear after the UseAuthentication() is aware that the user is authenticated.
We must invoke the UseAuthentication
- After
UseRouting, so that route information is available for authentication decisions. - Before
UseEndpoints, so that users are authenticated before accessing the endpoints.
startup.cs
1 2 3 4 5 6 7 8 9 10 11 | app.UseRouting(); app.UseAuthentication(); app.UseAuthorization(); app.UseEndpoints(endpoints => { endpoints.MapRazorPages(); }); |
Now, Run the Application. You should be able to access the Product Page after login.
Checking if User is Logged in
To check if the User is logged in or not, we can use the User Property. The User Property is nothing but a instance of ClaimsPrincipal. It is automatically injected into the Controller Or Razor Pages.
1 2 3 | User.Identity.IsAuthenticated |
Modify the _LoginPartial.cshtml to show the login & Register link only if the user is not logged in. If he is logged in, then show the Logout link.
_LoginPartial.cshtml
1 2 3 4 5 6 7 8 9 10 11 12 13 14 15 16 17 18 19 20 21 22 23 24 | <ul class="navbar-nav"> @if (User.Identity.IsAuthenticated) { <li class="nav-item"> Hello @User.Identity.Name! </li> <li class="nav-item"> <form class="form-inline" asp-area="" asp-page="/Account/Logout" asp-route-returnUrl="@Url.Page("/", new { area = "" })" method="post"> <button type="submit" class="nav-link btn btn-link text-dark">Logout</button> </form> </li> } else { <li class="nav-item"> <a class="nav-link text-dark" asp-area="" asp-page="/Account/Register">Register</a> </li> <li class="nav-item"> <a class="nav-link text-dark" asp-area="" asp-page="/Account/Login">Login</a> </li> } </ul> |
Logging Out
To Logout use the SignOutAsync method of the HttpContext.
Logout.cshtml
1 2 3 4 5 6 7 8 9 10 11 12 13 14 15 16 17 18 19 20 21 22 23 | @page @model LogoutModel @{ ViewData["Title"] = "Log out"; } <header> <h1>@ViewData["Title"]</h1> @{ if (User.Identity.IsAuthenticated) { <form class="form-inline" asp-area="Identity" asp-page="/Account/Logout" asp-route-returnUrl="@Url.Page("/", new { area = "" })" method="post"> <button type="submit" class="nav-link btn btn-link text-dark">Click here to Logout</button> </form> } else { <p>You have successfully logged out of the application.</p> } } </header> |
Logout.cshtml.cs
1 2 3 4 5 6 7 8 9 10 11 12 13 14 15 16 17 18 19 20 21 22 23 24 25 26 27 28 29 30 31 32 33 34 35 36 37 38 39 40 41 42 43 44 45 | using System; using System.Collections.Generic; using System.Linq; using System.Threading.Tasks; using Microsoft.AspNetCore.Authentication; using Microsoft.AspNetCore.Authentication.Cookies; using Microsoft.AspNetCore.Authorization; using Microsoft.AspNetCore.Identity; using Microsoft.AspNetCore.Mvc; using Microsoft.AspNetCore.Mvc.RazorPages; using Microsoft.Extensions.Logging; namespace AspNetCoreCookieAuthentication.Pages.Account { [AllowAnonymous] public class LogoutModel : PageModel { public LogoutModel(ILogger<LogoutModel> logger) { } public void OnGet() { } public async Task<IActionResult> OnPost(string returnUrl = null) { await HttpContext.SignOutAsync(CookieAuthenticationDefaults.AuthenticationScheme); if (returnUrl != null) { return LocalRedirect(returnUrl); } else { return RedirectToPage(); } } } } |
Listing the users Claims
You can read the claims of the user by iterating through the Claims collection of the ClaimsPrincipal (user Object).
Product.cshtml
1 2 3 4 5 6 7 8 9 10 11 12 13 14 | @if (User.Identity.IsAuthenticated) { <table class="table table-sm"> @foreach ( var claim in User.Claims ) { <tr> <td>@claim.Type</td> <td>@claim.Value</td> </tr> } </table> } |
Read More
- ASP.NET Core Tutorial
- Authentication in ASP.NET Core
- Cookie Authentication in ASP.NET Core
- Introduction to ASP.NET Core Identity
- ASP.NET Core Identity Tutorial From Scratch
- Sending Email Confirmation in ASP.NET Core
- Add Custom Fields to the user in ASP.NET Core Identity
- Change Primary key in ASP.NET Core Identity
- JWT Authentication in ASP.NET Core
- Introduction to Authorization
- Simple Authorization using Authorize attribute
- Adding & Managing Claims in ASP.NET Core Identity
- Claim Based Authorization in ASP.NET Core
- Policy-based Authorization
- Resource-Based Authorization


hello. it is working perfectly. how can I make role table and use with if role admin. could you please help me.
@if (User.Identity.IsAuthenticated && User.IsInRole(“admin”))
it is working perfectly. How can I add role based this sample?
I want to fill profil page. how can I get user another info with id.
new Claim(ClaimTypes.NameIdentifier, user.Id.ToString()),
One point is missing.
In the Index.cshtml need to change from
@model IndexMOdel
to
@model AspNetCoreCookieAuthentication.Pages.Shared._LoginPartialModel
then it will work.